Salads
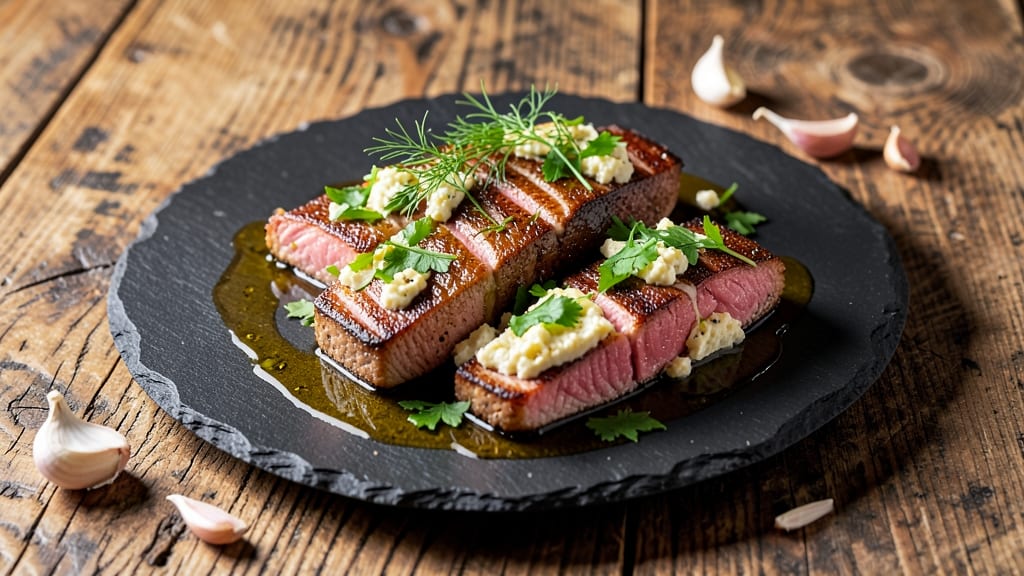
This baked tuna recipe delivers the perfect balance of crispy edges and creamy cheese magic that transforms simple ingredients into a restaurant-worthy dish. After years of testing different methods, I’ve perfected a technique that ensures tender tuna with a golden crust and a rich, melty topping—no overcooking or soggy results.
The secret lies in precise timing and the right combination of herbs and cheese.
You’ll start with fresh tuna fillets, lightly seasoned and topped with a blend of cream cheese, garlic, and fresh herbs that infuse flavor while keeping the texture delicate.
Baking at the right temperature ensures the top becomes crispy without drying out the fish underneath, while the cheese creates a velvety contrast. This method works equally well for weeknight dinners or special occasions, requiring just 20 minutes of active prep and 15 minutes in the oven.
The result is a dish that’s elegant yet straightforward—crispy on top, creamy inside, with a bright, herby finish that pairs beautifully with sides like steamed asparagus or a simple arugula salad.
The technique is foolproof, and the flavors are so satisfying that even seafood skeptics will be convinced. This is the kind of meal that feels indulgent but comes together effortlessly.
Serve with a squeeze of lemon and a sprinkle of fresh parsley for a touch of brightness, or pair it with a crisp white wine to elevate the dining experience.
Whether you’re cooking for two or preparing a family meal, this recipe delivers professional-quality results with minimal effort. Let’s get started on creating your perfect baked tuna dish.
Ingredients for baked tuna
Fresh tuna fillets, creamy cheese, and aromatic herbs transform into a restaurant-worthy dish with crispy edges and velvety texture.
| Ingredient | Amount | Notes |
|---|---|---|
| Fresh Tuna Fillets 🐟 | 2 whole | Sushi-grade, 6-8 oz each |
| Cream Cheese 🧈 | 8 oz | Full-fat, room temperature |
| Garlic Cloves 🧄 | 3 cloves | Freshly minced, aromatic |
| Fresh Parsley Leaves 🌿 | ¼ cup | Finely chopped, vibrant |
| Fresh Dill Weeds 🌿 | ¼ cup | Finely chopped, bright flavor |
| Extra-Virgin Olive Oil 🫒 | 2 tbsp | Light, fruity variety |
| Lemon Zest 🍋 | 1 tbsp | Freshly grated, bright citrus |
| Diamond Crystal Kosher Salt 🧂 | ½ tsp | Fine grain, sea salt |
| Freshly Ground Black Pepper 🌶️ | ¼ tsp | Coarsely cracked |
| Panko Breadcrumbs 🍞 | ¼ cup | Light, for crispy topping |
| Lemon Juice 🍋 | 1 tbsp | Freshly squeezed, acidic |
| Unsalted Butter 🧈 | 1 tbsp | Melted, for brushing |
| Fresh Lemon Slices 🍋 | 2 slices | For garnish, bright contrast |
The quality of the tuna is non-negotiable—sushi-grade fillets from a reputable fishmonger ensure optimal texture and safety. Look for vibrant color and firmness when selecting at Whole Foods Market or Trader Joe's, where they typically carry high-quality seafood. The cream cheese should be full-fat for proper melting and texture; Philadelphia brand works reliably, but avoid low-fat versions that can compromise the dish's richness. Fresh herbs like parsley and dill should be bright green with no wilting, indicating peak freshness. If using dried herbs, reduce to one-third the amount, though fresh is preferred for that bright, herby finish.
No fresh dill? Substitute with fresh tarragon or a blend of parsley and chives for a similar aromatic profile. Running low on panko? Toasted breadcrumbs or crushed cornflakes create a comparable crispy texture. The lemon zest can be omitted if unavailable, but the juice is essential for balancing the richness—bottled lemon juice works in a pinch. For a dairy-free option, replace the cream cheese with a blend of cashew cream and nutritional yeast, though the texture will differ slightly. Always use extra-virgin olive oil; lower-quality oils lack the fruity notes that complement the dish's delicate flavors.
Store fresh tuna fillets in the coldest part of your refrigerator, wrapped in a damp paper towel, and use within 2 days for optimal freshness. The prepared topping mixture can be refrigerated for up to 4 hours before baking, though it's best used immediately for peak texture. Leftovers, if any, should be consumed within 2 days when stored properly. For meal prep, assemble the dish just before baking to maintain the crispy topping—reheating baked tuna can make the breadcrumbs soggy. Serve immediately with a squeeze of fresh lemon and garnish with parsley for a restaurant-quality presentation.
Why You'll Love This Recipe
- One-Pan Magic: I swear by this—no chopping boards, no extra pans. Just tuna, cream cheese, and herbs straight onto a sheet pan. Twenty minutes later, dinner’s ready while I’m still wiping my hands.
- Garlic-Dill Magic: That first bite? Crispy edges with the creamiest center, all thanks to the garlic and fresh dill. It’s like a Mediterranean hug in your mouth—no heavy sauce, just pure, bright flavor.
- Lunchbox Hero: Between us, this bakes up into perfect portions. Pack the leftovers for work, and you’ve got a lunch that’s fancy enough for a meeting but took less effort than a sandwich.
- Budget-Friendly Luxe: Fresh tuna feels special, but the cream cheese stretches it into a meal that feeds four for less than takeout. Plus, the leftovers taste just as good the next day—honestly, I’ve reheated this three times and never tired of it.
Step-by-step instructions for baked tuna with creamy cheese magic
Master the perfect balance of crispy topping and velvety cream cheese filling with this foolproof baking method.
Prepare the Tuna and Seasoning Mixture
Preheat your oven to 400°F and position a rack in the middle position. Place the 2 whole fresh tuna fillets on a cutting board, skin-side down. Using a sharp knife, make a ½-inch deep horizontal cut along the top of each fillet, being careful not to cut all the way through. This creates a pocket for the creamy filling.
In a small bowl, combine the 8 oz cream cheese, 1 tablespoon lemon zest, 1 tablespoon lemon juice, 0.5 teaspoon diamond crystal kosher salt, and 0.25 teaspoon freshly ground black pepper. Mix until completely smooth and homogeneous. The texture should be thick and spreadable—if it's too soft, chill the mixture for 10 minutes to firm up slightly. This ensures the filling stays put during baking.
Assemble and Bake the Tuna
Spread the cream cheese mixture evenly into the pockets you created in each tuna fillet. Press gently to ensure it adheres well to the sides. Place the prepared fillets in a baking dish lined with parchment paper, seam-side down. Drizzle the 2 tablespoons extra-virgin olive oil evenly over the top of the fillets, then sprinkle with the 0.25 cup panko breadcrumbs. This creates the crispy crust we're after.
Bake for 12-15 minutes until the edges are golden brown and the panko topping is crispy. The internal temperature should reach 145°F when measured with an instant-read thermometer. Be careful not to overbake—the tuna should be just cooked through, not dry. The cream cheese filling should be warm but still hold its shape.
Create the Herb Garnish and Finish
While the tuna bakes, prepare the herb garnish by combining the 0.25 cup fresh parsley leaves and 0.25 cup fresh dill weeds in a small bowl. Mince the 3 garlic cloves and add them to the herb mixture. In a separate small saucepan, melt the 1 tablespoon unsalted butter over low heat, then pour it over the herb mixture. This creates a fragrant, aromatic topping that will elevate the dish.
Once the tuna is baked to perfection, remove it from the oven and let it rest for 3-5 minutes. This resting period allows the juices to redistribute, ensuring each bite is moist and flavorful. Spoon the herb butter mixture evenly over the top of each fillet, then place the 2 slices fresh lemon slices on top for a bright, citrusy contrast. The combination of crispy panko, creamy cheese, and fresh herbs creates a harmonious balance of textures and flavors.
Serve Immediately for Optimal Texture
Slice each tuna fillet into 4 equal portions and arrange them on a serving platter. The crispy panko topping should hold its shape while the creamy cheese filling remains intact. Serve immediately while the topping is still crisp and the cheese is warm. This dish pairs beautifully with a side of roasted vegetables or a fresh salad to balance the richness of the tuna.
Each bite should deliver the perfect combination of crispy, creamy, and fresh elements. The lemon slices add a zesty contrast that cuts through the richness of the cream cheese, while the herb butter topping infuses each portion with aromatic depth. Enjoy your restaurant-quality baked tuna with this simple yet impressive technique.
Pro Tips For Making Baked Tuna
- Preheat Like It’s 1985: Your oven should hit 425°F (220°C) and sit for 10 full minutes before the tuna goes in—no exceptions. I learned this the hard way when my first batch came out undercooked because the pan was still cold. That’s the magic number for crispy edges and perfectly set cream cheese.
- Pat That Tuna Dry: Wet tuna fillets? Big mistake. After rinsing, dry them thoroughly with paper towels—even if it feels like overkill. The moisture will turn your baked dish into a soggy mess, and nobody wants that. Trust me, five extra seconds now saves you from a sad, limp result later.
- Garlic Minus the Burn: Smash those garlic cloves flat with the side of your knife before mincing—no need to chop them tiny. This way, they soften evenly in the cream cheese instead of turning to paste or burning. (Yes, I’ve seen both happen.)
- Mix the Herbs Last: Toss parsley and dill into the tuna right before baking, not while prepping. Fresh herbs lose their punch when sitting in cream cheese too long, and you don’t want them turning into sad, wilted garnishes. Sprinkle them on top at the end for maximum brightness.
Make-ahead tips for this baked tuna
Prep Ahead Strategy
Assemble the tuna fillets with their creamy cheese filling up to 4 hours ahead of baking, then refrigerate uncovered. This allows flavors to meld while preventing moisture buildup. When ready to bake, let the fillets sit at room temperature for 15 minutes before placing them in the oven.
This ensures even cooking and a crispy topping. 🌡️
Cheese Mixture Prep
Prepare the cream cheese mixture the night before and store it in an airtight container. The cold temperature helps it maintain its shape during baking. When ready to use, let it sit at room temperature for 10 minutes to soften slightly—this makes spreading into the tuna pockets much easier.
I like to add a pinch of extra salt to the mixture ahead of time for even seasoning.
Herb Butter Prep
Combine the herb butter mixture (parsley, dill, garlic, and melted butter) in advance and store it in a small jar. This keeps all the aromatic components together, making assembly faster on baking day.
Refrigerate until ready to use, then warm gently before spooning over the baked tuna for maximum fragrance. This step saves 5 minutes of prep time during the final assembly.
Panko Topping Prep
Toast the panko breadcrumbs in a dry skillet over medium heat for 2-3 minutes ahead of time and store in an airtight container. This enhances their crispiness and prevents them from absorbing moisture from the tuna.I keep a small bowl of toasted panko ready in my pantry for quick access during baking sessions. The extra crunch makes all the difference in the final texture. 🍞
Make-Ahead Serving
For meal prep, assemble the dish completely (including panko topping) and refrigerate for up to 2 hours before baking. When ready to serve, bake as directed, then slice and store in an airtight container.
The crispy topping will soften slightly but remains delicious when reheated in a 350°F oven for 5-7 minutes. Serve with prepped sides like roasted asparagus or a simple salad to complete the meal.
Freezer-Friendly Option
While not ideal for texture, you can freeze the assembled tuna (without panko) for up to 1 month. Thaw overnight in the refrigerator, then add fresh panko and bake as directed.
The cream cheese filling will be slightly softer after freezing, but the flavor remains intact. This works best for quick weeknight meals when you don’t have time for full prep. 🧊
Nutrition facts
Frequently asked questions
Can I use canned tuna instead of fresh for this recipe?
The recipe calls for sushi-grade fresh tuna to achieve the perfect texture and flavor. Canned tuna lacks the delicate firmness and buttery mouthfeel that makes this baked dish so special. For a similar experience, look for high-quality vacuum-sealed fresh tuna fillets at specialty seafood markets or well-stocked grocery stores.
How do I know when the tuna is fully cooked without overcooking it?
Use an instant-read thermometer to check the internal temperature—it should reach 145°F for perfect doneness. The edges should be golden brown and crispy, while the center remains tender. Overcooking by even 1 minute can make the tuna dry, so keep a close eye on it during the last 2 minutes of baking.
What are the best sides to serve with this baked tuna?
Pair this dish with light, fresh sides to balance its richness. Try a simple arugula salad with lemon vinaigrette, steamed asparagus with garlic butter, or jasmine rice with toasted sesame seeds. A crisp white wine like Sauvignon Blanc or Pinot Grigio complements the flavors beautifully.
Can I substitute cream cheese for a dairy-free alternative?
Yes! Use a blend of cashew cream (soaked cashews blended with water) and nutritional yeast for a dairy-free version. For best results, chill the mixture for 10 minutes before spreading to ensure it holds its shape during baking. The texture will be slightly different but still delicious.
Why did my panko topping get soggy?
Soggy panko usually happens when the tuna releases too much moisture during baking. To prevent this, pat the fillets dry before creating the pockets, and bake at 400°F for no longer than 15 minutes. Also, ensure your oven rack is positioned in the middle for even heat distribution. For extra crispiness, toast the panko in a dry skillet before using.