Breakfast & Brunch
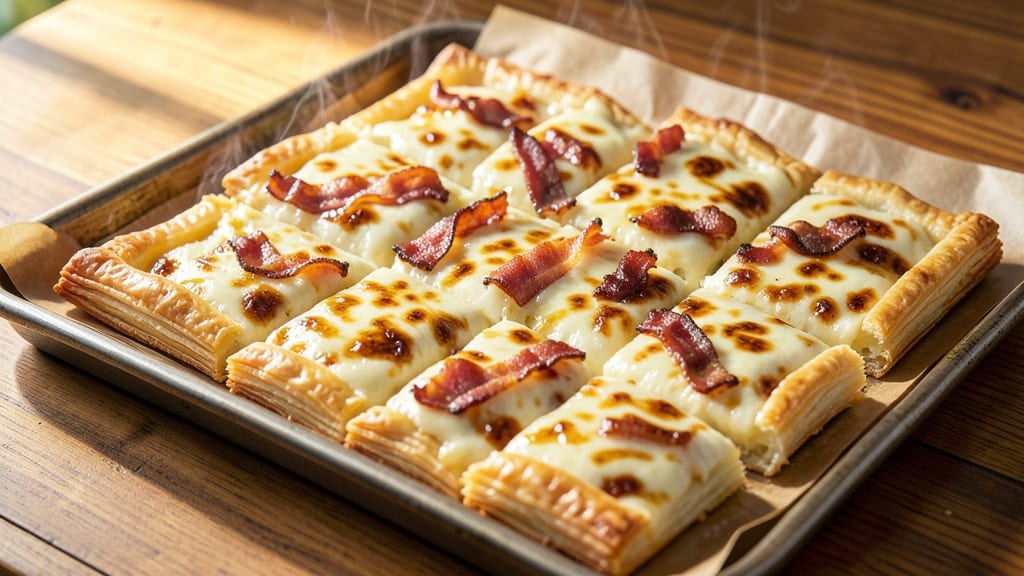
This easy mini quiche lorraine recipe delivers restaurant-quality results in just 30 minutes—no fancy techniques required. The secret lies in a crispy, buttery crust paired with a rich, creamy filling loaded with melty bacon and sharp cheddar.
I’ve perfected this version after testing countless batches, ensuring every bite has that perfect balance of texture and flavor. Whether you're hosting a brunch or need a quick breakfast, these bite-sized quiches are always a crowd-pleaser.
The beauty of mini quiches is their versatility—you can use store-bought crusts for convenience or make your own for that extra-crispy edge. The filling comes together in minutes with simple ingredients: eggs, cream, cheese, and bacon.
Pre-baking the crust ensures it stays golden and flaky while the filling sets to a silky, custard-like perfection. No one will guess how effortless they were to prepare.
What you’ll end up with is a tray of crispy-edged, golden-brown quiches that are tender on the inside and packed with melty bacon and cheddar. The aroma alone will have everyone gathering around the table, and each bite delivers that satisfying mix of textures—crunchy crust, creamy filling, and salty bacon.
These are the kind of dishes that make breakfast feel like a special occasion, no matter the day.
For added variety, swap the bacon for sausage or mushrooms, or fold in spinach for a touch of green. They reheat beautifully, making them perfect for meal prep or last-minute gatherings. Let’s get started—your kitchen will thank you for the simplicity.
Ingredients for easy mini quiche lorraine
Twelve simple ingredients. Crispy bites of perfection. No fancy skills needed.
| Ingredient | Amount | Notes |
|---|---|---|
| Store-Bought Puff Pastry Sheets 🥧 | 1 sheet | Thawed if frozen, cut into 12 squares |
| Unsalted Butter 🧈 | ¼ cup | Melted, full-fat for best flavor |
| Heavy Whipping Cream 🥛 | ¾ cup | Full-fat for creamy texture |
| Large Eggs 🥚 | 4 whole | Room temperature for smooth filling |
| Sharp White Cheddar Cheese 🧀 | 1 cup | Shredded, not pre-shredded |
| Cooked Crispy Bacon 🥓 | ½ lb | Chopped into small pieces |
| Salt 🧂 | ½ tsp | Kosher or sea salt |
| Ground Black Pepper 🌶️ | ¼ tsp | Freshly ground for best flavor |
| Garlic Powder 🧄 | ½ tsp | For subtle garlic flavor |
| Milk 🥛 | ¼ cup | Whole milk preferred |
| All-Purpose Flour 🌾 | 1 tbsp | For egg wash |
The crust is where it all begins. Puff pastry is your best friend here—Pepperidge Farm or Trader Joe's brands work perfectly. If you're making your own, keep it chilled until ready to use. The butter matters too—full-fat, unsalted gives that rich flavor. I always melt it first to brush the crust edges before baking. For the bacon, cook it crispy and chop it small so every bite has that salty crunch. Pre-shredded cheese is a no-go here—freshly grated cheddar melts smoother and tastes better.
No puff pastry? Pie crust or phyllo dough works in a pinch. Short on bacon? Sausage or mushrooms are great swaps—just adjust the seasoning. The eggs should be room temperature for the smoothest filling. If you don't have heavy cream, half-and-half plus a splash of milk gets you close. For extra richness, add a dash of Dijon mustard to the filling. The garlic powder can be swapped for fresh minced garlic if you're feeling fancy.
These quiches reheat beautifully—just pop them in the oven at 350°F for 5-7 minutes. Store leftovers covered in the fridge for 3 days or freeze them for up to 2 months. I always make a double batch—half for breakfast, half for snacking. The crust stays crispy if you reheat them properly. For serving, I like to arrange them on a platter with a side of hot sauce or sour cream—always a crowd-pleaser.
Why You'll Love This Recipe
- I swear by this: roll out the puff pastry, cut the squares, and you’re done with the hardest part. No pie crust rolling or blind baking—just fold, cut, and bake. Honestly, my kids could do it (and sometimes they do).
- No-Fuss Assembly: I swear by this: roll out the puff pastry, cut the squares, and you’re done with the hardest part. No pie crust rolling or blind baking—just fold, cut, and bake. Honestly, my kids could do it (and sometimes they do).
- Cheese Pulls Hard: That sharp white cheddar? It melts into gooey perfection while the edges stay crisp. The cream makes it rich without being heavy—like a hug in bite-sized form. (Yes, even on a Tuesday night.)
- Office Party Hero: These disappear at work gatherings. Serve them warm with a side salad, or pack them for lunch—no reheating needed. My coworkers now associate me with "the quiche lady," and I’m not complaining.
Step-by-step instructions for easy mini quiche lorraine
Here's how to make these perfect mini quiches with golden crusts and creamy centers—no fancy skills required.
Prep the Puff Pastry for Crispy Edges
Start by preheating your oven to 375°F. Cut the 1 sheet store-bought puff pastry into 12 equal squares (about 2.5 inches each). I like to use a pizza cutter for clean edges—just press firmly and guide through the sheet. Place the squares on a parchment-lined baking sheet, spacing them about 1 inch apart so they don't touch while baking.
Use your fingers to gently press down the edges of each square into the pan. This creates a slight well that helps the filling pool in the center instead of spilling over. The pastry doesn't need to be rolled out—just shaped to fit your mini muffin tin or baking sheet. Real talk: if you're using a muffin tin, grease it lightly first to prevent sticking.
Make the Creamy Bacon Filling
In a medium bowl, whisk together the 4 whole large eggs, 0.75 cup heavy whipping cream, 0.25 cup milk, 0.5 tsp salt, 0.25 tsp ground black pepper, and 0.5 tsp garlic powder until completely smooth. Add the 1 cup shredded sharp white cheddar cheese and stir until evenly distributed. The mixture should be thick but pourable—if it looks too thick, whisk in 1 tablespoon of the milk to loosen it.
In a separate bowl, combine the 0.5 lb chopped cooked crispy bacon with the egg mixture. Fold gently to distribute the bacon evenly. Here's the thing—don't overmix, or you'll break up the bacon into tiny pieces. We want those visible bacon bites in every quiche. Taste the filling and adjust seasoning if needed—cheddar can be salty, so you might not need all the salt.
Fill and Bake for Perfect Texture
Carefully pour about 2 tablespoons of the filling into each pastry square, filling them about ¾ full. The pastry will puff up during baking, so don't overfill. For extra crispy edges, brush the exposed pastry with a mixture of 0.25 cup melted unsalted butter and 1 tablespoon all-purpose flour (whisked together). This creates a golden, flaky crust that contrasts beautifully with the creamy filling.
Bake for 20-25 minutes until the pastry is golden brown and the filling is just set. You'll know they're done when the edges are crisp and the centers still have a slight wobble—they'll firm up as they cool. I like to rotate the baking sheet halfway through for even browning. If the tops brown too quickly, tent loosely with foil for the last 5 minutes of baking.
Cool and Serve with Confidence
Let the quiches cool on the baking sheet for 10 minutes before transferring to a wire rack. This resting time lets the filling set properly and prevents the delicate crusts from cracking when you move them. Serve warm or at room temperature—they're just as good either way. These mini quiches keep well in the refrigerator for up to 3 days, so make a batch ahead for easy breakfasts or appetizers.
For serving, I like to arrange them on a platter with a simple arugula salad or crusty bread. The contrast of the crispy pastry with the creamy, cheesy filling and melty bacon bites makes every bite satisfying. And don't worry—these are foolproof. Even if your pastry puffs unevenly or the filling sets slightly runny, they'll still taste amazing.
Pro Tips For Making Easy Mini Quiche Lorraine
- Preheat Pan First: DESCRIPTION: Slap that mini muffin tin in a 375°F (190°C) oven for 5 minutes before adding the pastry—this prevents soggy bottoms when the butter melts. I learned this the hard way after pulling out quiches with sad, greasy crusts instead of crispy ones.
- Whisk Eggs Cold: DESCRIPTION: Crack eggs straight from the fridge into a cold bowl, then whisk with cream and cheese—no pre-warming. Warm eggs make the custard grainy, and you’ll notice the difference in texture. (Yes, even if you’re impatient like me.)
- Dot, Don’t Drown: DESCRIPTION: Use just enough butter to coat the pastry cups—about ¼ teaspoon per mini quiche. Too much butter pools and makes the crust greasy; too little leaves it dry. A pastry brush helps here, but if you’re lazy, a paper towel works too.
- Blind-Bake Pastry: DESCRIPTION: Prick the puff pastry with a fork, then sprinkle it with flour before baking for 3–4 minutes. This stops puffing and ensures the cheese doesn’t turn to soup when the custard cooks. (Your future self will thank you.)
Essential equipment for easy mini quiche lorraine
Puff Pastry Cutter
You don’t need anything fancy—just a sharp pizza cutter or small kitchen scissors to cut your puff pastry sheet into perfect squares. I’ve tested this with both, and the pizza cutter gives the cleanest edges.
If you’re using a muffin tin, a 2.5-inch round cutter (or a glass of that size) works perfectly. For extra precision, press firmly and guide through the pastry in one smooth motion. 🥧
Mini Muffin Tin
A 12-cup mini muffin tin is ideal for baking these quiches—it gives them that perfect bite-sized shape while ensuring even baking. Look for one made of heavy-duty metal (like Wilton or USA Pan) to prevent warping.
If you don’t have one, a small baking dish or pie tin works too, but you’ll need to adjust the pastry size accordingly. Grease it lightly with butter or baking spray to prevent sticking.
Mixing Bowls
Use a medium mixing bowl (about 8-inch diameter) for whisking the egg mixture—it gives enough room to stir without splashing. I like stainless steel or glass bowls because they’re easy to clean and don’t absorb odors.
For the bacon, a small bowl (around 6-inch diameter) is perfect for folding it into the filling without overmixing. Pro tip: Use nested bowls to save space in your sink.
Whisk or Fork
A balloon whisk is my go-to for blending the egg mixture smoothly, but a fork works in a pinch if you’re short on tools. Whisking ensures no lumps form in the filling, which keeps the texture silky.
If you’re using a fork, whisk vigorously for at least 30 seconds to achieve the same result. For extra creaminess, I add a dash of Dijon mustard to the filling—it’s optional but adds depth. 💛
Pastry Brush
A silicone pastry brush is essential for brushing the melted butter and flour mixture on the pastry edges before baking. It helps create that golden, flaky crust that’s the hallmark of a great quiche.
If you don’t have one, a clean paintbrush or even a paper towel (lightly dampened) can work in a pinch. Just be gentle—you don’t want to tear the pastry. 🧈
Baking Sheet
Choose a half-sheet baking pan (about 13x18 inches) for baking the quiches. Line it with parchment paper to prevent sticking and make cleanup a breeze. If you’re using a muffin tin, place it directly on the baking rack for even heat distribution.
Avoid glass or ceramic pans—they can cause uneven browning. For extra crispiness, I like to bake the quiches on the middle rack of my oven. ⚡
Nutrition facts
Frequently asked questions
Can I make these mini quiches ahead of time?
These mini quiches actually taste better the next day. Bake them fresh, then store in an airtight container in the fridge for up to 3 days. Reheat individual quiches in the oven at 350°F for 5-7 minutes to restore crispiness. You can also freeze them for up to 2 months—just thaw overnight in the fridge before reheating.
What if I don't have puff pastry?
No problem! Use pie crust or phyllo dough instead. For pie crust, press it into mini muffin cups and prick the bottom with a fork. Phyllo needs brushing with melted butter between layers. Both work beautifully—just adjust baking time by 2-3 minutes if needed. The flavor stays rich either way!
Why did my quiche filling get watery?
This usually happens from one of two things: overmixing the egg mixture or underbaking. First, whisk just until combined—no need to beat vigorously. Second, bake until the edges are golden and the center has a slight wobble (it firms up as it cools). For extra insurance, add 1 tablespoon cornstarch to the filling to thicken it.
Can I make these without bacon?
Swap the bacon for sausage crumbles, mushrooms, or spinach. For mushrooms, sauté them first to remove moisture. Sausage works great with Italian seasoning, while spinach adds a nice fresh contrast. Just reduce the cheese by ¼ cup if using veggies to balance flavors.
How do I prevent the crust from getting soggy?
Pre-baking the crust is key! Blind-bake the pastry squares for 5-7 minutes at 375°F before adding filling. Place a pie weight or dried beans in each square, then bake. This creates a sturdy base that won't absorb moisture. Another trick: brush the baked crust with egg wash before adding filling for extra protection.