Beverages
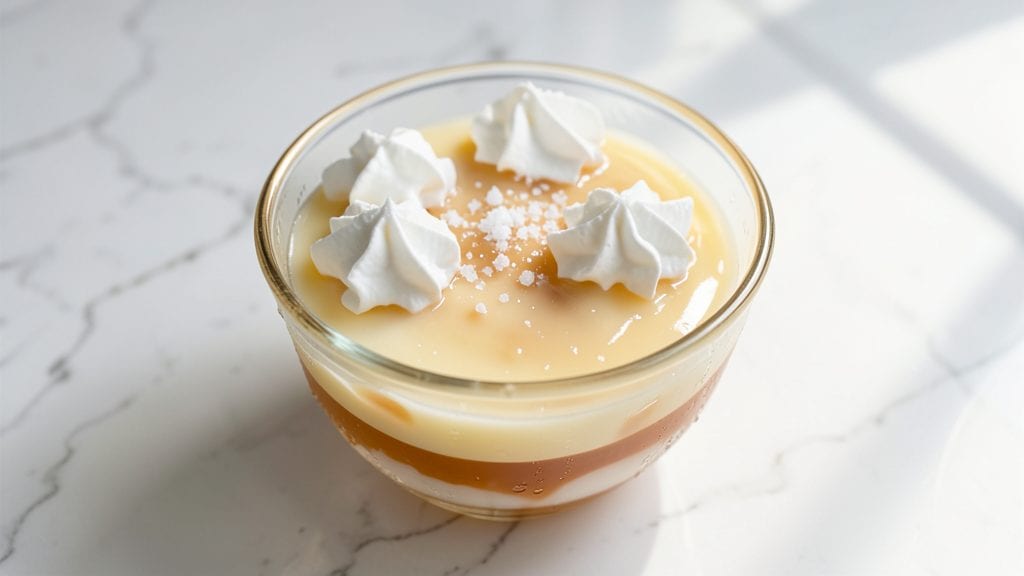
This evaporated milk jello recipe delivers the perfect balance of creamy smoothness and delicate jiggle—like a luxurious dessert that defies expectations. The secret lies in combining evaporated milk with gelatin, creating a texture that's neither too firm nor too wobbly, but just right.
I first discovered this technique while searching for a dessert that felt indulgent yet required minimal effort, and it became an instant family favorite.
The beauty of this recipe is its versatility—it works as a standalone dessert or as an elegant layer in trifles and parfaits. With just a few simple ingredients and precise timing, you'll achieve that signature ultra-smooth yet slightly jiggly texture that feels decadent.
The evaporated milk adds natural sweetness and richness, while the gelatin provides structure without overpowering the delicate flavor.
What makes this recipe truly special is how it transforms ordinary gelatin into something extraordinary—creamy on the inside with a delicate outer layer that sets perfectly. The result is a dessert that's smooth enough to sip like a milkshake but firm enough to slice like traditional jello.
It's the kind of treat that feels like a restaurant dessert without the fuss.
Once you've mastered the basic technique, you can customize it with fruit purees, whipped cream, or even a splash of vanilla extract for added depth. The possibilities are endless, but the foundation remains the same: simple, foolproof, and always impressive. Let's get started on creating this creamy masterpiece.
Ingredients for evaporated milk jello
Six core ingredients transform ordinary gelatin into a velvety, restaurant-worthy dessert.
| Ingredient | Amount | Notes |
|---|---|---|
| Unflavored Gelatin Powder 🍬 | 2 tbsp | High-quality, powdered gelatin |
| Evaporated Milk 🥛 | 2 cups | Full-fat for optimal creaminess |
| Granulated Sugar 🍚 | ½ cup | White or light brown preferred |
| Vanilla Extract 🌸 | 1 tbsp | Pure, high-quality extract |
| Heavy Whipping Cream 🥛 | ½ cup | Cold, full-fat for stability |
| Lemon Juice 🍋 | 1 tbsp | Freshly squeezed, optional |
| Salt 🧂 | ¼ tsp | Fine sea salt for balance |
| Warm Water 💧 | 1 cup | 160°F for proper dissolution |
| Food Coloring (Optional) 🎨 | 1 tsp | Gel-based for vibrant hue |
| Fresh Berries (Optional) 🍓 | ½ cup | Pureed for garnish |
| Whipped Cream (Optional) 🍦 | ¼ cup | Stabilized with powdered sugar |
The gelatin quality is non-negotiable—Great Lakes or Knox brand ensures proper setting. Evaporated milk should be full-fat; Carnation is the gold standard for consistent results. Sugar isn't just for sweetness—it stabilizes the texture, so Domino or C&H brands work best. For vanilla, Heinz or Nielsen-Massey pure extract delivers authentic flavor. The heavy cream must be cold; Land O'Lakes or Organic Valley brands stay stable during setting. Store gelatin in an airtight container to prevent moisture absorption, and keep evaporated milk refrigerated after opening.
No evaporated milk? Full-fat condensed milk at half the amount works in a pinch, though texture will be slightly denser. Substitute vanilla with vanilla bean paste at double the quantity for depth. For a citrus twist, swap lemon juice for orange juice or lime juice at equal measure. The optional berry puree can be made from frozen berries—simply thaw and strain. Food coloring should be gel-based (like Wilton) to disperse evenly. If omitting whipped cream, stabilize with 1 tsp powdered sugar per ½ cup cream. All substitutions should be incorporated at the same temperature as their originals for consistency.
This dessert requires precise temperature control—160°F water for gelatin dissolution, room temperature for mixing, and refrigeration at 35°F for setting. Once set, it maintains texture for 3-4 days refrigerated or 2 months frozen. For freezing, portion into individual molds before transferring to a sealed container. To serve, let sit at room temperature for 10-15 minutes before unmolding. The outer layer will firm up slightly upon chilling—this is normal and enhances presentation.
Why You'll Love This Recipe
- No-Fuss Magic: I swear by this recipe because it’s the kind of dessert that feels special without requiring a single step beyond boiling water. Just sprinkle the gelatin, stir in the evaporated milk and sugar, then let it set—no fancy equipment, no stress.
- Creamy-Vanilla Hug: That first bite? It’s like a warm, custardy cloud with a whisper of vanilla. The evaporated milk gives it this rich depth, while the whipped cream on top turns it into something that tastes like a hug from your favorite bakery.
- Party in a Bowl: Honestly, this is my go-to for potlucks or lazy Sunday mornings. It’s fancy enough for guests but so easy I can make it while scrolling through my phone—plus, the leftovers? Still delicious days later.
- Pocketbook Performer: Between us, this recipe is cheap to make and stretches far. A single box of gelatin and a can of evaporated milk feed four people for under $3. I’ll take that over store-bought pudding any day.
Step-by-step instructions for evaporated milk jello with ultra-smooth texture
This method transforms ordinary gelatin into a velvety-smooth dessert with a luxurious creaminess.
Bloom the Gelatin in Warm Water
In a medium bowl, sprinkle the 2 tbsp unflavored gelatin powder evenly over the 1 cup warm water (about 160°F). This temperature is crucial—hotter water will cook the gelatin instead of activating it. Let the mixture sit for 5 minutes until the gelatin forms a gel-like consistency with no visible powder.
Gently stir the bloomed gelatin with a whisk until fully dissolved. The mixture should become completely transparent with a slightly viscous texture. This step ensures even distribution of the gelatin particles, which prevents graininess in the final product. If any dry spots remain, add another 1 teaspoon warm water and whisk again.
Combine Liquid Ingredients
In a separate large mixing bowl, combine the 2 cups evaporated milk, 0.5 cup granulated sugar, 1 tbsp vanilla extract, 1 tbsp lemon juice, and 0.25 tsp salt. Whisk vigorously until the sugar dissolves completely and the mixture is smooth. The evaporated milk should be at room temperature—cold milk creates lumps when mixed with the bloomed gelatin.
If using 1 tsp food coloring, add it now and whisk until fully incorporated. The mixture should be uniform in color and texture. This combination of ingredients creates the signature creamy base while balancing sweetness and acidity for optimal flavor development.
Incorporate Gelatin Mixture
Gradually pour the dissolved gelatin into the milk mixture while whisking continuously. The goal is to maintain a steady stream to prevent the gelatin from setting prematurely. Whisk for an additional 2 minutes until the mixture is completely smooth and homogeneous. You should notice the texture become noticeably thicker as the gelatin activates.
At this stage, the mixture should coat the back of a spoon. If it appears too thick, add 1 tablespoon warm water and whisk again. This step is critical for achieving that signature ultra-smooth texture that distinguishes this recipe from standard gelatin desserts.
Add Heavy Cream and Optional Berries
Gently fold in the 0.5 cup cold heavy whipping cream using a rubber spatula, being careful not to incorporate too much air. The cream should blend seamlessly into the mixture, creating a marbled effect. If using 0.5 cup fresh berries, puree them first and fold in at this stage for a fruity variation. The berries should be finely strained to avoid texture issues.
For a layered effect, you can divide the mixture between two bowls—one with berry puree and one without. This creates visual interest while maintaining the creamy texture. The cold cream adds richness without altering the setting properties of the gelatin.
Pour and Set the Jello
Pour the mixture into a 6-cup mold or individual serving glasses, tapping gently on the counter to remove air bubbles. Cover with plastic wrap and refrigerate for 4 hours or until fully set. The jello should have a firm but slightly yielding texture when gently pressed with a finger—it should hold its shape but still have a slight give.
Once set, run a knife around the edges to loosen, then invert onto a serving plate. If using the optional 0.25 cup whipped cream, pipe it artistically on top just before serving. This dessert maintains its creamy texture even when chilled, thanks to the evaporated milk and heavy cream combination.
Pro Tips For Making Evaporated Milk Jello
- Bloom the Gelatin Right: Dump that powder into cold liquid, and you’re asking for lumps—especially with gelatin. Sprinkle the unflavored gelatin over ¼ cup of ice water first, let it sit for 3–5 minutes until it triples in size, then pour the rest of your evaporated milk mixture over it. This keeps everything silky smooth, no matter how impatient you are.
- Warm the Evaporated Milk: Cold evaporated milk will make your gelatin set too fast, leaving it grainy or weak. Heat it gently in a saucepan until it’s just warm to the touch (not boiling)—about 110°F—before mixing in the sugar and vanilla. This ensures the gelatin fully dissolves and the texture stays flawless.
- Whip the Cream Last: Fold in the heavy whipping cream right before pouring the mixture into molds—no earlier. If you add it too soon, the heat from the warm milk will melt it, and you’ll end up with a runny mess instead of that creamy, cloud-like finish you’re after.
- Chill the Molds Evenly: Pop the molds into the fridge for 2 hours, then transfer them to the freezer for the last 30 minutes. This two-step approach prevents ice crystals from forming on the outside while the center sets properly—no more rubbery or cracked jello. (Yes, I’ve ruined batches by skipping this.)
Dietary considerations for these flavors
Dairy-Free Adaptation
For a dairy-free version, replace the 2 cups evaporated milk with 2 cups full-fat coconut milk (canned, not carton) and use agar-agar powder instead of gelatin. Agar-agar sets at a higher temperature, so you'll need to heat the coconut milk to 185°F before dissolving the agar.
This creates a similar creamy texture without dairy, though it will have a subtle coconut flavor. 🥥
Vegan-Friendly Version
To make this recipe fully vegan, swap the gelatin for 1 tbsp agar-agar powder and use 2 cups almond milk (unsweetened) or cashew cream for richness. Add 1 tsp lemon juice to balance flavors, and increase the sugar to 0.75 cup since plant-based milks are less sweet.
The texture will be firmer but still creamy, and it sets beautifully in the same 4-hour refrigeration time.
Gluten-Free Assurance
This recipe is naturally gluten-free since it contains no wheat-based ingredients. However, always check your gelatin brand—some contain additives with gluten traces. Great Lakes or Knox unflavored gelatin are certified gluten-free.
The evaporated milk, sugar, and other ingredients in this recipe are also gluten-free, making it safe for those with celiac disease or gluten sensitivities. Always verify labels when using store-bought ingredients. 🌾
Low-Sugar Options
Reduce the sugar to 0.25 cup and add 1 tbsp honey or maple syrup for natural sweetness. Alternatively, use monk fruit sweetener (about 1 tbsp) to cut calories while maintaining flavor.
The evaporated milk provides enough richness that you won’t miss the extra sugar, and the vanilla extract enhances the natural sweetness. This version keeps the creamy texture while being more diet-friendly. 🍯
Nut-Free Considerations
If nut allergies are a concern, avoid almond milk substitutes and stick with the original evaporated milk or coconut milk. The recipe’s core ingredients—gelatin, evaporated milk, sugar, and vanilla—are naturally nut-free.
Always check labels on vanilla extract and food coloring, as some brands process in facilities with nuts. When in doubt, opt for pure vanilla bean extract from trusted brands like Nielsen-Massey. 🌰
Nutrition facts
Frequently asked questions
Why does evaporated milk make jello creamier than regular milk?
The canning process removes about 60% of the water from evaporated milk, creating a thicker, richer base that blends seamlessly with gelatin. This concentrated dairy adds natural sweetness and fat content that regular milk can't match, resulting in that signature ultra-smooth texture. The higher protein content also helps stabilize the gelatin network for a firmer yet creamy finish.
Can I make this recipe without a mold? What other serving options work?
Use individual 6-ounce ramekins for elegant portions, or pour into a loaf pan for a sliceable dessert. For a fun twist, try clear plastic cups layered with whipped cream or fruit puree. You can even shape it into a large rectangle on a baking sheet for easy cutting. The key is to use containers that allow for even setting—thicker layers may require 5-6 hours to fully firm up.
What's the best way to fix grainy jello texture?
Graininess usually means the gelatin didn't dissolve completely. First, whisk the mixture vigorously for 3-4 minutes to break up any undissolved particles. If that fails, strain the mixture through a fine-mesh sieve before pouring. For extra smoothness, chill the mixture for 10 minutes after mixing to help the gelatin fully activate before setting. Always use warm (160°F) water for blooming—not hot!
How long can I store this dessert, and what's the best way?
This jello keeps beautifully for 5-7 days refrigerated in an airtight container. For longer storage, freeze portions in ziplock bags for up to 3 months. To serve from frozen, thaw overnight in the fridge, then let sit at room temperature for 15 minutes before unmolding. The texture remains creamy when properly stored—just avoid freezing with whipped cream toppings.
Can I add alcohol to this recipe? What works best?
Yes! For a boozy twist, replace ½ cup of the evaporated milk with ½ cup vodka, rum, or bourbon (chilled). The alcohol helps dissolve the gelatin more completely and adds subtle depth. For a layered effect, pour the alcohol-infused mixture over regular jello in glasses. Let it set completely before serving—alcohol can slightly weaken the gelatin structure if overused.