Snacks
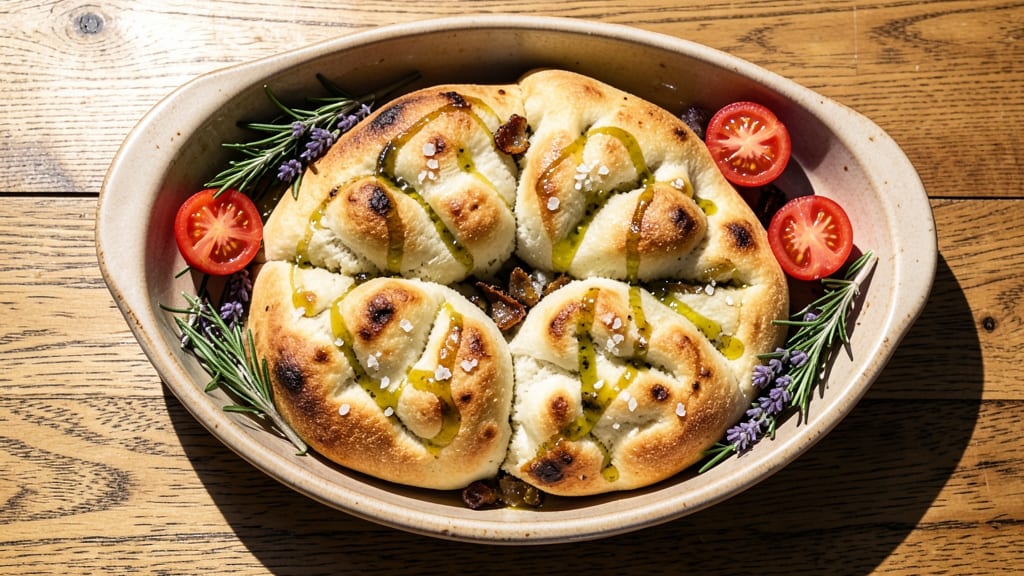
Creating fluffy olive oil focaccia rolls that pull apart effortlessly is easier than you think, and this recipe delivers restaurant-quality results with minimal effort.
The secret lies in a simple dough that gets its signature tenderness from olive oil and a long rise, while the baking technique ensures that crispy crust you crave.
I developed this method after years of experimenting with focaccia, and it never fails to impress—whether you're serving them as appetizers or alongside a meal.
What makes these focaccia rolls special is their foolproof technique, designed for beginners yet packed with professional results. You'll start with a basic dough of flour, yeast, water, olive oil, and salt, then shape it into individual rolls before baking until golden brown.
The dough's elasticity and the olive oil's richness create that iconic pull-apart texture, while the herbs or toppings you choose add layers of flavor. No special equipment or advanced skills are needed—just patience and a few simple steps.
The outcome is a batch of focaccia rolls with a crispy exterior that gives way to a soft, airy interior, all infused with the aroma of fresh herbs or your choice of toppings.
Each roll will be tender enough to tear apart with your hands while maintaining enough structure to hold fillings like cheese or olives. These rolls are perfect for feeding a crowd, meal prepping, or enjoying as a warm, comforting snack. Let’s get started on making them!
For extra flair, consider adding rosemary, garlic, or cherry tomatoes before baking—these toppings bake right into the rolls, creating a burst of flavor in every bite. The recipe scales easily, so you can make a small batch for two or double it for a party.
The key to success is letting the dough rise properly, which develops that signature texture and flavor. Trust the process, and you’ll have focaccia rolls that taste like they came from a Mediterranean bakery.
Ingredients for focaccia rolls
Twelve ingredients, twelve perfect focaccia rolls with that signature pull-apart magic.
| Ingredient | Amount | Notes |
|---|---|---|
| All-Purpose Flour 🌾 | 4 cups | Plus 2 tbsp for dusting |
| Active Dry Yeast 🍞 | 2 ¼ tsp | Or 1 packet (7g) |
| Granulated Sugar 🍚 | 1 tbsp | Activates yeast |
| Extra-Virgin Olive Oil 🫒 | 1 ¼ cups | High quality, fruity |
| Warm Water 💧 | 1 ¼ cups | 110°F (43°C) ideal |
| Sea Salt 🧂 | 1 ½ tsp | Fine grain preferred |
| Fresh Rosemary 🌿 | ¼ cup | Chopped, stems removed |
| Garlic Cloves 🧄 | 4 cloves | Minced, for topping |
| Cherry Tomatoes 🍅 | ½ lb | Halved, optional |
| Coarse Sea Salt 🧂 | 2 tbsp | For final sprinkle |
| Black Peppercorns 🌶️ | ½ tsp | Freshly cracked |
The olive oil is non-negotiable here—look for extra-virgin with fruity notes (I grab mine from Trader Joe's or Whole Foods bulk section). Fresh yeast works best, but if you're using active dry, make sure it's not expired—yeast loses its kick fast. The flour should be all-purpose, not bread flour (we're not making sourdough here). For rosemary, buy fresh sprigs—dried works in a pinch, but it lacks that bright aroma. If you're feeling fancy, grab a small bunch of fresh rosemary from the grocery store's produce section, where it's usually cheaper than pre-chopped herbs.
No fresh rosemary? Dried works at one-third the amount, but it won't have that same Mediterranean punch. Swap cherry tomatoes for kalamata olives or sun-dried tomatoes if you prefer. The garlic can be pre-minced from a jar (though fresh is always better), and if you're out of coarse sea salt, Maldon flakes are a great alternative. For the yeast, if you're unsure about the water temperature, microwave the water for 20 seconds to warm it—it should feel like bathwater to the touch. And if you're making these ahead, freeze the shaped rolls before baking—they'll keep for up to 3 months.
This dough is a patient one—let it rise for at least 2 hours, ideally overnight in the fridge for deeper flavor. Store any leftovers in an airtight container at room temperature for 2 days, or freeze the baked rolls for up to 3 months. To reheat, wrap in foil and warm in a 350°F (175°C) oven for 10 minutes. Pro tip: brush the baked rolls with more olive oil while warm—they'll taste like you spent all day in the kitchen.
Why You'll Love This Recipe
- No-Knead Magic: I swear by this dough—just mix, let it rise, and forget it. The yeast does all the work while I sip coffee, and those golden bubbles? Pure satisfaction without a single punch of effort.
- Oil Kissed Goodness: That first brush of extra-virgin olive oil before baking? Chef’s kiss. It turns every bite into a crispy, aromatic dream—no fancy ingredients, just honest, rich flavor from five simple things.
- Weeknight Swiss Army Knife: Breakfast rolls? Sandwiches? Pizza boats? This dough handles it all. I’ve stuffed them with eggs, cheese, and even leftover roasted veggies—no waste, no stress, just adaptability.
- Budget-Friendly Staple: Flour, yeast, oil—these are pantry basics that stretch for miles. A single batch feeds my family for days, and the leftovers? Toasted with jam or garlic butter? Absolute gold.
Step-by-step instructions for focaccia rolls recipe
Here's how to create fluffy, golden focaccia rolls with that irresistible pull-apart texture.
Activate the Yeast and Mix the Dough
In a large bowl, combine the 1.25 cups warm water (around 110°F) with 1 tbsp granulated sugar and 2.25 tsp active dry yeast. Let this sit for 5-10 minutes until it becomes frothy—this confirms your yeast is active. If it doesn’t bubble, start over with fresh yeast.
Add 4 cups all-purpose flour and 1.5 tsp sea salt to the bowl. Pour in the 1.25 cups extra-virgin olive oil and mix with a wooden spoon until a shaggy dough forms. The oil will make this dough sticky, so don’t worry if it looks messy. Knead lightly for 2-3 minutes until just combined—over-kneading develops gluten, which we don’t want for tender focaccia.
First Rise and Shape the Dough
Lightly oil a large bowl, place the dough inside, and cover with a damp towel. Let it rise in a warm spot for 1-2 hours, or until it has nearly doubled in size. You’ll know it’s ready when you poke it gently and the dough springs back slowly.
Once risen, turn the dough onto a lightly floured surface and divide it into 12 equal pieces (about 2 oz each). Roll each piece into a smooth ball, then place them on a parchment-lined baking sheet, spacing them 2 inches apart. Cover again and let them rise for another 30-45 minutes—they should puff up noticeably.
Drizzle and Top the Rolls
Preheat your oven to 375°F. Drizzle the risen rolls generously with any remaining olive oil, letting it pool in the dimples. Sprinkle 2 tbsp coarse sea salt evenly over the top, then scatter 0.25 cup chopped fresh rosemary and 4 minced garlic cloves over everything. If using, add 0.5 lb halved cherry tomatoes as well.
Here’s the thing—don’t press the toppings in too hard. Let them rest for 10 minutes so the oil absorbs slightly and the aromatics cling. This step ensures maximum flavor infusion without making the rolls dense.
Bake to Golden Perfection
Bake the focaccia rolls for 18-22 minutes until they’re deep golden brown on top and the edges are slightly crisp. The rolls should smell heavenly—like fresh bread with a hint of rosemary and garlic. If they brown too quickly, tent them loosely with foil after 15 minutes to prevent over-browning.
Remove from the oven and let them cool on the baking sheet for 5 minutes before serving. The rolls will be soft and pillowy inside with a crisp exterior—perfect for pulling apart and sharing. Serve warm with extra olive oil drizzled on top for that authentic Italian touch.
Pro Tips For Making Focaccia Rolls
- Use Lukewarm Water: That "warm" label on the water bottle is a lie—yeast needs lukewarm (about 105°F/40°C). I learned this the hard way when my focaccia rolls took 3 hours to rise because the yeast was basically napping. Test it by dropping a pinch of sugar in; if it dissolves instantly, you’re good.
- Dimple the Dough: Press your fingers into the dough before baking to create those classic dimples—it’s not just for looks. This keeps the rolls from puffing up into a single sad loaf and ensures even browning. Use a fork or your knuckles for consistent pressure.
- Oil the Pan Last: Grease the baking pan after shaping the rolls, not before. The dough absorbs oil like a sponge, and if you oil first, you’ll end up with soggy bottoms. Brush the pan lightly with olive oil right before baking—just enough to prevent sticking.
- Skip the Sugar (If You Dare): Granulated sugar is optional here, and honestly, it’s not doing much. If you’re short on time or just forgot it, your focaccia rolls will still rise and taste fine—just slightly less caramelized on top. Save the sugar for something that actually needs it.
Pro cooking tips for focaccia rolls
Dough Temperature Matters
The dough’s final temperature before shaping should be between 70-75°F—this ensures proper rise without overproofing. I use a kitchen thermometer to check: if the dough feels too warm, chill it in the fridge for 15-20 minutes before shaping.
Cold dough rises slower but develops better flavor. For extra insurance, place your mixing bowl on top of your fridge during the first rise to maintain a consistent 75°F environment. 🌡️
Oil Absorption Trick
After shaping the rolls, let them rest uncovered for 10 minutes before baking—this allows the olive oil to absorb into the dough rather than pooling. I find this step prevents a greasy crust while keeping the interior tender.
For even better absorption, lightly dimple each roll with your fingertips before drizzling with oil. This creates pockets that hold toppings and oil beautifully.
Steam for Crispy Crust
For that signature focaccia crust, create steam in your oven by placing a baking tray filled with ½ cup hot water on the lower rack when preheating. The steam helps the rolls rise dramatically during the first 5 minutes of baking, creating that airy interior.
I also recommend baking on the middle rack for even heat distribution—this prevents the bottoms from burning before the tops brown.
Proofing Perfection
Don’t rush the final proof! The rolls should nearly double in size during their 30-45 minute rest before baking. Look for gentle domes forming and edges pulling away from the pan. If they’re not puffing enough, extend the proof by 15 minutes—underproofed rolls will bake dense.
I keep my kitchen warm by running the oven light for 5 minutes before proofing to create an ideal environment.
Baking Sheet Prep
Line your baking sheet with parchment paper, but don’t skip the oil! Lightly brush the parchment with olive oil before placing the shaped rolls on it. This prevents sticking and makes cleanup a breeze.
I also recommend using a half-sheet pan (18x13 inches) for even baking—standard cookie sheets can cause uneven browning at the edges. 💡
Post-Bake Brilliance
After baking, immediately brush the warm rolls with another 1 tbsp olive oil while they’re still on the sheet. This step adds that restaurant-quality shine and enhances flavor. Let them cool for 5 minutes before serving—this allows the crust to set slightly while keeping the interior soft.
Store any leftovers in an airtight container at room temperature for 2 days, or freeze for up to 3 months.
Nutrition facts
Frequently asked questions about olive oil focaccia rolls
Can I make focaccia rolls without yeast?
Traditional focaccia relies on yeast for that signature airy texture, but you can make a quick version using baking powder. Replace the yeast with 2 tsp baking powder and 1 tsp baking soda, and reduce the rise time to 10 minutes before baking. The result will be denser but still delicious—great for when you're short on time.
How do I prevent my focaccia rolls from sticking?
Line your baking sheet with parchment paper and lightly brush it with olive oil before placing the shaped rolls. For extra insurance, dust your work surface with flour when shaping and avoid over-handling the dough. The oil in the dough will naturally prevent sticking, but this step ensures perfect release every time.
Can I freeze focaccia rolls before baking?
Shape the rolls, place them on a parchment-lined tray, and freeze solid (about 1 hour). Transfer to a freezer bag and bake directly from frozen at 375°F for 25-30 minutes, adding 5 minutes to the baking time. The texture will be slightly denser but still delicious—perfect for meal prep.
What's the best way to reheat focaccia rolls?
Wrap cooled rolls in foil and warm in a 350°F oven for 10-12 minutes until heated through. For extra crispiness, place them on a baking sheet and broil for 1-2 minutes at the end. Avoid microwaving—they'll turn rubbery. A quick oven refresh brings back that bakery-fresh quality!
Can I substitute olive oil with another fat?
While olive oil gives focaccia its signature flavor, you can use melted butter or vegetable oil in a pinch. For butter, reduce the amount to 1 cup (it's more concentrated) and add 1 tbsp extra flour to compensate for the lower fat content. The rolls will be less aromatic but still tender.