
Snacks
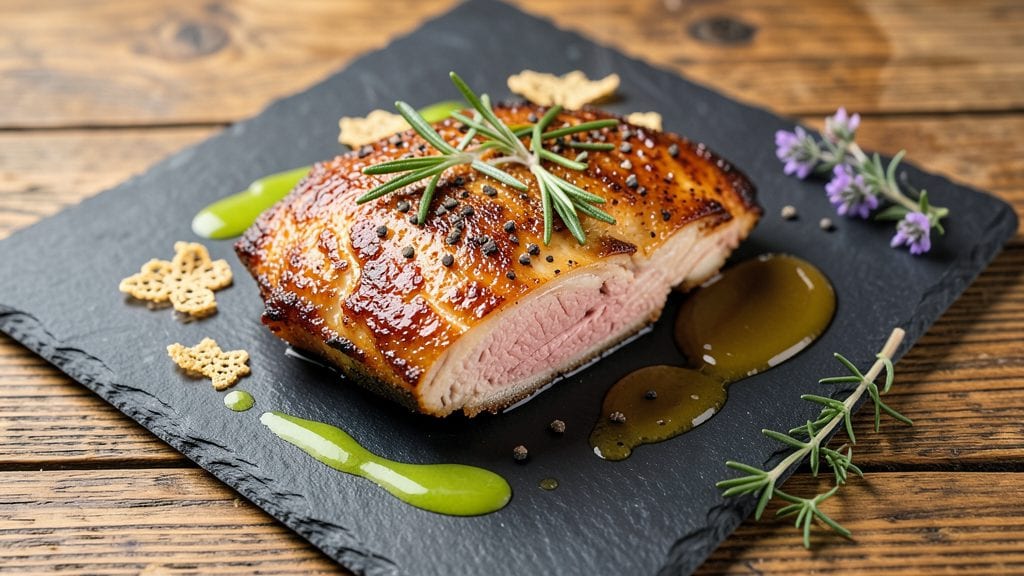
Mastering air fry duck recipe with crispy skin and juicy pink meat in just 20 minutes is simpler than you think—no deep-frying mess or hours in the oven required.
The secret lies in precise temperature control and a dry, room-temperature duck breast that develops that coveted golden-brown crust while staying tender inside. I’ve perfected this method after years of experimenting, and the results consistently impress even the most skeptical diners.
This technique transforms tough duck breast into a restaurant-worthy dish using only one piece of equipment: your air fryer. The high heat circulates evenly, creating a crispy exterior while the interior remains perfectly pink and moist.
No basting required—just a light coating of oil and a sprinkle of salt before cooking. The process is efficient, clean, and delivers professional-quality results without the fuss.
What you’ll achieve is a perfectly cooked duck breast with crispy, shatteringly thin skin and a juicy, tender center that’s still slightly pink—a hallmark of expertly prepared duck.
The aroma alone will have everyone gathering around the table, and the texture contrast between the crispy exterior and velvety interior makes every bite unforgettable. This method ensures you’ll never settle for less than premium duck again.
Serve with a simple side of roasted vegetables or a fresh salad to let the duck take center stage. The crispy skin holds up beautifully, making it ideal for slicing and sharing. Once you try this air fryer method, you’ll wonder why you ever cooked duck any other way.
Ingredients for air fry duck
Two duck breasts, eight simple ingredients, and one air fryer transform into restaurant-quality duck.
| Ingredient | Amount | Notes |
|---|---|---|
| Duck Breast 🦆 | 2 whole | Skin-on, bone-in, 12-16 oz each |
| Kosher Salt 🧂 | 1 ½ tsp | Fine grain, for seasoning |
| Black Pepper 🌶️ | ½ tsp | Freshly cracked, coarse |
| Avocado Oil 🫒 | 1 tbsp | High smoke point, for coating |
| Fresh Rosemary 🌿 | 2 sprigs | For aroma, optional garnish |
| Fresh Thyme 🌿 | 1 sprig | For aroma, optional garnish |
| Garlic Cloves 🧄 | 2 cloves | Minced, for optional rub |
| Lemon Wedges 🍋 | 1 whole | For serving, optional |
| Balsamic Glaze 🍯 | 2 tbsp | For drizzling, optional |
The duck is everything here. Look for bone-in, skin-on breasts—the bone adds flavor, and the skin crisps perfectly. I always grab mine from Whole Foods or D'Artagnan online if I can't find good ones locally. Size matters too: 12-16 oz each gives you that perfect balance of crispy skin and juicy pink meat. Pat the skin completely dry with paper towels—moisture is the enemy of crispiness. Let the duck sit at room temperature for 30-45 minutes before cooking (that's key for even doneness).
No avocado oil? Grapeseed or neutral oil works just as well—just avoid olive oil, which burns at high heat. Fresh herbs are ideal, but dried thyme at one-third the amount gets you close. Want extra flavor? Mix the minced garlic with a pinch of salt and rub it on the duck skin before air frying. The balsamic glaze can be swapped for honey or maple syrup if you prefer. And if you're short on time, skip the lemon wedges—a squeeze of fresh juice over the finished duck is just as good.
This duck is best served immediately, but if you must reheat, 5 seconds in the air fryer at 350°F revives the crisp. Store leftovers in an airtight container for 3-4 days, but honestly? It disappears faster than that. The skin gets soggy if you refrigerate it, so eat it fresh. For a crowd, double the recipe—just make sure your air fryer can handle it (some models max out at 4 lbs). The crispy skin holds up beautifully for 2-3 days if you slice and serve it immediately.
Why You'll Love This Recipe
- No-Fuss Crisp: I swear by the air fryer for this—just pat the duck dry, slather it with avocado oil, and let the magic happen. No basting, no flipping drama, just that perfect golden crust in 12 minutes.
- Herb-Packed Magic: That rosemary? It’s the secret weapon. Freshly crushed with salt and pepper, it clings to the duck like a flavor hug—earthy, bright, and impossible to resist. (Yes, even my picky husband asks for seconds.)
- Weeknight to Dinner Party: Same method, different vibes. Toss it on your Tuesday night table or impress guests at a last-minute gathering. Slice it thin, serve with crusty bread, and suddenly you’re the hero of the meal.
- Budget Luxury: Duck breast feels fancy, but this recipe stretches it like a pro. Leftovers? Reheat those slices for sandwiches or ramen—no waste, all flavor. (Between us, my wallet thanks me every time.)
Step-by-step instructions for air fry duck recipe
Here's how to transform duck breast into perfectly crispy, juicy bites with minimal effort.
Prepare the Duck for Maximum Crispiness
Start by patting the skin-on duck breasts completely dry with paper towels. This step is absolutely critical—any moisture will prevent that golden, crackling crust we're after. I like to press down firmly with the paper towels, especially around the skin folds where water tends to hide.
Season both sides generously with the 1.5 teaspoons kosher salt and 0.5 teaspoon black pepper, pressing the seasoning into the meat so it adheres well. Let the duck sit at room temperature for 15-20 minutes while your air fryer preheats. This resting time ensures even cooking and helps the skin crisp more uniformly.
Create the Crispy Skin Foundation
Preheat your air fryer to 375°F—this temperature gives you that perfect balance between crispy skin and juicy interior. While it's heating, rub the duck breasts with the 1 tablespoon avocado oil, focusing on the skin side. The oil creates a barrier that promotes browning while keeping the meat moist.
Place the duck breasts skin-side down in the air fryer basket, leaving about ½ inch between each piece for proper air circulation. I've found that using the air fryer's built-in rack (if available) helps prevent the duck from sitting in any potential drippings that could make the skin soggy.
Cook Until Skin is Golden and Crisp
Cook the duck for 12 minutes at 375°F, then carefully flip each breast skin-side up. Here's the thing—don't open the air fryer during cooking. Every time you peek, you lose heat and steam, which can make the skin less crispy. After flipping, cook for another 8-10 minutes until the internal temperature reaches 145°F when measured with an instant-read thermometer.
You'll know it's ready when the skin is deep golden brown and forms a crispy crust that crackles when you touch it gently. The meat should still look pink in the center—this is perfect for duck. If you notice the skin browning too quickly, reduce the temperature to 350°F for the remaining time.
Rest and Finish with Flavor
Transfer the cooked duck to a cutting board and let it rest for 5-10 minutes before slicing. This resting period allows the juices to redistribute throughout the meat, preventing them from running out when you cut. While it rests, minced the 2 cloves garlic, finely chop the 2 sprigs fresh rosemary and 1 sprig fresh thyme, and prepare the 2 tablespoons balsamic glaze for serving.
Slice the duck against the grain into ¼-inch thick pieces. Arrange on plates and drizzle with the balsamic glaze. Garnish with the chopped herbs and serve immediately with the lemon wedges on the side. The contrast of crispy skin, tender pink meat, and bright citrus acid makes every bite unforgettable.
Pro Tips For Making Air Fry Duck
- Preheat Like It’s Hot: Crank that air fryer to 375°F (200°C) and let it scream for 5 minutes—duck needs a screaming start to render fat fast. I learned this the hard way when my first batch came out greasy instead of crispy. Trust me, the extra wait pays off.
- Salt the Night Before: Toss the duck breast in kosher salt and refrigerate uncovered for 12–24 hours. Sounds weird, but it works: the salt breaks down the surface, creating that perfect crust without overpowering the meat. (Yes, even if you’re impatient like me.)
- Watch the Rosemary Placement: Sprinkle fresh rosemary after searing—not before. The heat will kill its flavor if you add it too early. Tuck a few sprigs under the duck in the last 3 minutes so they perfume the meat without burning.
- Flip Once, Then Rest: Flip the duck one time at 12 minutes, then let it ride—no fiddling. After it hits 135°F (63°C), transfer it to a plate, tent loosely with foil, and give it a solid 5–10 minutes under foil. Skipping this step means dry, chewy duck. (Your future self will thank you.)
Flavor customization for this recipe
Sweet & Savory Glaze
Transform your duck into a dessert-worthy main with a honey-soy glaze. Mix 2 tablespoons honey, 1 tablespoon soy sauce, and 1 teaspoon grated ginger in a small saucepan.
Simmer for 3 minutes until slightly thickened, then brush generously over the duck during the last 5 minutes of air frying. The caramelized glaze adds depth and a touch of sweetness that balances the crispy skin beautifully. 🍯
Spicy Orange Zest
For a bold kick, add 1 teaspoon chili flakes and 1 tablespoon orange zest to your seasoning mix. The citrus brightens the duck while the heat cuts through the richness.
I like to sprinkle this blend over the duck right before air frying—it clings perfectly to the skin and infuses flavor as it crisps. Serve with orange slices for extra zing. 🌶️
Herb-Infused Butter
Swap the balsamic glaze for herb-infused butter. Melt 2 tablespoons unsalted butter with 1 minced garlic clove, 1 teaspoon chopped rosemary, and a pinch of salt.
Drizzle this over the sliced duck just before serving—it adds a luxurious, velvety finish that melts into every bite. For extra flair, sprinkle with toasted sesame seeds. 🧈
Smoky Chipotle Rub
Create a smoky depth by mixing 1 teaspoon smoked paprika, ½ teaspoon chipotle powder, and ½ teaspoon garlic powder. Rub this blend onto the duck skin before air frying—it develops a rich, smoky crust that pairs perfectly with the crispy texture.
Serve with a side of avocado slices to cool the heat. 🔥
Garlic & White Wine Sauce
Elevate your dish with a quick garlic-white wine sauce. Sauté 2 minced garlic cloves in 1 tablespoon butter for 1 minute, deglaze with ¼ cup dry white wine, and reduce by half.
Stir in 1 tablespoon heavy cream and season with salt. Pour this silky sauce over sliced duck for a restaurant-worthy finish. 🍷
Citrus & Black Pepper Crust
For a vibrant twist, sprinkle ½ teaspoon freshly cracked black pepper and ½ teaspoon lemon zest onto the duck skin before air frying. The citrus enhances the crispiness while the pepper adds a subtle kick.
Garnish with thin lemon slices for a pop of color and acidity that cuts through the richness. 🍋
Nutrition facts
Frequently asked questions
Can I use bone-in duck legs instead of breasts in the air fryer?
Bone-in legs work beautifully but require 15-20 minutes at 375°F until the skin is crispy and internal temp hits 165°F. Flip halfway through and increase time by 5 minutes for thicker cuts. The bone adds flavor, but watch for overcooking—the meat should stay juicy pink inside.
Why is my duck skin not crispy after air frying?
Most likely, your duck wasn't dry enough or the air fryer wasn't hot enough. Pat the skin completely dry with paper towels and let it rest at room temperature for 30 minutes before cooking. Use 375°F (never below 350°F) and avoid opening the air fryer during cooking. A light oil coating helps too!
How do I reheat leftover air-fried duck without losing crispiness?
Reheat slices in the air fryer at 350°F for just 2-3 minutes until warm—this revives the crispy skin. Never microwave! For extra crunch, sprinkle with a pinch of salt and a light oil mist before reheating. Store leftovers in an airtight container for 3-4 days (though it disappears fast!).
Can I cook frozen duck in the air fryer?
Not recommended—frozen duck won't crisp properly and risks uneven cooking. Thaw overnight in the fridge first. If absolutely necessary, pat dry thoroughly and increase cooking time by 50%, checking frequently. The skin won't be as crispy as with fresh, room-temperature duck.