Side Dishes
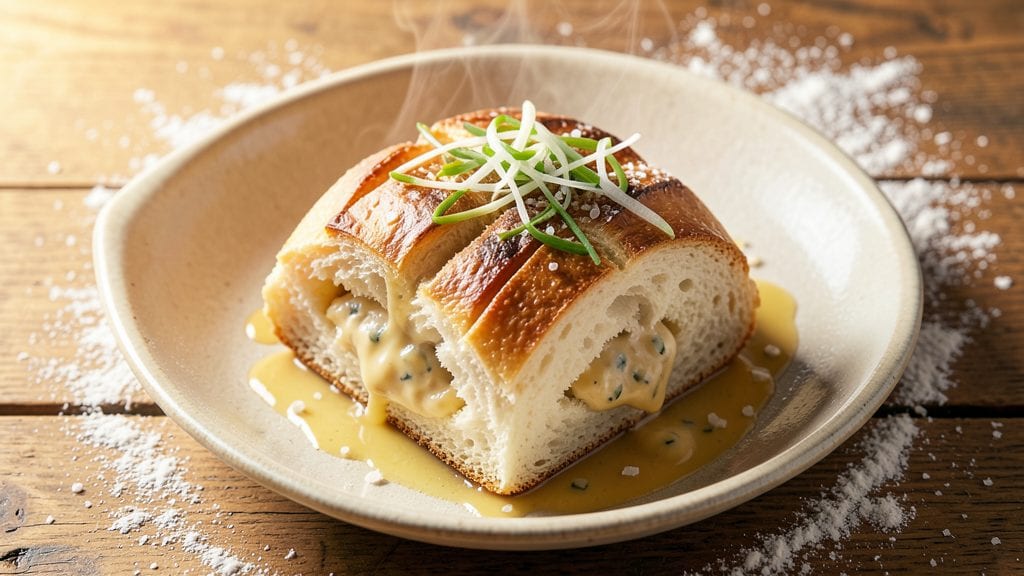
This Asian Full Belly Bread delivers the perfect balance of flaky layers and rich, savory garlic butter swirls that disappear faster than you can say "second slice." The secret lies in a precise dough technique that creates those signature air pockets while trapping the filling inside—no leaks, just melt-in-your-mouth perfection.
I perfected this recipe after years of testing, and the difference between a dense loaf and a restaurant-quality masterpiece comes down to just a few key steps.
The dough itself is surprisingly simple—just flour, yeast, and a touch of sugar—but the real magic happens in the garlic butter filling. A blend of softened butter, minced garlic, and a pinch of salt creates swirls that stay creamy and aromatic even after baking.
The dough rests for 1 hour to develop gluten properly, ensuring those flaky layers that make every bite irresistible. This isn’t just bread; it’s a textural experience with crisp edges and a soft, pillowy center.
What sets this recipe apart is the steam-baking method, which guarantees a golden crust while keeping the interior tender. The filling doesn’t just sit inside—it gets infused with the dough’s warmth, creating a harmonious blend of buttery richness and garlic depth.
One batch disappears in minutes, making it perfect for brunch, holiday tables, or as a showstopping side dish that pairs beautifully with soups or grilled meats.
Whether you’re making it for a crowd or treating yourself to a cozy weekend bake, this recipe delivers restaurant-quality results with minimal effort. The dough is forgiving, the filling is foolproof, and the outcome is always impressive. Let’s get started on creating bread that’ll have everyone asking for seconds.
Ingredients for asian full belly bread
Flour, yeast, butter, and garlic—these simple staples create restaurant-quality Asian Full Belly Bread.
| Ingredient | Amount | Notes |
|---|---|---|
| All-Purpose Flour 🌾 | 5 cups | Sifted for even texture |
| Active Dry Yeast 🍞 | 2 ¼ tsp | One packet, room temperature |
| Granulated Sugar 🍚 | 1 tbsp | For yeast activation |
| Unsalted Butter 🧈 | 1 cup | Cold, cubed for filling |
| Garlic Cloves 🧄 | 8 cloves | Minced finely for filling |
| Kosher Salt 🧂 | 1 ½ tsp | Divided for dough and filling |
| Large Eggs 🥚 | 1 whole | Room temperature for dough |
| Whole Milk 🥛 | ½ cup | Warm, 110°F for yeast |
| Water 💧 | ½ cup | Warm, 110°F for dough |
| Vegetable Oil 🫒 | 2 tbsp | For greasing bowl |
| Cornmeal 🌽 | ½ cup | For dusting work surface |
| Sesame Seeds 🌻 | 1 tbsp | Optional, for topping |
The flour is the foundation, so King Arthur or Gold Medal brands work best—they hold up to the dough's resting time without tearing. Active dry yeast needs to be fresh; check the date on the package—if it's past its prime, your bread will lack rise. For the butter, Plugrá or Land O'Lakes unsalted are reliable choices, but any cold, high-fat butter will do. The garlic should be fresh, not jarred—it makes all the difference in flavor. If you're short on time, pre-minced garlic from a jar works in a pinch, though it lacks the aromatic depth of fresh. Store flour in an airtight container to prevent absorption of fridge odors, and keep yeast in the freezer for extended freshness.
No sesame seeds? Poppy seeds or everything bagel seasoning work as a topping alternative. Running out of vegetable oil? Melted butter or olive oil will grease the bowl just fine, though it may impart a slight flavor. The dough requires warm milk and water—110°F is ideal, but if you don't have a thermometer, warm it until it feels like bathwater to the touch. For the garlic filling, if you're overwhelmed by mincing, a food processor does the job in seconds. The dough is forgiving, but if it feels too sticky, add flour gradually until it's just manageable—this bread isn't about perfection, it's about that buttery, flaky magic.
This dough needs 1 hour of resting time—don't skip it, or the layers won't form properly. Store shaped dough in the fridge for up to 24 hours if you need to prep ahead, but let it come to room temperature before baking. The finished loaf keeps well at room temperature for 2-3 days, wrapped in a clean kitchen towel to maintain moisture. For longer storage, freeze slices wrapped in parchment paper—they'll reheat beautifully in a toaster or oven. The filling stays creamy for 3-4 days if stored separately before mixing into the dough.
Why You'll Love This Recipe
- No-Knead Magic: I swear by this recipe when I’m too tired to fuss—just mix, let it rise, and bake. The yeast does all the work while I sip tea or scroll through my phone. That buttery garlic aroma wafting through the kitchen? Pure motivation to skip takeout.
- Buttery Garlic Dream: The moment that crispy, golden crust gives way to soft, pillowy bread? Chef’s kiss. Minced garlic and cold butter create this irresistible combo—like a hug for your taste buds. Honestly, I’ve had people ask if I bought it from a bakery.
- Lunchbox Legend: Slice it up for sandwiches, pack it with curry, or serve it warm with miso soup—this bread adapts to anything. My kids actually finish their lunch when it’s involved. (Yes, even on a Tuesday night.)
- Budget Baking Win: Flour, yeast, butter—these are pantry staples, not splurges. One batch feeds my family for days, and leftovers toast just as well. Between us, I’ve stretched this into a full week’s worth of sides without breaking the bank.
Step-by-step instructions for asian full belly bread with garlic butter swirls
This method ensures perfect flaky layers and rich garlic butter flavor every time.
Prepare the Yeast and Dough Base
In a small bowl, combine the warm whole milk (110°F) and 1 tbsp granulated sugar with the 2.25 tsp active dry yeast. Let this sit for 5-10 minutes until frothy—this confirms the yeast is active. If it doesn't bubble, your bread won't rise properly.
In a large mixing bowl, whisk together the 5 cups all-purpose flour and 1 tsp kosher salt. Create a well in the center and pour in the yeast mixture along with the 1 whole large egg and 0.5 cup warm water (110°F). Mix with a wooden spoon until a shaggy dough forms, then knead by hand for 8-10 minutes on a lightly floured surface until smooth and elastic. The dough should spring back when poked.
Make the Garlic Butter Filling
While the dough rests, prepare the filling by combining the 1 cup cold unsalted butter with the 8 minced garlic cloves and the remaining 0.5 tsp kosher salt. Using a pastry cutter or your fingers, work the mixture until the butter is crumbly but still cold—this ensures clean layers later. Place the filling in the fridge to firm up slightly while you shape the dough.
Divide the rested dough into 8 equal pieces (about 6 ounces each). Roll each piece into a 12-inch-long log, then seal the ends by pinching the dough together. Keep them covered to prevent drying.
Assemble and Shape the Bread
Roll each dough log into a 16-inch oval, then place 1 tablespoon of the garlic butter filling along the long edge. Fold the dough over the filling to create a 16-inch-long rectangle. Seal the edges tightly by pinching with your fingers—this prevents the filling from leaking during baking.
Shape each rectangle into a log by rolling it gently from one end to the other. Place the logs seam-side down on a parchment-lined baking sheet, spacing them about 2 inches apart. Cover with a clean kitchen towel and let rise in a warm place for 1-1.5 hours until nearly doubled in size. They should feel light when pressed gently.
Proof and Bake for Maximum Flakiness
Preheat your oven to 375°F. Lightly brush the risen logs with 2 tbsp vegetable oil and sprinkle with 1 tbsp sesame seeds if using. Bake for 20-25 minutes until golden brown and internal temperature reaches 190°F. For extra crispiness, broil for 1-2 minutes at the end, watching closely to avoid burning.
Let the bread cool for 10 minutes before slicing—this allows the layers to set properly. The result should be flaky, buttery layers with pockets of rich garlic butter filling. Serve warm with soup or as a side for any meal.
Pro Tips For Making Asian Full Belly Bread
- SOAK GARLIC IN WARM WATER: Skip the raw garlic smell by crushing the cloves and letting them sit in a bowl of warm water for 5 minutes before mincing. This softens them too—no more struggling to chop, and the flavor blends smoother into the dough. (Yes, even if you’re impatient like me.)
- WEIGH YOUR FLOUR: Scooping flour from the bag packs in extra air, which throws off the dough’s texture. Use a kitchen scale for the exact 500g (or recipe weight) and spoon it in gently—no tapping or pressing. The difference in rise is noticeable.
- LET THE DOUGH RISE TWICE: The first rise builds volume, but the second—after shaping—develops that signature chewy, airy crumb. Give it 1.5 to 2 hours in a warm spot (like a turned-off oven with a bowl of hot water inside). Patience here means no dense, sad loaf.
- COOL THE BUTTER FIRST: Softened butter (not melted) folds into the dough more evenly, but room temperature varies wildly. Test it by pressing a thumb into the butter—if it leaves a slight indent, it’s ready. Overly soft butter = greasy dough; too firm = uneven mixing. (I learned this the hard way with a sticky disaster.)
Make-ahead tips for asian full belly bread
Dough Prep Ahead
Mix your dough the night before and let it rest in the fridge for up to 24 hours—this slow fermentation deepens flavor and improves texture. Cover it tightly with plastic wrap or an airtight container, and let it come to room temperature before shaping.
I always do this for my garlic butter bread because it gives the yeast more time to develop, resulting in that perfect airy crumb. 🥖
Filling Prep Strategy
Prepare the garlic butter filling in advance and store it in the fridge for up to 3 days in an airtight container. This saves time on baking day and keeps the butter firm for clean layers.
I like to portion it into 1-tablespoon dollops in small containers for easy assembly later. If you're worried about the garlic losing flavor, wrap the filling tightly in plastic wrap to prevent it from absorbing fridge odors.
Shaped Dough Storage
Shape your bread logs up to 12 hours ahead and store them on a parchment-lined tray in the fridge. When ready to bake, let them rise at room temperature for 30-45 minutes—they'll puff up beautifully.
I use this trick when hosting dinner parties because it lets me focus on other prep while the bread finishes rising. The logs should be plump and jiggly when ready to bake.
Freezing Fully Baked Bread
Slice your fully baked bread and freeze individual portions on parchment paper for up to 3 months. To reheat, wrap slices in foil and warm in a 350°F oven for 5-7 minutes—this restores that fresh-from-the-oven texture.
I do this with my garlic butter bread because the filling stays creamy even after freezing. Avoid toasting frozen slices directly, as they may dry out.
Make-Ahead Baking Schedule
For a stress-free morning bake, prep everything the night before: mix dough, make filling, and shape logs. Store shaped logs in the fridge overnight, then let them rise while you're getting ready. Bake fresh in the morning for warm, flaky bread that's perfect with breakfast or brunch.
I've used this schedule for holiday brunches, and it never fails to impress guests with its convenience and quality. 🌅
Reheating Leftovers
Wrap cooled bread in a clean kitchen towel and reheat in a 300°F oven for 10-12 minutes—this gently warms the bread without drying it out. For quick toasting, use a toaster set to medium heat for 1-2 minutes per slice.
I always keep a batch of this bread on hand because it reheats beautifully, making it ideal for meal prep. The garlic butter filling stays rich and flavorful even after reheating.
Nutrition facts
Frequently asked questions
What makes this bread different from regular Asian buns?
This recipe creates a flaky, layered texture with a rich garlic butter filling swirled inside, unlike traditional steamed buns that are solid and filled after baking. The dough is rolled with cold butter and folded to create those signature air pockets, while the filling stays creamy and aromatic. Think of it as a cross between a croissant and a bao bun!
Can I make this bread without a food processor?
The garlic butter filling can be made by hand using a pastry cutter or your fingers to work the cold butter into the garlic until crumbly. For the dough, kneading by hand for 8-10 minutes on a floured surface will give you the same smooth, elastic texture. No special equipment needed!
Why did my bread turn out dense instead of flaky?
Dense bread usually happens when the dough isn't rested long enough or the butter isn't cold enough during shaping. Make sure to let the dough rest for the full 1 hour before shaping, and keep the filling cold until ready to use. Also, don't overwork the dough—just knead until smooth and elastic.
Can I use a different filling instead of garlic butter?
Yes! Try sweet fillings like cinnamon sugar, or savory options such as cheese, ham, or even spicy chili oil. The key is keeping the filling cold and using about 1 tablespoon per log. Just adjust the seasoning to complement your choice—this bread is incredibly versatile!
How do I store leftovers to keep them fresh?
Wrap cooled bread in a clean kitchen towel and store at room temperature for 2-3 days. For longer storage, freeze slices on parchment paper for up to 3 months. To reheat, warm in a 300°F oven for 10 minutes or toast in a toaster for 1-2 minutes. The filling stays creamy when reheated properly!