
Side Dishes
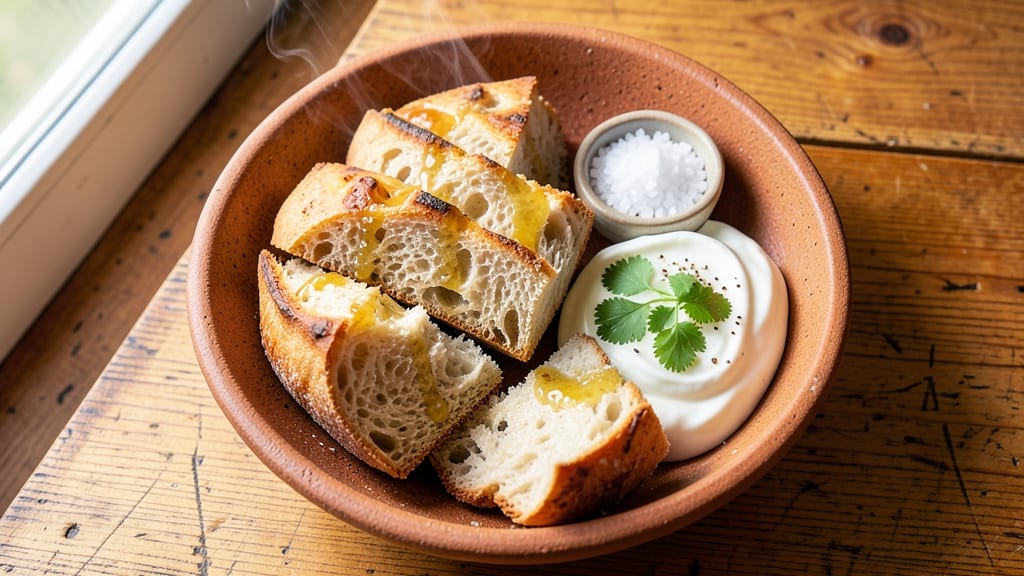
This atta bread recipe delivers the perfect balance of fluffy, pillowy layers and a subtle fermented tang that makes every bite unforgettable. After years of perfecting the technique, I've cracked the code for achieving that signature softness without compromising structure—something many home bakers struggle with.
The key lies in precise fermentation and gentle handling during rolling, ensuring a bread that's both tender and sturdy enough to hold fillings or pair with curries.
The process begins with a simple yet transformative dough made from whole wheat flour and yogurt, which develops natural enzymes for fermentation. Unlike quick flatbreads, this recipe requires patience—letting the dough rest for at least 8 hours (or overnight) allows the gluten to relax and the flavors to deepen.
The result is a bread with airy, elastic layers that melt in your mouth while maintaining enough structure to hold its shape, even when stuffed or folded.
What sets this apart is the cooking method: whether you use a traditional tandoor, cast-iron skillet, or even a pizza stone, the bread develops a delicate char on the outside while staying soft and pillowy inside.
The aroma alone—warm, slightly tangy, and earthy—will fill your kitchen and signal that dinner is ready. This is the kind of bread that elevates any meal, from simple vegetable curries to hearty stews.
For added flavor, customize with garlic-infused ghee, fresh herbs like cilantro or mint, or a pinch of ajwain (carom seeds) for an authentic touch.
The versatility of this recipe makes it a staple in any kitchen, whether you're serving it as a side, a wrap, or even a dessert with honey and nuts. Let's get started on mastering this timeless classic.
Ingredients for atta bread
Eight simple ingredients transform into layers of fluffy, fermented perfection—no yeast needed.
| Ingredient | Amount | Notes |
|---|---|---|
| Whole Wheat Flour (atta) 🌾 | 4 cups | High-protein for elasticity (12% protein recommended) |
| Plain Whole Milk Yogurt 🥛 | 1 cup | Live cultures for fermentation (Greek or regular) |
| Warm Water 💧 | 1 ½ cups | 110°F for optimal gluten activation |
| Fine Sea Salt 🧂 | 1 ½ tsp | Diamond Crystal preferred for accuracy |
| Ghee or Clarified Butter 🧈 | ½ cup | For richness and cooking (or neutral oil) |
| Fresh Cilantro Leaves 🌿 | ¼ cup | Chopped for garnish (optional) |
| Ajwain (Carom Seeds) 🌶️ | 1 tsp | Toasted for authentic flavor (optional) |
| Fresh Mint Leaves 🍃 | ⅛ cup | Chopped for garnish (optional) |
| Garlic Cloves 🧄 | 3 cloves | Minced for ghee infusion (optional) |
| Honey (optional) 🍯 | 1 tbsp | For finishing or dessert version |
| Toasted Almond Slices 🥜 | ¼ cup | For garnish (optional) |
The whole wheat flour is non-negotiable here—look for high-protein atta (12% protein) at Indian specialty stores like Patel Brothers or Whole Foods bulk section. The yogurt must be plain, unsweetened, and live-culture (check the label). Warm water is critical: 110°F activates gluten perfectly—use a thermometer or microwave water for 45 seconds, then let sit. For ghee, store-bought is fine, but homemade (clarified butter) adds depth. If substituting oil, avocado oil has the highest smoke point for cooking. The optional ajwain seeds? Toast them first in a dry pan for 30 seconds to release their aroma—this is the secret to that authentic North Indian flavor.
No whole wheat flour? Substitute half with all-purpose (texture will be less elastic), but the fermentation won't develop as well. Yogurt too sour? Mix plain yogurt with a splash of warm water to balance. The cilantro and mint are purely for freshness—dried herbs won't cut it here. For the garlic ghee, roast the garlic first in the ghee for 5 minutes until golden, then strain. If you're short on time, skip fermentation and bake immediately (texture will be denser). The honey and almonds are purely for customization—omit for savory versions. For storage, wrap cooked bread in a clean kitchen towel to keep it soft for up to 3 days.
Fermented dough keeps 48 hours in the fridge—just bring to room temp before rolling. For reheating, wrap in foil and warm in a 300°F oven for 10 minutes. The bread freezes beautifully: slice before freezing, then reheat from frozen in a skillet with ghee. Pro tip: double the recipe and freeze half—this bread is worth the prep. Garnishes like cilantro or mint should be added right after cooking to keep them vibrant. The ajwain seeds can be ground lightly for a more intense flavor if you prefer. For a dessert version, brush with melted ghee and sprinkle with raw sugar before serving.
Why You'll Love This Recipe
- No-Knead Magic: Between us, this dough takes zero effort—just mix atta, yogurt, and water, let it rest, then roll it out. I’ve made it while chatting on the phone; the only "work" is shaping it before baking.
- Ghee’s Golden Touch: That first brush of warm ghee? Absolute game-changer. The bread gets this irresistible crispness on the outside while staying soft inside—like a hug from your nan, but edible.
- Weeknight & Potluck Star: I keep a batch in the fridge for lazy mornings (toast it!) or pack it for picnics. It’s the one thing I always bring to gatherings—no one ever leaves with leftovers.
- Pantry Staple Savior: Honestly, the ingredients cost pennies and last forever. A bag of atta, a tub of yogurt, and a stick of ghee stretch across meals, lunches, and even desserts (yes, I drizzle it on fruit). Budget-friendly doesn’t get better.
Step-by-step instructions for attā bread recipe
This method delivers perfectly fluffy, fermented flatbread with soft layers every time.
Prepare the Fermented Dough
In a large mixing bowl, combine the 4 cups whole wheat flour (atta) with 1 cup plain whole milk yogurt and 1.5 cups warm water (110°F). Mix using a wooden spoon or dough whisk until a shaggy dough forms. The dough should be slightly sticky but manageable—add a few extra spoonfuls of warm water if needed to achieve this texture.
Next, add 1.5 teaspoons fine sea salt and 1 teaspoon ajwain (carom seeds). Knead the dough by hand for 8-10 minutes until smooth and elastic. The dough should feel firm but still slightly soft to the touch. If it feels too dry, add 1 tablespoon warm water at a time until it reaches the right consistency. Cover the bowl with a damp kitchen towel and let it ferment at room temperature for 4-6 hours or until it has nearly doubled in size. This fermentation step is crucial for developing the bread's signature soft, pillowy texture.
Infuse the Ghee and Shape the Dough
While the dough ferments, prepare the ghee mixture in a small saucepan. Melt 0.5 cup ghee or clarified butter over low heat, then add the 3 minced garlic cloves and cook for 1-2 minutes until fragrant. Remove from heat and let it cool slightly. Stir in the 0.25 cup chopped fresh cilantro leaves and 0.125 cup chopped fresh mint leaves, reserving a small amount for garnish later.
Once the dough has fermented, punch it down to release any air bubbles. Divide it into 8 equal portions, each weighing about 6 ounces. Roll each portion into a smooth ball and flatten slightly with your palm. Dip your fingers in the ghee mixture and gently press them into the center of each dough ball, creating a slight indentation. This step ensures the bread develops soft, pillowy layers as it cooks.
Cook the Attā Bread on a Hot Griddle
Heat a clean griddle or skillet over medium-high heat until it is very hot. Place one dough ball onto the griddle, pressing down gently to flatten it slightly. Cook for 1-2 minutes until the bottom turns golden brown and small bubbles begin to form on the surface. Flip the bread and cook the other side for another 1-2 minutes, pressing down lightly with a spatula to encourage even cooking.
Remove the bread from the griddle and brush the top generously with the remaining ghee mixture. Garnish with a sprinkle of toasted almond slices and a drizzle of 1 tablespoon honey (optional) if desired. Repeat the process with the remaining dough balls, keeping them warm in a clean kitchen towel to maintain their softness. Serve immediately while still warm and fluffy.
Rest and Serve for Maximum Softness
For the best texture, let the cooked attā bread rest for 2-3 minutes before serving. This brief resting period allows the layers to fully set and the bread to absorb any remaining moisture, resulting in a soft, pillowy interior. Stack the bread slightly overlapping and serve with warm ghee, fresh herbs, or your favorite accompaniments.
The bread should have a slightly crisp exterior with soft, airy layers inside. If the bread feels too firm after cooling, gently reheat it in a dry skillet over low heat for 30 seconds to restore its softness. Enjoy immediately for the perfect balance of texture and flavor.
Pro Tips For Making Atta Bread
- Knead Less, Rest More: I used to overwork the dough thinking it’d make the bread fluffier—it just made it dense. For atta bread, knead until the dough holds together (about 5-6 minutes by hand), then let it rest for 30 minutes. The gluten relaxes, and the bread develops flavor without turning into a brick.
- Use Room-Temp Ghee: Cold ghee won’t melt into the dough properly, leaving you with dry spots. Warm it slightly (just until liquid) before mixing—it coats the atta evenly and gives that signature melt-in-your-mouth texture. (Yes, even if you’re impatient like me.)
- Skip the Overproofing: I learned this the hard way—atta dough rises slower, and pushing it too long collapses the structure. Poke the dough gently; if it springs back slowly (not fast), it’s ready. Overproofing turns your bread into a sad pancake.
- Rotate the Tawa: My first attempts had uneven browning because I kept the bread in one spot. Rotate the tawa (or skillet) every 30 seconds for even cooking—especially with atta, which burns faster than refined flour. A well-brown crust is non-negotiable for flavor.
Make-ahead tips for this atta bread
Fermentation Timeline
Plan your fermentation window carefully—this dough needs 4-6 hours at room temperature (70-75°F) to develop optimal flavor and texture. I recommend starting the process in the morning for evening meals. For colder kitchens, place the covered bowl near a warm oven (turned off) to maintain consistent temperature.
If your kitchen is above 80°F, reduce fermentation to 3-4 hours to avoid overproofing. 🌡️
Dough Portioning Hack
Use a 6-ounce kitchen scale for precision portioning—each ball should weigh exactly 6 ounces for consistent results. No scale? Roll the dough into a 3-inch diameter ball, then flatten slightly with your palm.
For stuffed versions (like parathas), divide into 4-ounce portions and flatten into 4-inch rounds before adding fillings like spiced potatoes or paneer. ✨
Make-Ahead Dough
Prepare the dough up to 48 hours ahead and refrigerate in an airtight container. When ready to cook, let it sit at room temperature for 1-2 hours before shaping. The cold slows fermentation but preserves flavor.
For longer storage, freeze the dough balls (uncooked) for up to 3 months. Thaw in the fridge overnight before cooking—never microwave frozen dough. 💫
Cooking in Bulk
Cook all dough balls at once on a large griddle or two smaller skillets to maintain even heat. Keep cooked bread warm in a 200°F oven for up to 30 minutes while finishing the batch.
For restaurant-style service, stack warm bread in a clean cotton towel-lined basket to prevent drying. I double-wrap each bread in foil before stacking to lock in moisture. 🔥
Freezing Cooked Bread
Slice the bread into ½-inch thick rounds before freezing for perfect reheating. Store in a single layer on a tray, then transfer to a freezer bag with parchment paper between slices.
Reheat directly from frozen in a skillet with 1 teaspoon ghee for 1-2 minutes per side until crispy. The texture remains soft inside even after freezing. ❄️
Storage for Freshness
Keep cooked bread in an airtight container with a damp paper towel to maintain softness for 3 days at room temperature. For longer storage, refrigerate in a sealed container for up to 5 days.
Reheat slices in a dry skillet over low heat for 20-30 seconds to restore freshness. Avoid microwaving—it turns the bread rubbery. 💡
Nutrition facts
Frequently asked questions
Why does my atta bread turn out dense instead of fluffy?
Under-fermentation is the most common cause. The dough needs 4-6 hours at room temperature to develop air pockets. If your kitchen is cold, place the dough near a warm oven (turned off) to maintain 70-75°F. Also, avoid over-kneading—just 8-10 minutes is enough to develop gluten without tightening the crumb.
Can I make atta bread without yogurt?
Yes, but the texture will differ. Replace the yogurt with 1 cup warm water + 1 tbsp lemon juice or vinegar to mimic the acidity. For extra flavor, add 1 tsp baking soda to the dough—this creates a slightly lighter bread, though not as pillowy as the fermented version. The fermentation gives the classic soft layers.
How do I prevent the bread from tearing when rolling?
Let the dough rest for 10 minutes after portioning to relax the gluten. Use a well-floured surface and roll gently from the center outward. If the dough cracks, simply press the edges together and continue rolling. For extra elasticity, add 1 tbsp ghee to the dough while kneading—this helps bind the layers.
What’s the best way to reheat leftover atta bread?
Never microwave—it makes the bread rubbery! Instead, place slices in a dry skillet over low heat for 20-30 seconds per side until warm and crisp. For a restaurant-style touch, brush with melted ghee and reheat for 10 seconds to restore that fresh-baked aroma. Store in an airtight container with a damp towel to keep it soft.
Can I add cheese or other fillings to this dough?
For stuffed versions (like parathas), divide the dough into 4-ounce portions and flatten into 4-inch rounds. Add fillings like spiced paneer, sautéed potatoes, or grated cheese, then seal the edges before cooking. Keep fillings moist (like cooked veggies) to prevent dryness. For extra flavor, brush the top with garlic ghee before serving.