
Main Courses
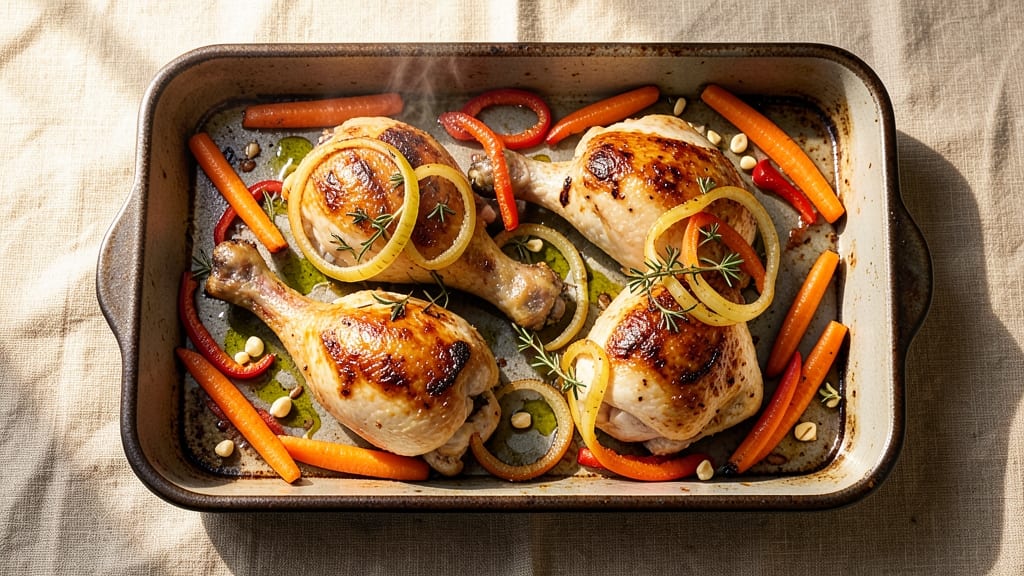
This baked chicken legs with vegetables recipe delivers perfectly juicy meat and caramelized veggies in one pan—no fuss, no mess, just restaurant-quality results. The key lies in a simple marinade that keeps the chicken moist while high-heat roasting transforms tough vegetables into sweet, tender bites.
I’ve perfected this method over years of testing, and it never fails to impress even skeptical eaters.
The beauty of this one-pan approach is its simplicity: just chicken thighs, seasonal vegetables, olive oil, and a few pantry staples. The chicken develops a golden, crispy skin while staying tender inside, and the vegetables roast until their edges caramelize into sweet perfection.
No flipping, no basting—just set the oven and let it work its magic for about 45 minutes.
What you’ll end up with is a plate of juicy, flavorful chicken paired with vibrant, caramelized vegetables—all ready in one pan. The aromas alone will have everyone gathering around the table, and the clean-up is minimal.
This is the kind of meal that transforms an ordinary weeknight into something special without requiring advanced skills or hours in the kitchen.
Serve with a squeeze of lemon or a sprinkle of fresh herbs for extra brightness, and you’ve got a complete dinner that’s hearty enough for a family meal but simple enough for a weeknight. Let’s get started with this foolproof one-pan roast.
Ingredients for baked chicken legs with vegetables
Four juicy chicken legs and seasonal veggies—this one-pan roast delivers restaurant-quality flavor with zero fuss.
| Ingredient | Amount | Notes |
|---|---|---|
| Chicken Legs 🍗 | 4 whole | Bone-in, skin-on for crispiness |
| Baby Carrots 🥕 | 1 ½ lbs | Whole or halved lengthwise |
| Red Bell Pepper 🌶️ | 1 whole | Cut into 1-inch chunks |
| Yellow Onion 🧅 | 1 whole | Cut into wedges |
| Extra-Virgin Olive Oil 🫒 | ¼ cup | High-quality, fruity variety |
| Garlic Cloves 🧄 | 4 cloves | Minced for marinade |
| Dried Thyme 🌿 | 1 tbsp | Or 1 tbsp fresh thyme |
| Dried Rosemary 🌿 | 1 tsp | Crushed between fingers |
| Diamond Crystal Kosher Salt 🧂 | 1 ½ tsp | For seasoning and marinade |
| Ground Black Pepper 🌶️ | ½ tsp | Freshly ground preferred |
| Fresh Lemon Juice 🍋 | 2 tbsp | Freshly squeezed |
| Fresh Parsley 🌿 | ¼ cup | Chopped for garnish |
The chicken legs are the star here, so bone-in, skin-on is non-negotiable for that crispy, golden skin. I grab mine from the butcher counter—they’re usually cheaper there than pre-packaged. Look for legs with a good amount of fat marbling around the thigh; that’s what keeps them juicy. For the vegetables, baby carrots and red bell peppers work perfectly, but swap in whatever’s in season—zucchini, Brussels sprouts, or even potatoes all roast beautifully. The key is cutting them evenly so they cook at the same rate as the chicken.
No fresh thyme? Dried works at the same amount, but fresh has that bright, floral punch. Running low on olive oil? Avocado oil is a great substitute—it’s neutral in flavor and handles high heat well. The lemon juice is worth squeezing fresh (trust me, it makes a difference), but if you’re in a pinch, bottled lemon juice will do. For the herbs, parsley is just for garnish, but if you want to add more flavor, toss in a sprig or two of fresh rosemary with the chicken before roasting. The salt is where flavor really builds—don’t skimp, but don’t overdo it either.
This dish reheats beautifully—just pop it in the oven at 350°F for 10-15 minutes to revive that crispy skin. The veggies and chicken keep well in the fridge for 3-4 days, but honestly, it’s even better the next day once everything has time to meld. For meal prep, I portion the chicken and veggies into separate containers so they stay fresh longer. The marinade? Use it up within 3 days for best flavor, or store it in the fridge for up to 1 week.
Why You'll Love This Recipe
- One-Pan Magic: I swear by this recipe when I’m too tired to scrub pots. Toss everything—chicken, carrots, peppers, onion—on a sheet pan, drizzle with olive oil, and let the oven do the work. No chopping boards to clean, no pans to wash.
- Meal Prep MVP: Make a double batch on Sunday, and you’ve got lunch or dinner covered for days. The flavors only get better as the chicken rests, and the veggies stay fresh longer than most salads. My kids grab these for school lunches—no complaints, just empty containers.
- Budget-Friendly Feast: Chicken legs stretch further than breasts, and the veggies are cheap but pack a punch. A single pan of this feeds four for under $10, and the leftovers reheat like a dream. Between us, it’s my go-to when I need to feed a crowd without breaking the bank.
Step-by-step instructions for baked chicken legs with vegetables
Here's how to nail perfectly juicy chicken legs with caramelized vegetables in one pan.
Prep the Chicken and Vegetables for Maximum Flavor
Start by patting the 4 whole chicken legs completely dry with paper towels—this ensures crispy skin later. In a small bowl, mix the 0.25 cup extra-virgin olive oil with the 2 tbsp fresh lemon juice, 4 cloves minced garlic, 1 tbsp dried thyme, 1 tsp crushed dried rosemary, 1.5 tsp diamond crystal kosher salt, and 0.5 tsp ground black pepper. This marinade works wonders while you prep the vegetables.
Cut the 1 whole red bell pepper into 1-inch chunks and the 1 whole yellow onion into wedges. Halve the 1.5 lbs baby carrots lengthwise if they're particularly large. Toss everything in a large bowl with the marinade, making sure the chicken legs are thoroughly coated. Let it sit at room temperature for 15 minutes while you get your pan ready.
Arrange the Chicken and Vegetables on the Roasting Pan
Preheat your oven to 425°F. Line a large rimmed baking sheet with aluminum foil for easy cleanup. Arrange the chicken legs skin-side up in a single layer, leaving space between each piece. Distribute the vegetables around and between the chicken, creating a single layer that touches the pan in spots for better caramelization.
This arrangement allows the chicken to cook evenly while the vegetables roast directly underneath. The vegetables will absorb the chicken's juices and develop deep, concentrated flavors. Don't overcrowd the pan—this prevents proper browning and moisture circulation.
Roast Until Juicy and Caramelized
Place the baking sheet in the preheated oven and roast for 45 minutes. After this initial period, flip the chicken legs skin-side up and sprinkle any accumulated juices from the pan over the vegetables. This basting technique ensures maximum moisture retention in the chicken and adds flavor to the vegetables.
Continue roasting for another 20-25 minutes, or until the chicken legs reach an internal temperature of 165°F and the skin is deep golden brown. The vegetables should be tender with caramelized edges. You'll know they're done when the carrots pierce easily with a fork and the onions are soft and slightly charred.
Rest and Garnish for Perfect Presentation
Remove the baking sheet from the oven and let everything rest for 5 minutes. This resting period allows the juices to redistribute throughout the chicken legs, preventing them from drying out when you cut into them. It also lets the vegetables finish steaming slightly, making them even more tender.
While the chicken rests, stir the vegetables gently and sprinkle with the 0.25 cup chopped fresh parsley. The parsley adds a bright, fresh contrast to the rich, caramelized flavors. Serve immediately with the chicken legs arranged on top of the vegetables, spooning any accumulated juices from the pan over everything for maximum flavor in every bite.
Pro Tips For Making Baked Chicken Legs With Vegetables
- Preheat Like a Pro: Crank your oven to 425°F (220°C) and let it scream for 15 full minutes before adding anything. I used to skip this, and my chicken legs always came out damp instead of golden—hot oven = crispy skin, every time.
- Trim the Fat, Not the Flavor: Pat those chicken legs bone-dry with paper towels, then scrape off just the thickest patches of skin fat (not all—some renders flavor). The rest will melt into crispy magic; you’re just cutting down on grease splatter.
- Stack Veggies Strategically: Tuck onion quarters and bell pepper halves under the chicken legs in the pan—this keeps them from getting lost in the shadow of the meat. Baby carrots? Toss them in a single layer on top so they roast evenly without steaming.
- Rotate Once, Ignore Twice: After 20 minutes, flip the chicken and stir the veggies once. Then leave it alone—peeking or poking just lets heat escape. The chicken’s internal temp will hit 165°F (74°C) without your interference.
Essential equipment for this dish
Roasting Pan Essentials
You’ll need a large rimmed baking sheet—I recommend a half-sheet pan (13x18 inches) for even heat distribution. Look for one with high edges to prevent spills, like the Chicago Metallic Commercial Half Pan.
Avoid nonstick pans for roasting—they can’t handle the high heat needed for caramelization. If you’re on a budget, a heavy-duty aluminum foil-lined rimmed sheet pan works just as well. 🔥
Thermometer for Precision
An instant-read meat thermometer is non-negotiable for perfect chicken. I swear by the Thermoworks Smoke—it’s accurate, durable, and reads temps in seconds. Insert the probe into the thickest part of the chicken thigh (avoid the bone) to check for 165°F internal temperature.
Without one, you risk overcooking or undercooking. For veggies, a fork test works: they’re done when tender and slightly charred.
High-Quality Olive Oil
Use extra-virgin olive oil with a low smoke point (like California Olive Ranch) for roasting—it enhances flavor without burning. Avoid "light" or refined oils; they lack the fruity depth needed for caramelization.
A small squeeze bottle (like OXO Good Grips) makes marinade application easier. For extra crispiness, brush the chicken skin with a light coat of oil before roasting.
Foil and Parchment
Line your pan with heavy-duty aluminum foil (like Reynolds Wrap) for easy cleanup, but leave the edges uncovered to allow airflow. If you prefer parchment, use half-sheet parchment (12x17 inches) from Amazon Basics—it’s sturdy enough for high-heat roasting.
For extra crispy veggies, place them directly on the pan (no foil) for 10 minutes before adding chicken. ✨
Tongs for Flipping
Invest in long-handled tongs (like OXO Good Grips) to flip chicken legs safely without burning yourself. Avoid forks—they pierce the skin, releasing juices and ruining crispiness. For basting, use a small silicone brush (like Silicomart) to spread pan juices over veggies mid-roast.
A baster bottle (like OXO Good Grips) works too, but tongs are my go-to for flipping.
Nutrition facts
Frequently asked questions
Can I use boneless chicken thighs instead of bone-in legs?
You can substitute boneless thighs, but the cooking time will be shorter—about 25-30 minutes total at 425°F. Boneless thighs cook faster and won’t develop the same crispy skin as bone-in legs. For best results, pat them extra dry and increase the olive oil by 1 tablespoon to compensate for lost moisture.
What vegetables work best for this recipe?
This method works beautifully with hearty vegetables like Brussels sprouts, sweet potatoes, or asparagus. For maximum caramelization, choose firm veggies that hold up well to high heat. Potatoes take longer—add them 10 minutes before the chicken is done. Avoid delicate greens like spinach or lettuce; they’ll wilt too quickly.
Why did my chicken turn out dry?
Overcooking is the most common cause—chicken is done at 165°F, but it continues cooking while resting. Use a meat thermometer and remove it 2-3°F early. Another culprit? Skipping the rest time or cutting into the chicken too soon. Always let it rest 5 minutes before serving to lock in juices.
Can I make this recipe ahead of time?
The flavors actually improve overnight. Store components separately in the fridge for up to 3 days. Reheat the chicken and veggies together at 350°F for 10-15 minutes, covered loosely with foil. For extra crispiness, broil for 2-3 minutes at the end. The skin will crisp up beautifully when reheated properly.
How do I adjust this for a slow cooker?
This recipe isn't ideal for slow cooking—high heat is key for crispy skin and caramelized veggies. However, you could try a 4-hour low-and-slow approach at 275°F with extra liquid (like broth) to keep things moist. The results won't match the oven version, but it's a good option for meal prep. For best texture, stick with the oven method.