
Main Courses
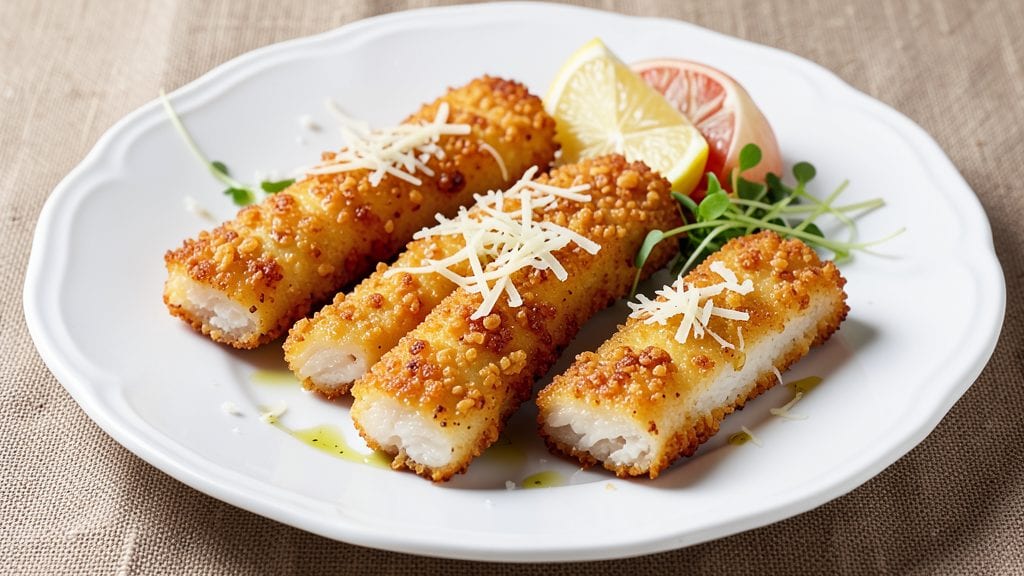
This baked fish sticks recipe delivers the same crispy, kid-friendly crunch you love without relying on frozen breading—just a simple, foolproof method that works every time.
The secret lies in a light, crunchy coating of panko and parmesan that stays golden and satisfying under the broiler, while the fish remains tender inside. I developed this after years of testing homemade versions that actually held up to picky eaters (and survived the trip from kitchen to table).
The beauty of this recipe is its simple prep and customizable seasoning—no special equipment needed beyond a baking sheet and a bowl.
You’ll use 5 basic ingredients (plus your choice of white or cod fillets) to create fish sticks that are crispy on the outside, flaky on the inside, and packed with flavor.
The broiler step ensures that crunch without the mess of deep-frying, making it a healthier alternative that still tastes like a restaurant favorite.
By the time these fish sticks emerge from the oven, you’ll have a plate of golden, crispy sticks that disappear faster than you can say "dipping sauce." The tender fish pairs perfectly with classic tartar sauce, honey mustard, or even a simple yogurt-based dip.
This recipe is designed to be restaurant-quality at home—no shortcuts, just a proven method that works for weeknight dinners or game-day snacks.
Serve with sweet potato fries, coleslaw, or a side of roasted vegetables for a complete meal. The best part? These fish sticks reheat beautifully, so you can make a batch ahead and keep them on hand for busy evenings.
Let’s get started with a method that’s easy, fast, and guaranteed to please even the pickiest eaters.
Ingredients for baked fish sticks
Five basic ingredients transform plain fish into crispy, golden sticks kids will love.
| Ingredient | Amount | Notes |
|---|---|---|
| White Fish Fillets 🐟 | 1 ½ lb | Cod or haddock, skinless |
| Japanese Panko Breadcrumbs 🍞 | 1 ½ cups | Light and crispy texture |
| Parmesan Cheese 🧀 | ½ cup | Freshly grated, fine grade |
| All-Purpose Flour 🌾 | ½ cup | For light coating |
| Large Eggs 🥚 | 2 whole | Beaten for dredge |
| Lemon Juice 🍋 | 1 tbsp | Freshly squeezed |
| Garlic Powder 🧄 | 1 tsp | For subtle seasoning |
| Paprika 🌶️ | ½ tsp | Smoked for depth |
| Salt 🧂 | 1 tsp | Diamond Crystal preferred |
| Black Pepper 🌶️ | ½ tsp | Freshly ground |
| Olive Oil 🫒 | 1 tbsp | For brushing fish |
| Unsalted Butter 🧈 | 2 tbsp | Melted for brushing |
The fish is non-negotiable here—cod or haddock stay flaky while holding their shape. Grab fresh fillets from the seafood counter (not frozen blocks) for the best texture. If you're using Whole Foods or Trader Joe's, look for their pre-cut fillets to save time. The panko needs to be the light, airy kind—Japanese-style from the Asian aisle, not the dense breadcrumbs. I always buy extra because it disappears fast. For the Parmesan, grate it yourself from a wedge—pre-grated has anti-caking agents that ruin the crispiness.
No panko? Crushed cornflakes work in a pinch, though they won't be as crispy. Short on Parmesan? Pecorino Romano has a sharper bite that works well. The flour is just for a light dusting—don't skip it, but don't overdo it either. For the eggs, room temperature beats cold straight from the fridge. The lemon juice adds brightness—freshly squeezed is best, but bottled works if you're in a hurry. Want extra crunch? Toss in 1 tbsp crushed cornflakes with the panko mixture. The butter and olive oil combo gives that restaurant-style shine without being greasy.
These reheat beautifully—5 minutes at 350°F brings back the crispiness. Store leftovers in an airtight container for up to 3 days in the fridge. For longer storage, freeze in a single layer for 2 months before transferring to a bag. I always make a double batch because they vanish faster than you can say "dipping sauce." The broiler method ensures that crunch without the mess of deep-frying, making it a healthier alternative that still tastes like a restaurant favorite.
Why You'll Love This Recipe
- I swear by this method: just pat the fish dry, dip in flour, egg, then panko. No breading station needed—my kids can do it while I stir the oven on. That crispy Parmesan crust happens every time, even if I’m distracted.
- No-Fuss Setup: I swear by this method: just pat the fish dry, dip in flour, egg, then panko. No breading station needed—my kids can do it while I stir the oven on. That crispy Parmesan crust happens every time, even if I’m distracted.
- Crunchy-Creamy Magic: The panko gives this a shatteringly crisp exterior, but the inside stays tender—like biting into a golden, salty hug. Honestly, the Parmesan makes it taste fancier than it is. (Yes, even on a Tuesday night.)
- Lunchbox Hero: These reheat beautifully for school lunches or office snacks—just pop them in the toaster or microwave. My son’s teacher actually asked for the recipe after he brought them twice. (I take that as a win.)
Step-by-step instructions for baked fish sticks
Here's how to create crispy, golden fish sticks that'll disappear faster than you can say "dinner's ready."
Prepare the Fish for Crispy Perfection
Begin by cutting the 1.5 lb white fish fillets into 1-inch thick sticks. I like to use cod or haddock for this recipe—they stay firm during cooking. Arrange the sticks on a parchment-lined baking sheet and brush each side generously with the 1 tbsp olive oil. This creates a barrier between the fish and the breading, preventing sogginess and ensuring maximum crispiness.
While the oil is still wet, sprinkle each stick evenly with the 1 tsp salt and 0.5 tsp black pepper. Don't skip this step—seasoning the fish before breading ensures every bite has flavor. Let the fish sit for 5 minutes while you prepare the breading mixture. This brief rest allows the oil to penetrate slightly, creating an even cooking surface.
Create the Crispy Breading Mixture
In a large bowl, whisk together the 2 whole large eggs until just combined. Add the 1 tbsp lemon juice and whisk again to create a bright, tangy base for your breading. In a separate shallow dish, combine the 0.5 cup all-purpose flour, 1.5 cups Japanese panko breadcrumbs, 0.5 cup freshly grated Parmesan cheese, 1 tsp garlic powder, and 0.5 tsp paprika. Mix well to distribute all the seasonings evenly.
Here's where the magic happens: the panko gives you that signature crispy texture, while the Parmesan adds a savory depth that kids and adults alike will love. I like to use freshly grated Parmesan because pre-shredded cheese often contains anti-caking agents that can make your breading less crispy.
Bread the Fish Sticks for Maximum Crunch
Working in batches to avoid overcrowding, dip each fish stick into the egg mixture first, letting any excess drip off. Then press the stick firmly into the breading mixture, coating all sides completely. The goal is to create an even, thick layer—about ¼ inch thick—that will become beautifully golden and crispy in the oven.
Place the breaded sticks on a second parchment-lined baking sheet. For extra crispiness, I like to brush the tops with melted 2 tbsp unsalted butter before baking. This step isn't mandatory, but it adds an incredible richness to the finished product. Let the breaded sticks rest for 10 minutes while you preheat your oven to 425°F.
Bake to Golden, Crispy Perfection
Bake the fish sticks for 12-15 minutes until they're golden brown and crispy. You'll know they're done when they release easily from the baking sheet and the edges are deeply golden. I like to flip them halfway through baking at the 7-minute mark to ensure even browning on both sides.
Don't be tempted to open the oven door before the time is up—this causes the temperature to drop and can lead to soggy fish sticks. The high heat is what creates that perfect crispy exterior while keeping the inside tender and flaky. Once removed from the oven, let them rest for 2-3 minutes before serving—they'll continue to crisp up slightly during this time.
Serve with Your Favorite Dipping Sauces
Serve the fish sticks immediately while they're still crispy. I like to pair them with classic tartar sauce, creamy ranch dressing, or a simple lemon aioli made from the reserved lemon juice. The contrast between the crispy exterior and tender fish inside makes every bite satisfying.
For extra fun, arrange the fish sticks on a platter with toothpicks and serve with cut-up vegetables or sweet potato fries. This recipe makes 4 servings, so you'll have leftovers for lunch the next day—just reheat in a 350°F oven for 5-7 minutes to restore that crispy texture.
Pro Tips For Making Baked Fish Sticks
- Dry the Fish Well: Pat those fillets thoroughly with paper towels before dredging—wet fish means soggy breading, and no one wants mushy fish sticks. I learned this the hard way after making a batch that fell apart like a wet cardboard box.
- Use Cold Egg Wash: Chill your beaten eggs in the fridge for 10 minutes before dipping—cold egg clings better to the panko, giving you that perfect crispy crust. (Yes, even if you're impatient like me.)
- Don’t Overcrowd the Pan: Bake in a single layer with space between sticks—if you pile them, the heat gets trapped, and the breading turns greasy instead of golden. Trust me, your oven will thank you.
- Add a Little Cornstarch: Mix 1 tablespoon cornstarch into your panko-Parmesan mix—it cuts through the grease and keeps the coating extra crispy. I was skeptical until I tried it; now I never skip it.
Serving suggestions for this recipe
Classic Dipping Sauces
Start with tartar sauce—mix ½ cup mayonnaise, 1 tbsp Dijon mustard, 1 tbsp lemon juice, 1 tbsp finely chopped capers, 1 tbsp chopped parsley, and ½ tsp celery seeds. This creamy, tangy sauce cuts through the crispy breading beautifully. 🍋
For a honey mustard twist, blend ¼ cup mayonnaise, 2 tbsp Dijon mustard, 1 tbsp honey, and 1 tsp apple cider vinegar. The sweetness balances the savory fish perfectly, and it’s a crowd-pleaser with kids and adults alike.
Fresh & Crunchy Sides
Serve with sweet potato fries—toss 1 lb sweet potato sticks in 1 tbsp olive oil, ½ tsp smoked paprika, and ½ tsp salt, then bake at 425°F for 20-25 minutes until crispy. The natural sweetness pairs wonderfully with the fish’s savory crust.
For a lighter option, try coleslaw with a creamy slaw dressing—whisk ½ cup mayonnaise, 2 tbsp apple cider vinegar, 1 tbsp honey, and 1 tsp celery seeds. Toss with shredded cabbage and carrots for a refreshing crunch.
Plating for Fun
Arrange fish sticks on a wooden platter with toothpicks for easy grabbing—great for game day or casual dinners. Add a lemon wedge on the side for squeezing over the top, and sprinkle with extra crushed paprika for a pop of color. 🌟
For a build-your-own vibe, set out small bowls of different sauces and let everyone customize their sticks. This works especially well for picky eaters who might prefer mild or spicy options.
Unexpected Upgrades
Add quick-pickled red onions—slice ½ red onion thinly, soak in ¼ cup vinegar, 1 tbsp sugar, and ½ tsp salt for 10 minutes. The bright acidity cuts through the richness of the fish sticks.
For a grown-up twist, serve with a spicy aioli—mix ¼ cup mayonnaise, 1 tsp sriracha, and 1 tsp lime juice. The heat adds a fun contrast to the crispy exterior.
Nutrition facts
Frequently asked questions
Can I use frozen fish fillets instead of fresh?
Fresh fish works best for this recipe, but you can use frozen fillets if thawed properly. Place frozen fish in a sealed bag and submerge in cold water for 30-45 minutes until fully thawed. Pat completely dry before cutting into sticks—excess moisture prevents crispy breading. Never thaw at room temperature to avoid bacterial growth.
Why did my fish sticks turn out soggy instead of crispy?
Soggy fish sticks usually mean one of three things: overcrowding on the baking sheet, insufficient drying time, or opening the oven too early. Start with a single layer of sticks and space them apart. Let breaded sticks rest 10 minutes before baking, and avoid peeking at them until the 12-minute mark. For extra crunch, broil for 1-2 minutes at the end.
What's the best way to reheat leftover fish sticks?
Reheat in a 350°F oven for 5-7 minutes on a wire rack placed over a baking sheet. This method restores crispiness better than a microwave. For air fryer reheating, cook at 375°F for 3-4 minutes. Always reheat from room temperature for even results.
Can I make these gluten-free?
Yes! Replace the all-purpose flour and panko with ½ cup gluten-free flour blend and 1.5 cups gluten-free panko. Use a 1:1 ratio for the breading mixture. For best results, add 1 tsp xanthan gum to help bind the coating. The texture will be slightly different but still crispy when baked properly.
How do I make these spicier for adults?
Add ½ teaspoon cayenne pepper or 1 teaspoon smoked paprika to the breading mixture for mild heat. For extra kick, mix 1 tablespoon sriracha into your dipping sauce or serve with a side of spicy mayo (mayo + hot sauce). The crispy coating helps balance the heat beautifully.