Snacks
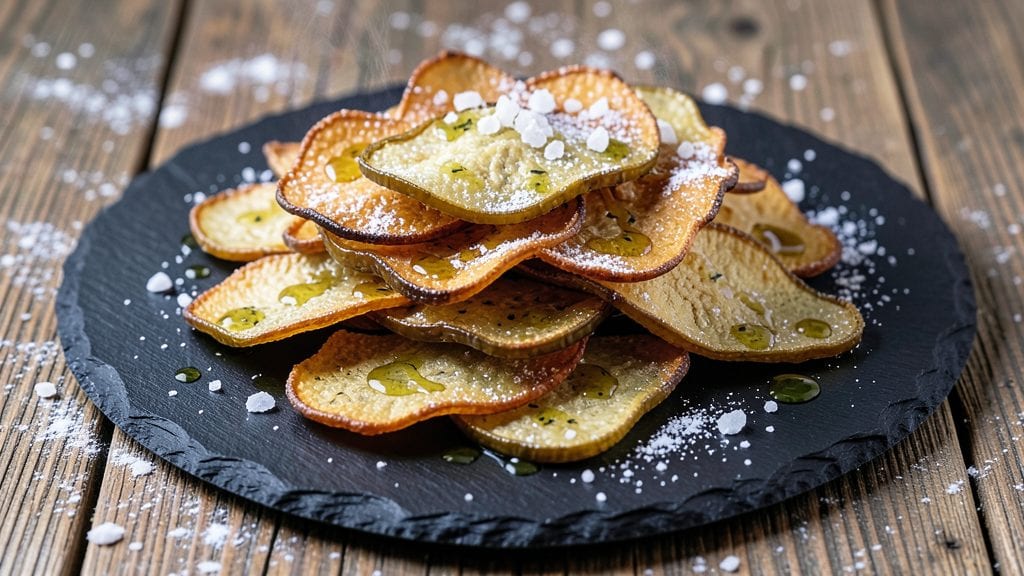
This baked pickle chips recipe transforms tangy, crunchy pickles into a vinegar-kissed snack that's addictively crispy and ready in just 15 minutes. The secret lies in thin, even slicing and a precise baking technique that preserves that signature tang while creating irresistible crunch—no frying required.
I perfected this method after testing countless batches, and the results are a perfect balance of savory, slightly sweet, and vinegary flavor that disappears too quickly from snack bowls.
The process is simpler than you'd think: slice your pickles paper-thin, pat them dry to ensure crispiness, and season lightly with salt before baking. A hot oven (425°F) is key—it renders the moisture quickly while creating that satisfying snap.
This recipe works with any pickle variety, but dill or bread-and-butter pickles deliver the most satisfying flavor profile. The vinegar's acidity cuts through the richness of the chips, making them refreshing yet crave-worthy.
What you'll end up with is a batch of golden, crispy chips that shatter between your teeth while delivering that bright pickle punch in every bite. They're perfect for game day, movie nights, or as a unique appetizer that pairs beautifully with dips like ranch or hummus.
The best part? These chips stay crisp for hours in an airtight container, making them an ideal make-ahead snack for busy weeks.
This recipe is also vegetarian-friendly and requires just five ingredients—no fancy equipment needed beyond a sharp knife and baking sheet. Whether you're looking to repurpose leftover pickles or create a crowd-pleasing snack, these chips deliver restaurant-quality crunch without the mess. Let's get started on making them!
Ingredients for baked pickle chips
Five simple ingredients transform pickles into addictive, vinegar-kissed crunch in minutes—no frying needed!
| Ingredient | Amount | Notes |
|---|---|---|
| Dill Pickles 🥒 | 1 lb | Freshly sliced, stems removed |
| Extra-Virgin Olive Oil 🫒 | 1 tbsp | For light brushing |
| Diamond Crystal Kosher Salt 🧂 | 1 tsp | Fine grain preferred |
| Cornstarch 🌾 | 1 tbsp | For extra crispiness |
| Garlic Powder 🧄 | ½ tsp | For subtle flavor boost |
The pickles are the star, so grab the freshest, firmest ones you can find—those sad, limp jars won’t cut it. Trader Joe’s or Whole Foods have the best quality, but any dill or bread-and-butter pickles from the grocery store work. Look for pickles with vibrant color and no soft spots. I always slice mine paper-thin (about 1/16-inch) using a mandoline for evenness, but a sharp knife works too. Pat them very dry with paper towels—this is non-negotiable for crispiness. Pro tip: Slice them right before baking so they stay crisp.
No cornstarch? Potato starch or arrowroot powder works just as well—it’s the secret to that addictive crunch. Short on garlic powder? Add a pinch of onion powder for depth. The olive oil is key—don’t skip it! A light brush helps the salt stick and enhances browning. For extra tang, toss the sliced pickles in 1 tsp pickle juice before baking. And if you’re feeling fancy, a sprinkle of smoked paprika adds a smoky kick. These chips reheat beautifully—just toss them back in the oven for 2-3 minutes at 375°F.
These chips stay crisp for up to 3 days in an airtight container, but honestly, they’re best enjoyed fresh. Store them in a single layer if you want to keep them extra crunchy. For longer storage, freeze them for up to 1 month—just spread them out on a tray first to prevent sticking. I always make a double batch because they vanish faster than you’d think. Pair them with ranch, hummus, or even a sprinkle of feta cheese for a gourmet twist.
Why You'll Love This Recipe
- No Chopping Needed: I swear by this—just slice the pickles thin, toss, and bake. The cornstarch gives them that addictive crunch without any fuss.
- Tangy Crunch Magic: That garlic powder and olive oil combo? It turns ordinary pickles into something dangerously crispy with a bright, herby punch. (Yes, even my kids fight over them.)
- Party Snack Hero: Serve them warm with wings or cold in a bowl of soup—no one will guess how little effort they took. Honestly, they disappear at gatherings.
- Budget Crunch Helper: A jar of pickles and pantry staples make this cheaper than store-bought chips. Plus, the leftovers stay crispy for days if you store them right. My secret weapon for lazy nights.
Instructions for crispy vinegar-kissed pickle chips
Here's how to transform tangy dill pickles into addictive, vinegar-kissed chips with a perfect crunch.
Prep and Season the Pickle Slices
Pat the 1 lb dill pickles completely dry with paper towels—this is absolutely critical for crispy chips. Any moisture left on the slices will prevent proper browning. I like to work in batches if the pickles are very wet, pressing them firmly between fresh towels.
Once dry, spread the slices out on a clean kitchen towel. In a small bowl, whisk together the 1 tbsp cornstarch, 0.5 tsp garlic powder, and 1 tsp diamond crystal kosher salt. This seasoning mix will give your chips that extra crunch and subtle garlic depth. Lightly toss the pickle slices with the seasoning mixture, coating each piece evenly. The cornstarch acts like a cornflake crust, creating that satisfying crunch we all love.
Arrange for Even Baking
Preheat your oven to 425°F—this high temperature is key for achieving crispiness in just 15 minutes. Line two baking sheets with parchment paper for easy cleanup. Arrange the seasoned pickle slices in a single layer on the prepared sheets, leaving about ½ inch between each piece. This spacing ensures even air circulation and prevents steaming, which would make them soggy.
Here's a pro tip: I like to arrange them with the cut sides facing up. This creates a slightly thicker edge that crisps up beautifully while still maintaining that vinegar-kissed tang. If your oven runs hot, you might need to reduce the temperature to 400°F—just watch for the color change instead of relying solely on the thermometer.
Bake Until Golden and Crisp
Bake the pickle chips for 12-15 minutes, flipping them halfway through at the 8-minute mark. You're looking for chips that are deep golden brown with just a few slightly darker spots—this indicates perfect crispiness. The edges should be slightly curled, and when you press one between your fingers, it should snap cleanly with a satisfying crunch.
Don't be tempted to overbake—they'll continue cooking slightly as they cool. If you pull them out too early, they'll be pale and rubbery. If you leave them in too long, they'll burn. The 8-minute flip is your best friend for even cooking on both sides. Keep an eye on them during the last few minutes to catch them at peak crispiness.
Brush with Olive Oil for Extra Shine
As soon as the chips come out of the oven, use a pastry brush to lightly coat each piece with the 1 tbsp extra-virgin olive oil. This step adds an incredible shine and enhances the flavor profile. The oil penetrates the chips just enough to keep them crispy while adding a subtle richness that balances the tangy pickle flavor.
Work quickly here—the chips will start to soften as they cool. Transfer them to a wire rack set over a baking sheet to cool completely. This keeps them crispy instead of letting them sit on a surface where they might steam and lose their crunch. Once fully cooled, they'll have that perfect vinegar-kissed crunch that makes them irresistible.
Serve Immediately for Maximum Crunch
These chips are best enjoyed fresh out of the oven while they're at their crispest. Serve them warm as an appetizer with your favorite dipping sauce—ranch, blue cheese, or even a simple garlic aioli would be perfect. The contrast of warm, crispy chips with a cool, creamy dip is pure magic.
If you need to store them, keep them in an airtight container at room temperature for up to 3 days. They'll lose some crispiness over time, but they'll still be delicious. For the absolute best experience, though, eat them fresh—they're worth the effort! These vinegar-kissed chips are the perfect balance of tangy, salty, and crispy that everyone will love.
Pro Tips For Making Baked Pickle Chips
- Slice Thinly, Evenly: Grab a sharp knife and cut the pickles into ⅛-inch slices—no thicker, no thinner. I learned this the hard way: uneven slices mean some chips burn while others stay doughy. A mandoline helps if you’re impatient like me, but a steady hand works too.
- Pat Dry, Don’t Rush: After slicing, lay the pickles on paper towels and press with another towel to remove excess moisture. Wet chips won’t crisp up, no matter how high you crank the oven. Give them 10 minutes—yes, even if you’re eager to bake.
- Toss with Cornstarch First: Mix the sliced pickles with 1-2 tablespoons of cornstarch before adding oil and seasoning. This creates a light, crisp coating that sticks better than shaking everything in the bowl. I used to skip this, and the chips always ended up greasy.
- Bake in Two Batches: Overcrowding the tray steams the chips instead of crisping them. Spread them in a single layer with space between each slice—even if it means baking twice. A hot oven (425°F) needs room to work its magic.
Best sauces and condiments for this recipe
Tangy Ranch Dip
This classic pairing takes ranch to the next level by adding 1 tbsp pickle juice to your favorite recipe. I mix 1 cup sour cream, ½ cup mayonnaise, 1 tsp dried dill, ½ tsp garlic powder, and ¼ tsp onion powder with the pickle juice.
The extra tang cuts through the richness of the chips beautifully. Serve immediately for maximum freshness—this dip stays creamy for up to 3 days in the fridge. 🥄
Spicy Aioli
For a bold contrast, whip up a garlic-horse-radish aioli by blending ½ cup mayonnaise, 1 tbsp fresh horseradish, 1 tsp lemon juice, and ½ tsp smoked paprika. The heat from the horseradish complements the vinegar tang perfectly.
I like to thin it slightly with 1 tsp pickle juice to tie the flavors together. This dip works best when served chilled and pairs especially well with the smoky variations of these chips. 🌶️
Blue Cheese Spread
A creamy blue cheese spread adds a luxurious touch to these chips. Mix 1 cup crumbled blue cheese with 2 tbsp sour cream, 1 tbsp chopped walnuts, and 1 tsp honey> to balance the saltiness.
The nutty, tangy flavors create a sophisticated contrast to the crispy chips. This spread keeps its texture best when refrigerated for up to 2 days before serving. 🧀
Sweet and Spicy Honey Mustard
For a sweet-and-spicy twist, blend ¼ cup honey, ¼ cup Dijon mustard, 2 tbsp apple cider vinegar, and 1 tsp cayenne pepper. The sweetness of the honey enhances the vinegar notes in the chips, while the cayenne adds a subtle kick.
This dip is especially popular for game day—it’s sweet enough to appeal to kids but spicy enough for adults. Store in an airtight container for 5 days in the refrigerator. 🍯
Pickle Juice Cocktail Sauce
Elevate your chips with a tangy cocktail sauce by mixing ½ cup ketchup, 2 tbsp pickle juice, 1 tbsp horseradish, 1 tsp Worcestershire sauce, and ½ tsp smoked salt.
This sauce adds a sophisticated twist to your snack spread and works beautifully with both classic and spicy chip variations. Keep it refrigerated for up to 1 week—the flavors deepen over time. 🍅
Warm Beer Cheese
For a crowd-pleasing dip, melt 4 oz sharp cheddar and 4 oz Monterey Jack cheese with ½ cup beer**> (I recommend a crisp lager) and 1 tsp Dijon mustard in a small saucepan over low heat.
The beer adds a subtle maltiness that pairs perfectly with the vinegar tang. Serve warm for the best texture—this dip stays delicious for 3 days in the fridge. 🍺
Nutrition facts
Frequently asked questions
Why do my baked pickle chips turn out soggy instead of crispy?
Moisture is the enemy of crispiness! Always pat the pickle slices completely dry with paper towels before baking—even if they feel dry. Also, never overcrowd the baking sheet; leave at least ½ inch between slices for proper airflow. If your oven runs hot, reduce the temperature to 400°F to prevent burning while still achieving crispiness.
Can I use any type of pickle for this recipe?
While dill and bread-and-butter pickles work best, you can experiment with other varieties! Try kosher dill or even sweet pickles for a different flavor profile. Just avoid overly soft or mushy pickles—they won’t hold up well during baking. For extra tang, toss the slices in 1 tsp pickle juice before seasoning.
How do I store these chips to keep them crispy?
Store them in an airtight container at room temperature for up to 3 days, but they’re best enjoyed fresh. For longer storage, freeze them for 1 month—spread them on a tray first to prevent sticking. To reheat, toss them back in the oven at 350°F for 2-3 minutes until crispy again.
Can I make these chips without cornstarch?
Swap cornstarch for potato starch or arrowroot powder—they work just as well for crispiness. If you’re completely out of starch, try a light dusting of semolina flour or even crushed cornflakes for texture. The key is ensuring the slices are bone-dry before baking to avoid sogginess.
What’s the best way to serve these chips for a party?
Serve them warm in a large bowl with a selection of dips—ranch, blue cheese, or even a tangy cocktail sauce. For a gourmet touch, sprinkle with flaky salt or smoked paprika before serving. Keep extra chips in a warm oven (200°F) until ready to serve to maintain crispiness.