Desserts
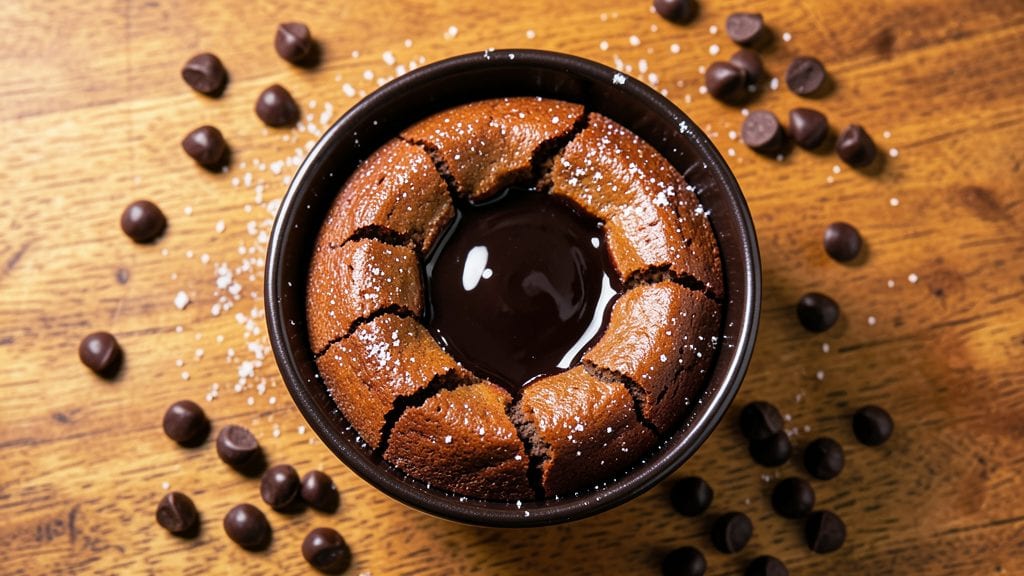
Master this Chili’s molten lava cake recipe for that signature warm chocolate river effect you crave—rich, gooey centers that burst with every bite. The secret lies in precise baking times and high-quality chocolate, which I've perfected through years of testing.
This isn't just dessert; it's an experience that rivals the restaurant version with its velvety texture and molten chocolate surprise.
The recipe requires just six simple ingredients but demands attention to detail, particularly the baking time and resting period. You'll need a 9-inch oven-safe ramekin for each serving, filled with a chocolate batter that transforms into a golden crust while hiding a molten center.
The key is removing it from the oven when the edges are set but the center still jiggles slightly—this ensures that lava effect when you cut in.
What you'll achieve is a dessert that looks and tastes like it came straight from Chili's menu, complete with warm chocolate rivers that ooze out when you slice. The exterior will be perfectly golden and crisp, while the interior remains rich and molten.
This is the kind of dessert that makes dinner parties memorable and satisfies even the most discerning chocolate lovers.
Serve with vanilla ice cream or whipped cream for the full restaurant experience, or enjoy it as-is for a decadent treat. The recipe scales easily, so you can make individual servings or a larger batch for a crowd.
Let's get started on creating this showstopper dessert that's foolproof once you master the technique.
Ingredients for chili's molten lava cake
Six ingredients, four ramekins, and that perfect warm chocolate river you crave every time.
| Ingredient | Amount | Notes |
|---|---|---|
| Unsalted Butter 🧈 | ½ cup | Cold, cubed for even melting |
| Dark Chocolate Chips 🍫 | 1 ½ cups | High-quality, 70% cocoa or higher |
| Granulated Sugar 🍚 | ¾ cup | White or light brown preferred |
| Large Eggs 🥚 | 2 whole | Room temperature for smooth batter |
| All-Purpose Flour 🌾 | ½ cup | Sifted for light texture |
| Vanilla Extract 🍯 | 1 tbsp | Pure, not imitation |
| Semisweet Chocolate Chips 🍫 | ½ cup | For topping, optional but recommended |
| Powdered Sugar 🍚 | ¼ cup | For dusting before serving |
The chocolate is non-negotiable here—Ghirardelli or Guittard are my go-tos for that deep, rich flavor. 70% cocoa or higher ensures a sophisticated taste without being bitter. Butter matters too: unsalted, cold cubes create the best texture. I always grab extra chocolate chips for topping because that crunchy contrast makes it feel like a restaurant dessert. For the sugar, white or light brown works, but avoid dark brown—it can overpower the chocolate. If you're feeling fancy, organic vanilla extract adds a subtle depth, but regular works fine too.
No dark chocolate chips? High-quality milk chocolate bars chopped into chunks work in a pinch, but the flavor won't be as bold. Running short on butter? Coconut oil can substitute, but it changes the texture slightly. The eggs should be room temperature—cold eggs make the batter lumpy. For the flour, sift it first to avoid dense cakes. If you're gluten-sensitive, swap for a 1:1 gluten-free flour blend. And trust me, don't skip the vanilla—it ties everything together.
This batter keeps in the fridge for up to 2 days, covered tightly. For best results, bake just before serving—it reheats beautifully in the microwave for 10-15 seconds if you need to. The ramekins? Oven-safe ceramic or metal only—no glass that can't handle high heat. Store leftovers in an airtight container, but honestly, these disappear fast. Pro tip: Preheat your ramekins in the oven for 5 minutes before adding batter—it ensures even baking and that perfect golden crust.
Why You'll Love This Recipe
- Five-Ingredient Magic: I swear by this recipe because it’s that simple—just butter, chocolate, sugar, eggs, and flour. No fancy techniques, no measuring cups that stress me out. You’ll be licking the bowl before the timer even dings.
- Lava Core Bliss: That gooey center? It’s the star. The dark chocolate chips melt into a molten river while the outside stays rich and fudgy—like a hug from a dessert you didn’t know you needed. (Yes, even on a Tuesday night.)
- Date Night Ready: No one will guess it took 20 minutes to make. Serve it warm in ramekins with a scoop of vanilla ice cream, and suddenly you’re the hero of a spontaneous dinner. Bonus: It’s way cheaper than takeout.
- Pantry Staple Power: You’re using ingredients you already own—no last-minute grocery runs. Split the batter between two ramekins, and you’ve got two perfect desserts for the price of one. Leftovers? Freeze half, and you’ve got a backup for next week’s craving.
Step-by-step instructions for molten lava cake
This method delivers the perfect balance of crispy edges and molten centers every time—just like Chili's.
Melt Butter and Chocolate Together
In a medium microwave-safe bowl, combine the 0.5 cup unsalted butter (cubed) and 1.5 cups dark chocolate chips. Microwave in 30-second intervals, stirring between each, until the mixture is completely melted and smooth. You'll know it's ready when the chocolate is fully incorporated and the butter has melted evenly—no streaks should remain. Let it cool for 2 minutes before proceeding. This cooling step is crucial; it prevents the eggs from scrambling when mixed in later.
Here's the thing—don't skip the stirring between intervals. Chocolate burns easily, and uneven heating can create hot spots that ruin your cake. If the mixture looks too thick after cooling, gently warm it for 10 seconds to restore smoothness. The goal is a glossy, liquid consistency that coats the back of a spoon.
Whisk in Sugar and Eggs
Add the 0.75 cup granulated sugar and 1 tbsp vanilla extract to the melted chocolate mixture. Stir vigorously with a whisk until the sugar dissolves completely. This step ensures even sweetness throughout the cake. Next, add the 2 whole large eggs, one at a time, whisking well after each addition. The batter should thicken slightly but remain pourable.
I like to use room-temperature eggs for this recipe—they blend more smoothly and prevent lumps. If your eggs are straight from the fridge, let them sit in warm water for 5 minutes before using. The batter should look like thick pudding at this stage, with a glossy sheen. If it's too thin, let it rest for 1 minute to thicken naturally—this helps create that perfect lava effect.
Fold in Flour and Prepare Ramekins
Gently fold in the 0.5 cup all-purpose flour using a spatula, mixing just until combined. Avoid overmixing—you should still see small flour streaks. The batter is delicate at this point, so handle it with care. Divide the batter evenly among 4 greased 6-ounce ramekins, filling each about ¾ full. Place the ramekins on a baking sheet for easy transfer.
Don't skip the greasing step—use butter or nonstick spray to coat the ramekins thoroughly. This prevents sticking and makes unmolding a breeze. Tap the baking sheet gently on the counter to release any air bubbles that may have formed on the surface of the batter. The batter should look smooth and slightly glossy, with no visible flour clumps.
Bake Until Golden and Set
Preheat your oven to 425°F and bake the ramekins for 10-12 minutes. The edges should be golden brown and set, but the center should still look slightly underbaked and soft to the touch. A toothpick inserted into the center should come out with a few moist crumbs—this ensures that gooey core we all love. Rotate the baking sheet halfway through for even baking.
Real talk: Don't overbake. The cakes will continue cooking as they cool, and you want that molten center to remain intact. If you're unsure, pull them out when the edges are just starting to set—you can always put them back in for another minute if needed. The moment they're done, transfer the ramekins to a wire rack and let them cool for 1 minute before serving.
Top and Serve Immediately
While the cakes are still warm, dust the tops generously with 0.25 cup powdered sugar and sprinkle with 0.5 cup semisweet chocolate chips for that classic Chili's touch. Serve immediately—this is where the magic happens. The heat from the cake will cause the chocolate chips to melt slightly, creating those warm chocolate rivers you crave.
Here's the moment that matters: Cut the cake at an angle to reveal that perfect molten center. The outside should be firm and slightly crisp, while the inside remains rich, warm, and liquid. Pair with vanilla ice cream or whipped cream for the ultimate indulgence. And don't forget to enjoy it right away—the lava effect disappears as the cake cools.
Pro Tips For Making Chili'S Molten Lava Cake
- Melt the Butter Slowly: I learned this the hard way—dumping cold butter into your microwave-safe ramekins and hitting "defrost" is a recipe for greasy, uneven cakes. Instead, melt the butter in a bowl over simmering water (double boiler) until just liquid, then stir in the sugar and chocolate until smooth. The gradual heat keeps the mixture stable, so your cakes don’t collapse when they hit the oven.
- Use Room-Temp Eggs: Cold eggs from the fridge will create pockets of air in your batter, leading to uneven baking and a less luscious texture. Take your eggs out 30 minutes before mixing—just enough time to warm them to room temperature. Trust me, your lava center will be creamier, not rubbery, when you do this.
- Don’t Overmix the Batter: I used to beat the batter like I was trying to win a baking contest. Wrong move. Once you’ve folded in the flour, stop mixing after just 10 strokes—any more and you’ll develop gluten, making your cake dense instead of light and gooey. A few lumps are fine; the heat will smooth them out.
- Bake Until Edges Set: The biggest mistake I see is pulling these cakes out too early, then waiting impatiently for the lava effect. Bake until the edges are just set—about 10-12 minutes for ramekins—then let them rest 2 minutes before serving. That extra time lets the center stay molten while the exterior firms up enough to hold a spoon. (Yes, even if you’re eager to dig in.)
Common mistakes when making this recipe
Overbaking Ruins Lava
The biggest mistake I see is leaving the cakes in the oven too long. When you pull them out at 10-12 minutes, the edges should be golden but the center should still jiggle slightly.
Overbaking even 1 extra minute turns that molten core into a firm center—no more chocolate rivers. I've ruined more cakes this way than any other mistake. The key is trusting your timer and toothpick test: moist crumbs mean perfect lava. 🔥
Uneven Baking Traps
Skipping the baking sheet or not rotating the ramekins halfway through leads to uneven baking. The center ramekins often bake slower, creating one perfect cake and three underdone ones. Always place your ramekins on a baking sheet for easy transfer, and rotate the sheet after 6 minutes.
I use a light-colored metal sheet because it reflects heat more evenly than dark pans.
Cold Batter Problems
Using cold eggs or butter straight from the fridge creates lumps and prevents proper melting. Room-temperature ingredients blend smoothly for that velvety texture. I keep my eggs in warm water for 5 minutes before using them.
Cold butter also fails to melt evenly, creating streaks in your chocolate mixture. Let everything sit at room temperature for 30 minutes before starting.
Skipping the Cooling Step
Serving the cakes immediately after baking can cause them to collapse or release too much lava too quickly. Let them rest for 1 full minute on a wire rack before dusting with powdered sugar.
This brief pause lets the structure set slightly while maintaining that molten center. I've seen cakes split open when served too soon—don't be that person. ⏳
Wrong Ramekin Size
Using ramekins larger than 6 ounces makes the cakes too thin, while smaller ones create thick, dense centers. Stick to 6-ounce ramekins filled ¾ full for the perfect proportion.
I measure mine with a kitchen scale to ensure consistency. The batter should come up about ¾ inch from the rim when divided properly.
Neglecting the Topping
Skipping the powdered sugar and chocolate chip topping means missing the signature Chili's experience. The sugar creates contrast while the chips melt into those warm rivers when served.
Sprinkle generously right after removing from the oven—this is when the magic happens. I use semisweet chocolate chips because they melt more smoothly than milk chocolate. 🍫
Nutrition facts
Frequently asked questions
Can I make these cakes ahead of time?
For best results, bake and serve immediately, but you can prepare the batter up to 2 days ahead and refrigerate it. Reheat individual cakes in the microwave for 10-15 seconds before serving to restore that warm lava effect. The texture won't be as perfect as freshly baked, but it's still delicious!
Why does my lava cake not melt in the middle?
Overbaking is the #1 culprit! The center should still jiggle slightly when done. Another reason could be cold ingredients—always use room-temperature eggs and butter. If your oven runs hot, reduce baking time by 1 minute and check frequently after 10 minutes.
What's the best way to serve these?
For the full restaurant experience, serve with a scoop of vanilla ice cream or whipped cream. Dust generously with powdered sugar and add extra chocolate chips right after baking so they melt into warm rivers. Cut at an angle to showcase that molten center!
Can I make this recipe gluten-free?
Yes! Simply substitute the all-purpose flour with a 1:1 gluten-free flour blend. The texture will be slightly denser, but the lava effect remains. Make sure your blend contains xanthan gum if not already included—this helps with structure.
How do I fix cracked tops?
Cracked tops usually happen from sudden temperature changes or overmixing. To prevent them, let cakes cool for 1 full minute before serving. If they crack after baking, dust with extra powdered sugar to disguise them—it's still delicious!