
Side Dishes
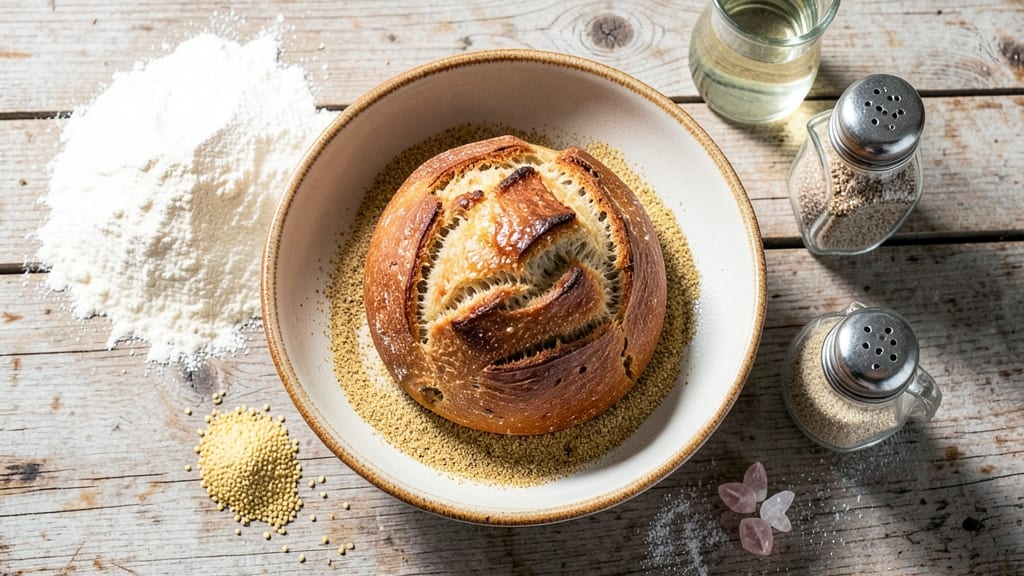
This farmers bread recipe delivers the perfect balance of rustic charm and effortless texture—no kneading required. The secret lies in a simple dough that develops flavor overnight, yielding a crispy crust and an airy interior that pairs beautifully with soups, stews, or butter.
I've perfected this method over years of baking, and it consistently produces bread that rivals artisanal loaves.
The beauty of this recipe is its simplicity: just flour, yeast, water, and salt create a dough that transforms through time. No fancy equipment or complicated techniques—just patience and a hot oven.
The dough rests overnight, allowing gluten to relax and flavors to deepen, while the baking process creates that signature crackly crust and light, open crumb.
What you’ll end up with is a loaf that’s crisp on the outside, tender inside, and packed with rustic character. The aroma alone will fill your kitchen with warmth, and every slice reveals that perfect combination of texture and flavor.
This is the kind of bread that makes homemade baking feel effortless yet impressive.
Whether you prefer a classic version or want to experiment with seeds, this recipe adapts easily. Let’s get started on creating your own perfect loaf—no kneading, no stress, just great bread.
Ingredients for farmers bread
Just five core ingredients transform into rustic, no-knead perfection—flour, yeast, water, salt, and time.
| Ingredient | Amount | Notes |
|---|---|---|
| All-Purpose Flour 🌾 | 4 cups | Plus 2 tbsp for dusting |
| Active Dry Yeast 🍞 | ¼ tsp | Single-use packet preferred |
| Granulated Sugar 🍬 | ½ tsp | Feeds the yeast |
| Salt 🧂 | 1 ½ tsp | Kosher or sea salt |
| Warm Water 💧 | 1 ½ cups | 110°F, not boiling |
| Cornmeal 🌽 | ¼ cup | For dusting loaf pan |
| Olive Oil 🫒 | 1 tbsp | For greasing pan |
| Coarse Sea Salt 🧂 | 1 tbsp | For sprinkling crust |
| Sesame Seeds 🌻 | 2 tbsp | Optional topping |
| Poppy Seeds 🌱 | 1 tbsp | Optional topping |
The flour is your foundation—King Arthur or Bob's Red Mill work best for that signature open crumb. If you're feeling fancy, swap 1 cup for whole wheat or rye for extra depth. The yeast? Fresh is best, but those little single-use packets from the store work in a pinch. Just make sure it's not expired—yeast is like a grumpy roommate, it won't perform if it's past its prime. Warm water is critical—too hot and you'll kill the yeast, too cold and it won't activate. 110°F is perfect—think warm bathwater, not scalding. For the salt, I always grab the coarse sea salt from Morton—it's perfect for sprinkling the crust later.
No cornmeal? Semolina or all-purpose flour works for dusting the pan. Olive oil shortages? Vegetable or melted butter are great swaps. Want to skip the seeds? A sprinkle of everything bagel seasoning adds instant flavor. The dough might look shaggy at first—that's normal! It'll come together beautifully as it rests. If your kitchen's cold, place the bowl in a warm spot to help the yeast activate faster. And if you're short on time, reduce the overnight rest to 4 hours—it'll still be delicious, just with slightly less flavor development.
This dough is a dream to work with—it's forgiving and flexible. Shape it however you like: a classic loaf, a round boule, or even individual rolls. For extra crispiness, bake on a preheated pizza stone or in a Dutch oven. The bread keeps well at room temperature for 2-3 days wrapped in a clean kitchen towel, or freeze slices for up to 3 months. Pro tip: Toast the next day's slices—they'll be even more flavorful with a crispy crust!
Why You'll Love This Recipe
- I’ll be real: a loaf costs me pennies to make, and it lasts. Freeze half the dough for another day, or stash slices in the freezer for toast later. No wasted ingredients, no last-minute store runs—just good bread that doesn’t break the bank. That’s the kind of recipe I keep coming back to.
- Pantry Staples Only: Honestly, if your kitchen has flour, yeast, and water, you’re already halfway there. No fancy starters or obscure ingredients—just the basics, mixed into a dough that rises while you sip coffee. That’s the magic of this recipe: no hunting down specialty items, just good, honest baking.
- Crusty Outside, Soft Inside: Here’s what sold me—the contrast. The crust gets that golden, shatter-y crunch when baked in a Dutch oven, while the inside stays pillowy and tender. It’s the kind of bread where the first bite makes you pause, like you’ve just discovered a secret.
- Weeknight Workhorse: Between us, this is the bread I grab when I’m too tired to think. Toss it in the oven while dinner simmers, and suddenly you’ve got warm bread for sandwiches, toast for breakfast, or even a quick charcuterie board. It’s my go-to for lazy nights—or when I’m feeding a crowd and need something reliable.
Step-by-step instructions for farmers bread recipe: rustic crust with airy, no-knead magic
This no-knead method transforms simple ingredients into a crusty, artisanal-style loaf with minimal effort.
Mix the Dough and Let It Rest
In a large mixing bowl, combine the 4 cups all-purpose flour, 1.5 tsp salt, and 0.25 tsp active dry yeast. Stir gently to distribute the ingredients evenly—this prevents pockets of dry flour that can lead to uneven texture. In a separate small bowl, whisk together the 1.5 cups warm water (about 110°F) and 0.5 tsp granulated sugar until the sugar dissolves completely. The sugar helps activate the yeast for a better rise.
Pour the water mixture into the flour and stir with a wooden spoon until just combined. You'll notice the dough will be shaggy and sticky—that's perfect for this recipe. Add 1 tbsp olive oil and mix until fully incorporated. Cover the bowl with a damp kitchen towel and let it rest at room temperature for 12-18 hours. This long fermentation develops incredible flavor and a light, airy crumb. I like to set my timer for overnight so it's ready when I wake up.
Shape and Prepare the Loaf Pan
After resting, the dough should be noticeably puffier and smell slightly yeasty. Lightly dust a 9x5-inch loaf pan with 2 tbsp all-purpose flour (the extra amount from your ingredients list) and give it a gentle shake to coat the bottom evenly. This prevents sticking and ensures easy removal later. Transfer the dough to the prepared pan and shape it by pressing down gently with wet hands—this helps distribute the dough evenly and creates that classic rustic top.
Sprinkle 0.25 cup cornmeal evenly over the dough's surface. The cornmeal creates a beautiful golden crust and adds a subtle nutty flavor. Lightly brush the top with a bit of water using a pastry brush, then sprinkle 1 tbsp coarse sea salt evenly across the surface. This salt will create those gorgeous, crackling crust pockets when baked. Cover the pan loosely with plastic wrap and let it rest for 1-2 hours at room temperature while you preheat your oven.
Bake for a Crispy, Golden Crust
Preheat your oven to 375°F. Place a baking sheet on the lower rack to catch any potential drips. When the oven is fully preheated, bake the loaf for 45-50 minutes until the top is deep golden brown and sounds hollow when tapped on the bottom. The internal temperature should reach 190-200°F—this ensures it's fully baked through without being dry.
About 10 minutes before the bread finishes baking, sprinkle 2 tbsp sesame seeds and 1 tbsp poppy seeds evenly over the top. These seeds add beautiful texture and a subtle crunch. If the seeds don't stick well, lightly brush the top with a bit more water before adding them. Remove the bread from the oven and let it cool in the pan for 5 minutes, then transfer to a wire rack to cool completely. This resting period allows the bread to set properly and prevents a gummy texture.
Serve Warm for Maximum Enjoyment
The best part of this farmers bread comes when you slice into it warm. The crust should be crisp and crackly, with a beautiful golden-brown color that contrasts perfectly against the soft, airy interior. Each slice should pull apart easily with a gentle tug, revealing an open crumb structure that's light yet substantial. For serving, I like to brush the warm bread with a little olive oil and sprinkle with flaky sea salt—this enhances the crust's flavor and adds a sophisticated touch.
This bread is incredible on its own, but it also pairs wonderfully with soups, stews, or as a side for charcuterie boards. The no-knead method makes it incredibly forgiving—even if you're not an experienced baker, you'll achieve professional-quality results. Store any leftovers wrapped in a clean kitchen towel at room temperature for up to 3 days, or freeze slices for quick toast later. The flavor only improves as it sits!
Pro Tips For Making Farmers Bread
- Test Yeast First: Skip the guesswork—mix 1 packet yeast with ¼ cup warm water and 1 tsp sugar in a small bowl. If it bubbles within 5-10 minutes, your yeast is alive and ready to work. No bubbles? Toss that packet and start fresh. I learned this the hard way after baking a dense, flavorless loaf from dead yeast.
- Knead Until Silky: Stop when the dough passes the "windowpane test"—stretch a small piece and it should be thin enough to see light through without tearing. Over-kneading is easy, but under-kneading means a gummy loaf. Use your knuckles for 10 minutes or a stand mixer with a dough hook for 5-6 minutes on medium.
- Shape Tightly, Score Deeply: Roll the dough into a log, then pinch the seam tightly to seal—no gaps. Use a sharp knife or lame to slash the top at a 45-degree angle, cutting through the crust, not just the surface. A shallow score won’t steam properly, and a jagged cut won’t open cleanly.
- Preheat With Steam: Place a metal bowl of boiling water in your oven while preheating to 425°F (220°C). When you bake, the steam will give your bread that signature crackly crust and airy crumb. I used to skip this, and my loaves always came out flat and dense—until I tried this.
Storing and reheating your farmers bread
Room-Temp Storage
This rustic loaf stays fresh for 2-3 days at room temperature when stored properly. Wrap it tightly in a clean kitchen towel or beeswax wrap—this traps moisture and keeps the crust crisp.
I avoid plastic bags because they make the bread soggy. Place it on a wire rack to prevent condensation buildup, which can soften the crust prematurely. 🌾
For extra flavor development, let the bread sit out for 1-2 hours before slicing. The starches retrograde slightly, creating a firmer texture that's perfect for toast. If you notice the crust softening after day 2, pop slices in a 350°F oven for 5-7 minutes to restore crispiness.
Refrigerator Storage
If you need to store for longer than 3 days, refrigerate wrapped in the towel for up to 5 days. The cold slows staling, but the crust will lose some crispness.
To revive, brush slices with melted butter and toast in a 400°F oven for 3-4 minutes—this restores that golden crunch.
I recommend freezing for longer storage—this preserves texture far better than refrigeration. Slice the loaf first, then wrap individual slices in parchment paper before placing in a freezer bag. This prevents freezer burn and makes toast-ready portions easy to grab. 🧊
Freezer Preservation
Frozen farmers bread maintains its quality for up to 3 months—perfect for meal prep. Thaw at room temperature for 1-2 hours before toasting. For quick use, toast frozen slices directly in a toaster or toaster oven—they'll crisp up beautifully without needing full thawing.
For whole loaves, freeze before slicing in a heavy-duty freezer bag with all air removed. When ready to use, thaw overnight in the fridge, then reheat at 350°F for 10 minutes to restore freshness. The texture remains remarkably close to freshly baked!
Reheating Secrets
Microwave reheating works in a pinch, but it can make the crust rubbery. If you must use it, wrap a slice in a damp paper towel and heat for 15-20 seconds on medium power. For best results, always use oven or toaster methods—they preserve that perfect crust-to-crumb contrast.
My pro tip: Sprinkle reheated slices with flaky salt and a drizzle of garlic-infused olive oil—this mimics the fresh-from-oven experience. The salt enhances the crust's flavor while the oil adds richness that complements the airy interior. ✨
Nutrition facts
Frequently asked questions
Why does this recipe call for an overnight rest?
The overnight fermentation is what creates that signature rustic flavor and airy texture. This extended proofing allows the gluten to relax and develop fully, while the yeast breaks down starches into sugars for deeper flavor. The result is a bread with a complex taste that's far more interesting than quick-rise versions.
Can I use whole wheat flour instead of all-purpose?
Yes, but replace only 1 cup of the all-purpose flour with whole wheat to avoid a dense crumb. Whole wheat absorbs more water, so you may need an extra 1-2 tablespoons. The flavor will be nuttier and slightly heartier, but the texture will be slightly denser than the classic version.
What if my dough doesn't rise much overnight?
Cold temperatures can slow yeast activity. Try placing the dough in a warm spot (75-80°F) like near the oven with the light on. If it's still flat, your yeast may be old—replace it with fresh and try again. The dough should at least double in size for best results.
How do I get that perfect crackly crust?
The secret is steam! Place a baking sheet on the lower oven rack before preheating, then pour 1/2 cup hot water into it when loading the bread. The steam creates that signature crackly crust. Also, brush the dough with water before baking and sprinkle with coarse salt—this enhances crust formation.
Can I make this bread without seeds?
Skip the sesame and poppy seeds and try other toppings like everything bagel seasoning, crushed herbs, or even coarse sugar for a sweet version. The base recipe works perfectly with any topping—just adjust the quantity to 2-3 tablespoons total for visual appeal.