Desserts
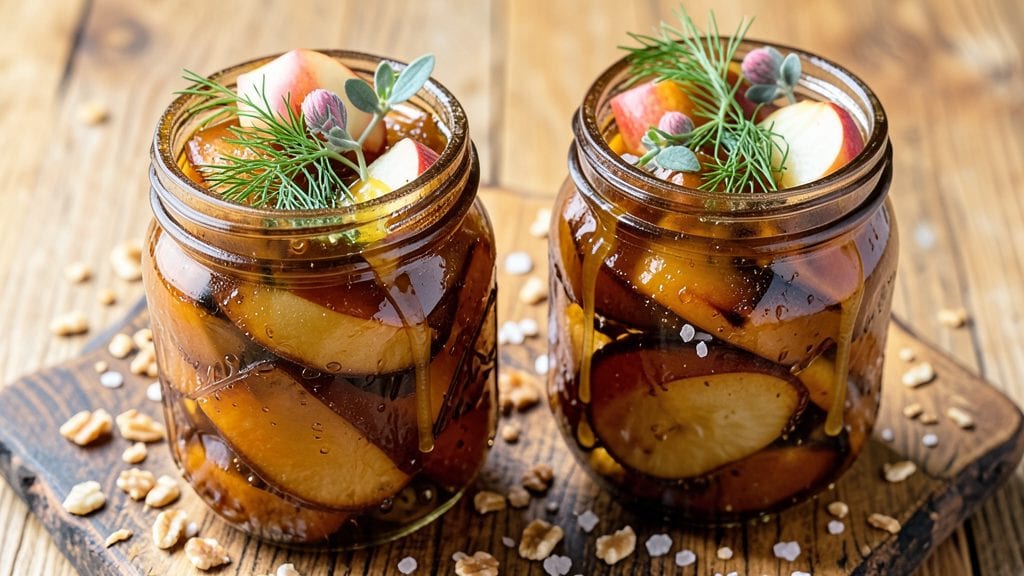
Fermented apple slices deliver a tangy-sweet crunch that transforms ordinary fruit into a probiotic-rich snack with restaurant-quality complexity. After perfecting this 7-day ferment, I discovered how simple ingredients—just apples, salt, and herbs—create a snack that’s both vibrant and deeply satisfying.
The fermentation process develops layers of flavor while preserving the fruit’s natural crunch, making it far more exciting than fresh slices.
This recipe transforms crisp apples into a tangy, slightly effervescent treat with a bright herbal finish—ideal for snacking or pairing with charcuterie boards. The 7-day fermentation ensures optimal flavor development without requiring special equipment, though a fermentation weight helps keep slices submerged in brine.
Safety is built into the process with proper salt levels and storage instructions, so you can enjoy the benefits of fermentation without risk.
What you’ll end up with is a batch of apples that’s bright, crunchy, and packed with probiotics, offering a refreshing contrast to sweet desserts or salty snacks. The tangy flavor pairs beautifully with sharp cheeses, cured meats, or even as a palate cleanser for rich dishes.
Once you try fermented apples, fresh slices will never taste the same again.
Use these fermented apples as a snack, garnish for cocktails, or even a tangy topping for yogurt and oatmeal. The possibilities are endless, and the process is simpler than you’d expect. Let’s get started on creating your own batch of tangy-sweet fermented apples.
Ingredients for fermented apple
Four crisp apples, two herbs, and a pinch of salt transform into probiotic-rich fermented bites.
| Ingredient | Amount | Notes |
|---|---|---|
| Organic Honeycrisp Apples 🍎 | 4 whole | Firm, unblemished, cored and sliced |
| Non-Iodized Sea Salt 🧂 | 1 ½ tbsp | Diamond Crystal preferred for purity |
| Fresh Dill Weeds 🌿 | ¼ cup | Chopped, stems removed |
| Fresh Thyme Sprigs 🌱 | ⅛ cup | Leaves only, finely chopped |
| Filtered Water 💧 | 4 cups | Room temperature preferred |
| Lemon Juice 🍋 | 1 tbsp | Freshly squeezed, organic |
| Fermentation Weight 🪨 | 1 piece | Glass or ceramic, 1-inch thick |
| Clean Quart Mason Jars 🥫 | 2 jars | With airtight lids |
| Rubber Bands 🪢 | 2 whole | For securing cheesecloth |
| Cheesecloth 🧾 | 1 sheet | Unbleached, cut to size |
The apples are everything here—Honeycrisp or Fuji hold their shape best during fermentation. Grab organic if possible (thicker skins resist browning), and avoid any with bruises or soft spots. Local farmers markets often have perfect specimens when grocery stores are spotty. For the herbs, freshness matters: Penzeys or Whole Foods bulk sections have the best quality. The sea salt is non-negotiable—iodized table salt can interfere with fermentation. If you can't find Diamond Crystal, Maldon flaky salt works in a pinch, but measure carefully since it's less dense.
Short on dill? Fresh parsley at double the amount gives a milder flavor, but the anise notes are worth hunting for. No thyme? Fresh rosemary leaves at half the quantity adds piney depth. The lemon juice can be swapped for apple cider vinegar at 1:1 ratio, but fresh lemon adds brightness. For the fermentation weight, a small glass plate or even a clean wine bottle works if you don't have a dedicated one. Just make sure it's food-safe and heavy enough to keep the apples submerged. The mason jars? Ball brand is the gold standard—check for cracks or chips before using.
Store the jars at room temperature, 68-72°F, away from direct sunlight for the full 7 days. After opening, keep them in the fridge where they'll last 2 weeks. The flavor peaks at day 7 but keeps developing for another week. I like to portion mine into smaller containers for snacking—glass jars with snap lids work perfectly. The brine reduces slightly over time, so if you notice apples peeking above, just add a splash of filtered water. These keep their crunch beautifully and taste even better after a day or two in the fridge.
Why You'll Love This Recipe
- No-Chop Necessary: I swear by this—just core those Honeycrisp apples (no peeling, no fuss) and let the salt and water do the magic. Ten minutes of hands-on time, then I forget about it for days.
- Herb-Packed Zing: That bright dill and thyme? They turn sweet apples into something tangy and alive—like a summer picnic in your mouth. The salt brings out the crispness in a way store-bought sauces never could.
- Picnic to Party: Slather it on toast for a quick breakfast, drizzle it over yogurt for a fancy brunch, or serve it in little jars at a potluck. It’s my go-to for when I need something effortless but impressive.
- Lasts All Week: Honestly, I’ve had a jar sitting for two weeks and it’s still fresh—no spoilage, no waste. Plus, the cost? A fraction of what I’d spend on fancy sauces, and it’s packed with real ingredients.
Step-by-step instructions for fermented apple recipe
Transform crisp apples into probiotic-rich, tangy-sweet bites with this precise fermentation method.
Prepare and Sterilize Your Equipment
Begin by thoroughly cleaning the two clean quart mason jars and their lids with hot, soapy water, then rinse with boiling water to eliminate any contaminants. Sterilization is critical for successful fermentation—you want to prevent unwanted bacteria from competing with your beneficial cultures. While the jars dry, cut the 1 sheet cheesecloth into two equal squares large enough to cover each jar's opening completely.
Place the fermentation weight in a small pot of water and bring to a boil for 5 minutes. This sterilizes the weight and ensures it's ready for use. Keep everything within reach so you can work efficiently during the next steps. The goal here is to create a completely sanitary environment where only the flavors and textures you intend will develop.
Core and Slice the Organic Honeycrisp Apples
Using a sharp apple corer or knife, carefully remove the cores from all 4 whole Organic Honeycrisp Apples while leaving the skins intact. The skin adds texture and nutrients to your ferment. Cut each apple into ½-inch thick slices—uniform thickness ensures even fermentation throughout. Arrange the slices on a clean cutting board to prevent browning.
As you work, keep the knife sharp to make clean cuts. The apples should yield easily without tearing. If you notice any bruised or damaged areas, trim them away immediately. These slices will form the base of your ferment, so their preparation sets the foundation for the final texture and flavor profile you're aiming for.
Create the Herb-Infused Brine Solution
In a large mixing bowl, combine the 4 cups filtered water with the 1.5 tbsp non-iodized sea salt and stir until completely dissolved. Add the 0.25 cup chopped fresh dill weeds and 0.125 cup finely chopped fresh thyme sprigs, then pour in the 1 tbsp freshly squeezed lemon juice. Mix gently to distribute the herbs throughout the liquid.
This herb-infused brine creates the flavor foundation while providing the right salinity for fermentation. The lemon juice adds brightness that will complement the apples' natural sweetness. Let the mixture sit for 10 minutes to allow the flavors to meld. You'll notice the herbs will sink to the bottom, which is normal—they'll infuse the brine as you work.
Pack and Ferment the Apples
Divide the apple slices evenly between the two sterilized jars, packing them tightly but not compressing them. Pour the herb-infused brine over the apples in each jar until completely submerged, leaving about 1 inch of headspace at the top. This liquid coverage prevents mold growth and ensures proper fermentation.
Place the cheesecloth squares over each jar's opening and secure them tightly with the rubber bands. This creates an airlock system that allows gases to escape while keeping contaminants out. The fermentation weight should be placed on top of the cheesecloth in each jar to keep the apples submerged. Store the jars at room temperature, away from direct sunlight.
Monitor and Taste Test Over 7 Days
After 24 hours, check the jars and press the apples down gently to ensure they remain submerged. You may need to add a bit more brine if they've risen. Over the next 7 days, taste a slice from one jar each day—you'll notice the flavor evolving from sweet to tangy-sweet with subtle herbal notes. The texture will soften slightly but maintain its crunch.
When the flavor reaches your desired balance of sweetness and tang (typically around day 5-7), transfer the jars to the refrigerator to slow fermentation. The cold temperature preserves the probiotics while maintaining the perfect flavor profile. Your fermented apples will keep for up to 3 weeks in the fridge, developing deeper complexity with each passing day.
Pro Tips For Making Fermented Apple
- Core Apples First: Honeycrisp apples stay crispest when you remove the core before slicing—it prevents bruising and uneven fermentation. I learned this the hard way when my first batch turned mushy in spots because the core punctured the flesh while cutting.
- Salt the Water Hard: Non-iodized sea salt should taste salty in the brine—aim for about 2% salinity (roughly 20g salt per liter of water). Too little and fermentation stalls; too much and it’ll overwhelm the apples’ natural sweetness. Taste-test the brine before adding fruit.
- Pack Apples Tightly: Stuff the jar with apple slices firmly, pressing them down to release juices and submerge the herbs completely. Loose packing leads to mold spots on exposed surfaces—my first batch had dill floating like a sad garnish.
- Burp Jars Daily: Open and release gas from the jar once a day for the first 3 days—fermentation creates pressure, and skipping this can crack jars or push apples to the surface. Use a clean spoon to press slices back down after each burp. (Yes, it’s annoying, but worth it.)
Essential equipment for this recipe
Fermentation Weights
A fermentation weight is essential for keeping apple slices submerged in brine, preventing mold growth. I use a glass or ceramic weight (like the Fermenting Weight from Cultures for Health) because they’re food-safe and won’t react with acids.
If you don’t have one, a small sterilized wine bottle or even a clean glass plate works—just ensure it’s heavy enough to stay in place. The key is maintaining 100% submersion during the entire 7-day ferment. 🪨
Mason Jars
Invest in Ball brand quart-sized mason jars with airtight lids—they’re the gold standard for fermentation. The wide mouths make packing apple slices easy, and the vacuum-seal lids keep contaminants out. Sterilize jars by boiling lids for 5 minutes and rinsing with hot water.
Avoid chipped or cracked jars, as they can harbor bacteria. I also recommend wide-mouth jars (like Ball Wide Mouth) for easier access to submerged apples. 🥫
Cheesecloth & Rubber Bands
Unbleached cheesecloth creates a breathable barrier that allows gases to escape while blocking contaminants. Cut it into two large squares to cover each jar’s opening. Secure with rubber bands (I use black latex-free bands) to create a snug seal.
This setup mimics a DIY airlock, essential for safe fermentation. If you don’t have cheesecloth, clean muslin fabric or even paper towels (sterilized) work in a pinch. 🧾
Salt & pH Balance
Non-iodized sea salt (like Diamond Crystal) is critical—it creates the right 3-5% salinity for fermentation while preserving the apples. Avoid iodized salt, as iodine can inhibit beneficial bacteria.
For pH testing, I use pH strips (like API Fresh Water Test Kit) to confirm the brine stays between 3.6-4.0. If the pH drifts too high, add a splash of lemon juice to acidify. 🧂
Thermometer
Fermentation thrives at 68-72°F, so a digital thermometer (like Thermoworks TH5) ensures consistency. Place it near your jars to monitor temperature—fluctuations can slow or speed up fermentation unpredictably.
If your kitchen runs hot, ferment in a cool closet or basement. Avoid direct sunlight, which can raise temps and risk mold. 🌡️
Optional: pH Meter
For serious fermenters, a pH meter (like Apera Instruments) gives precise readings, but it’s not mandatory. If you skip it, taste testing daily is key—fermented apples should taste tangy but not sour.
A pH below 4.6 ensures safety, but 3.6-4.0 is ideal for flavor. I only use a meter for large batches or troubleshooting. 💡
Nutrition facts
Frequently asked questions
Can I use any type of apple for fermenting?
Not all apples ferment equally well. Honeycrisp, Fuji, or Granny Smith work best because they hold their shape and have balanced sweet-tart flavors. Avoid soft varieties like McIntosh—they turn mushy. Organic apples with thicker skins resist browning better during fermentation.
How do I know when the fermented apples are ready?
Taste test daily starting on day 3. The ideal flavor is tangy-sweet with herbal notes, not overly sour. The texture should remain crisp but slightly softened. Most batches peak between 5-7 days, but personal preference varies.
What if mold appears during fermentation?
If you see white, pink, or fuzzy mold, discard the batch immediately. This happens when apples aren't fully submerged or the environment isn't clean. Prevent it by using 100% submersion, sterilized equipment, and storing jars at 68-72°F. Always check the first 24 hours for floating slices.
Can I make this recipe without cheesecloth?
Yes! Use clean muslin fabric, paper towels, or a coffee filter as substitutes. The key is creating an airlock system that allows gas escape while blocking contaminants. Just ensure whatever you use is sterilized (boiled or sanitized with vinegar).
How long do fermented apples last in the fridge?
Once refrigerated, they'll keep for 3-4 weeks with peak flavor in the first 2 weeks. The probiotics remain active during this time, though flavor deepens over storage. For longer shelf life, portion into small airtight containers and freeze for up to 6 months.