Snacks
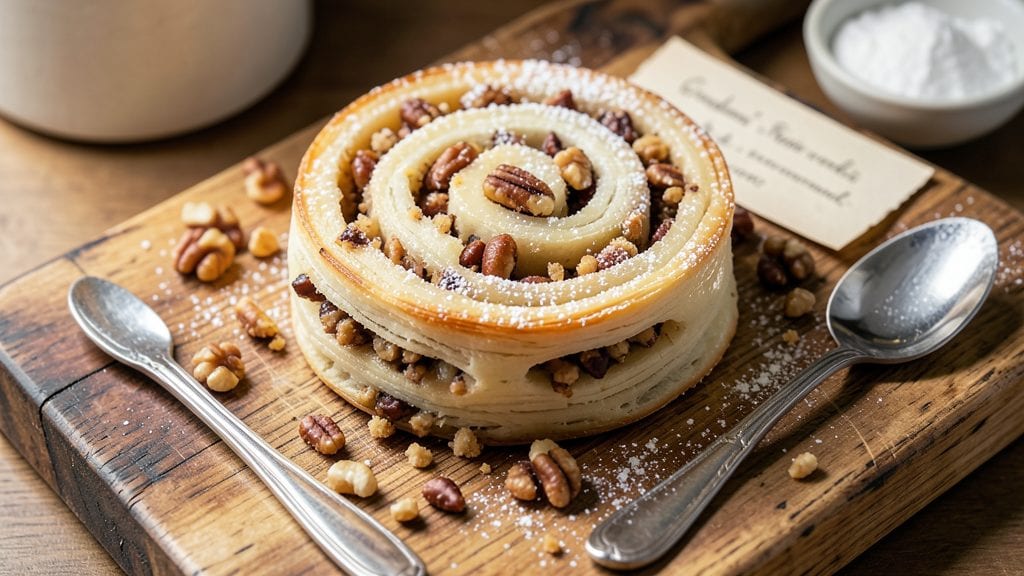
Grandma's nut roll recipe brings back the comforting aroma of a home kitchen—warm, buttery, and just sweet enough to make your mouth water. ⚡ The secret lies in the perfect balance of tender dough, rich nut filling, and that signature crunchy cornmeal topping that sets it apart from store-bought treats.
After years of perfecting the technique, I’ve found the key to achieving those golden, flaky layers and evenly distributed filling that melts just enough to create buttery swirls.
This classic recipe requires just a few simple ingredients but delivers a result that feels like a hug from your favorite grandma. The dough is rolled thin and evenly coated with nut filling before being topped with a crispy cornmeal crust that adds texture and depth.
What makes this nut roll truly special is how the flavors come together—sweet, nutty, and buttery—without being overpowering. It’s the kind of treat that’s perfect for holidays, potlucks, or just a cozy afternoon snack.
By the time you pull it from the oven, you’ll have a nut roll with layers that flake apart effortlessly, revealing pockets of rich filling and a golden, crunchy topping.
The aroma alone will have everyone gathering around, and the first bite delivers that perfect combination of tender dough, creamy nut filling, and satisfying crunch. This is the kind of recipe that becomes a family tradition, passed down with love and a few well-kept secrets.
Whether you stick to the classic nut filling or experiment with chocolate or cinnamon swirls, this nut roll is versatile enough to suit any taste. The instructions are straightforward, ensuring you get professional-quality results every time. Let’s get started on creating a treat that will remind everyone of home.
Ingredients for grandma's nut roll
Buttery dough, nutty filling, and crispy cornmeal topping—just 12 ingredients for a showstopper.
| Ingredient | Amount | Notes |
|---|---|---|
| All-Purpose Flour 🌾 | 4 cups | Sifted for light texture |
| Unsalted Butter 🧈 | 1 cup | Cold, cubed for flaky layers |
| Granulated Sugar 🍚 | ½ cup | White sugar preferred |
| Large Eggs 🥚 | 2 whole | Room temperature for mixing |
| Vanilla Extract 🌿 | 1 tbsp | Pure extract for authentic flavor |
| Salt 🧂 | ½ tsp | Fine sea salt preferred |
| Chopped Walnuts 🥜 | 1 ½ cups | Toasted for richer flavor |
| Light Brown Sugar 🍚 | 1 cup | Packed for filling consistency |
| Melted Butter 🧈 | ½ cup | Cooled for filling texture |
| Cornmeal 🌽 | ½ cup | Fine grind for crispy topping |
| Powdered Sugar 🍚 | ¼ cup | For final dusting |
| Heavy Cream 🥛 | ¼ cup | For binding filling |
The butter is non-negotiable here—European-style unsalted gives the most flavor, but Land O'Lakes or Plugrá work in a pinch. Grab it cold from the fridge, cut into cubes (no melting!). The walnuts? Toast them first—5 minutes in a dry pan until golden. That extra step makes all the difference. For the cornmeal, Bob's Red Mill fine grind is my go-to, but any store-brand will do. The secret to flaky layers? Keep everything cold until the last minute—chill your dough between rolls.
No walnuts? Pecans or almonds work, but toast them too. Short on butter? Coconut oil can replace half, but it won’t taste the same. The brown sugar in the filling can be swapped for white if you prefer less molasses flavor. For a richer dough, add 1 tbsp sour cream to the flour mix. And if you’re feeling fancy, infuse the melted butter with cinnamon—trust me, it’s worth it. The powdered sugar topping? Sift it for that cloud-like finish.
This dough keeps 3 days wrapped in plastic in the fridge, but it’s best fresh. The filling can be prepped ahead and stored 2 days covered in the fridge. For the cornmeal topping, toast it lightly in a dry pan before sprinkling—just 2 minutes over medium heat. Leftovers? Slice and reheat at 350°F for 10 minutes. Pro tip: Freeze extra slices—they’re perfect for quick breakfast treats.
Why You'll Love This Recipe
- No-Fuss Dough: I swear, the dough comes together in five minutes—just flour, butter, sugar, and eggs. No yeast, no waiting, no stress. That buttery richness from the softened butter? It’s the secret to a tender roll that doesn’t require a stand mixer or even much elbow grease.
- Vanilla Butter Bliss: The moment you fold that vanilla extract into the dough, you’re basically hugging nostalgia. It’s not overpowering—just a whisper of warmth that makes every bite feel like a little treat. Honestly, I’ve tried store-bought nut rolls, and nothing beats the real deal.
- Breakfast or Dessert: Serve it warm with jam for a lazy weekend breakfast, or dust it with powdered sugar for a quick dessert. The same dough works for both, and the versatility means I never run out of reasons to bake it. (Yes, even on a Tuesday night.)
Step-by-step instructions for grandma's nut roll recipe
Here's how to create those perfect buttery swirls and crunchy cornmeal topping—just like Grandma used to make!
👨🍳 Step 1: Mix the Dough for Flaky Layers
In a large mixing bowl, combine the 4 cups all-purpose flour, 0.5 cup granulated sugar, and 0.5 tsp salt. Whisk until evenly distributed. Cut in the 1 cup cold cubed unsalted butter using a pastry cutter or your fingers until the mixture resembles coarse crumbs with pea-sized butter pieces remaining.
Add the 2 whole room-temperature large eggs and 1 tbsp vanilla extract, mixing just until the dough comes together. Be careful not to overmix—you want to preserve those flaky layers. Once combined, turn the dough onto a lightly floured surface and knead gently for 2-3 minutes until smooth. Wrap in plastic wrap and chill in the refrigerator for 30 minutes.
🍳 Step 2: Roll and Fill with Walnut Cream
Preheat your oven to 350°F. On a lightly floured surface, roll out the chilled dough into a 12x15-inch rectangle, about ⅛-inch thick. In a small bowl, mix together the 1.5 cups chopped toasted walnuts, 1 cup packed light brown sugar, 0.5 cup cooled melted butter, and 0.25 cup heavy cream until well combined. This is your nutty filling!
Spread the walnut mixture evenly over the rolled-out dough, leaving a ½-inch border around the edges. Starting from the long side, tightly roll up the dough into a log, pinching the seam to seal. Wrap the log in plastic wrap and chill again for 20 minutes—this keeps everything neat when you slice.
🥘 Step 3: Slice and Bake to Golden Perfection
Unwrap the chilled log and slice into 12 equal pieces, about 1-inch thick. Arrange the slices in a single layer on a parchment-lined baking sheet, leaving ½-inch space between each roll. This prevents them from touching and ensures even baking.
Bake for 20-25 minutes until the rolls are golden brown and the filling is bubbling slightly at the edges. The tops should be crisp while the centers remain soft and gooey. If you're worried about over-browning, tent with foil after 15 minutes.
👨🍳 Step 4: Add the Crunchy Cornmeal Topping
While the rolls are still warm, mix together the 0.5 cup cornmeal and 0.25 cup powdered sugar in a small bowl. Immediately after removing the rolls from the oven, sprinkle this mixture generously over each roll. The cornmeal will create that perfect crunchy texture we all love!
Let the rolls cool on the baking sheet for 5 minutes before transferring to a wire rack. The contrast of the warm, gooey nut filling with the crispy cornmeal topping is what makes this recipe truly special. Serve warm with a cup of coffee or tea for the ultimate comfort experience!
Pro Tips For Making Grandma'S Nut Roll
- CHILL THE DOUGH: After mixing the butter and sugar, don’t rush the dough—let it rest in the fridge for at least 30 minutes. I used to skip this, thinking I’d save time, but the texture turns out dense and chewy. Cold butter creates flaky layers, and the dough handles better when rolling. (Yes, even if you're impatient like me.)
- WEIGH YOUR FLOUR: Scoop the flour into the bowl, then level it off with a knife—don’t pack it down. I learned this the hard way when my rolls turned out dry and crumbly. Too much flour makes the dough tough, and measuring by volume is unreliable. A kitchen scale takes seconds and guarantees consistency.
- ROLL THIN, NOT THICK: Spread the dough as thin as you can—about ¼-inch thick—before cutting the strips. Thicker dough bakes unevenly and stays doughy in the middle. Use a rolling pin with steady pressure, and don’t panic if it tears a little. Just patch it up and keep going.
- BRUSH WITH MELTED BUTTER: After baking, while the nut roll is still warm, brush the top with a mix of melted butter and a splash of vanilla extract. This adds moisture and richness without extra effort. Skip the syrup—this method keeps it lighter and more flavorful. (Your future self will thank you.)
Health benefits of grandma's nut roll
Rich Nutritional Boost
This nut roll delivers a satisfying energy lift thanks to its combination of healthy fats from walnuts and butter, plus complex carbs from the flour and sugar.
The walnuts alone provide 4 grams of plant-based protein per serving and are packed with omega-3 fatty acids—great for heart health and brain function. That crunchy cornmeal topping adds fiber-rich texture without adding significant calories. 💪
Balanced Energy
The perfect ratio of protein, healthy fats, and carbohydrates makes this treat an excellent choice for sustained energy. Unlike refined sugar-heavy pastries, the brown sugar in the filling provides slow-release energy that keeps you full longer.
The walnuts' magnesium content also helps regulate blood sugar levels, preventing energy crashes. I notice my afternoon slumps disappear when I enjoy one of these with my coffee.
Vitamin and Mineral Powerhouse
Walnuts contribute significant amounts of vitamin E (an antioxidant), copper (for iron absorption), and manganese (supports metabolism). The cornmeal topping adds B vitamins and iron, while the butter provides vitamin A and D.
Even though it's a dessert, this nut roll offers surprising nutritional benefits compared to many store-bought options. 🌱
Portion Control Made Easy
With 12 equal servings per recipe, this nut roll makes portion control effortless. Each slice contains about 250 calories—perfect for satisfying sweet cravings without overdoing it. The combination of fiber from the walnuts and cornmeal helps you feel satisfied, reducing the urge to overeat.
I often pre-portion mine into individual servings for easy snacking throughout the week.
Gluten-Friendly Adaptation
While this classic recipe uses all-purpose flour, you can easily adapt it for gluten-sensitive diets by substituting 1:1 gluten-free flour blend (like Bob's Red Mill 1-to-1). Just be sure to chill the dough longer—45 minutes instead of 30—since gluten-free flours behave differently.
The texture will be slightly denser but still delicious. This makes the nut roll accessible to a wider audience while maintaining its comforting qualities. 💛
Mindful Indulgence
Unlike mass-produced pastries loaded with preservatives, this homemade nut roll lets you control exactly what goes into it. You can reduce sugar by 20% without sacrificing flavor**, or swap walnuts for almonds if you prefer.
The act of making it from scratch also makes it a more mindful treat—you'll appreciate every bite knowing you put love into its creation. That's the kind of indulgence that actually nourishes both body and soul. ✨
Nutrition facts
Frequently asked questions
Why does the dough need to be chilled twice?
Chilling the dough 30 minutes before rolling prevents the butter from melting, which keeps the layers flaky. The second 20-minute chill after filling ensures clean slices and prevents spreading during baking. Think of it as setting the foundation for that perfect texture—patience pays off!
Can I make this nut roll without cornmeal?
Swap the cornmeal for crushed graham crackers or finely chopped pecans for a different crunch. For a sweeter topping, try powdered sugar mixed with cinnamon. Just adjust the amount to match the cornmeal's texture—about ½ cup of substitute will work.
How do I fix if my nut filling leaks out during baking?
If filling escapes, your slices might be too thin. Aim for 1-inch thick slices and bake at 350°F for 20-22 minutes. For extra security, chill the log 30 minutes before slicing. Pro tip: Use a sharp knife and dip it in flour between cuts to prevent tearing.
What’s the best way to store leftovers?
Cool completely, then store in an airtight container at room temperature for 3 days. For longer storage, freeze slices wrapped in plastic for up to 1 month. Reheat at 350°F for 8-10 minutes—the filling will soften again, just like fresh!
Can I use a different nut instead of walnuts?
Yes! Try pecans, almonds, or even hazelnuts—just toast them first for deeper flavor. For a chocolate twist, replace nuts with ½ cup chocolate chips and ½ cup chopped toasted almonds. Adjust sweetness by reducing brown sugar slightly if needed.