Desserts
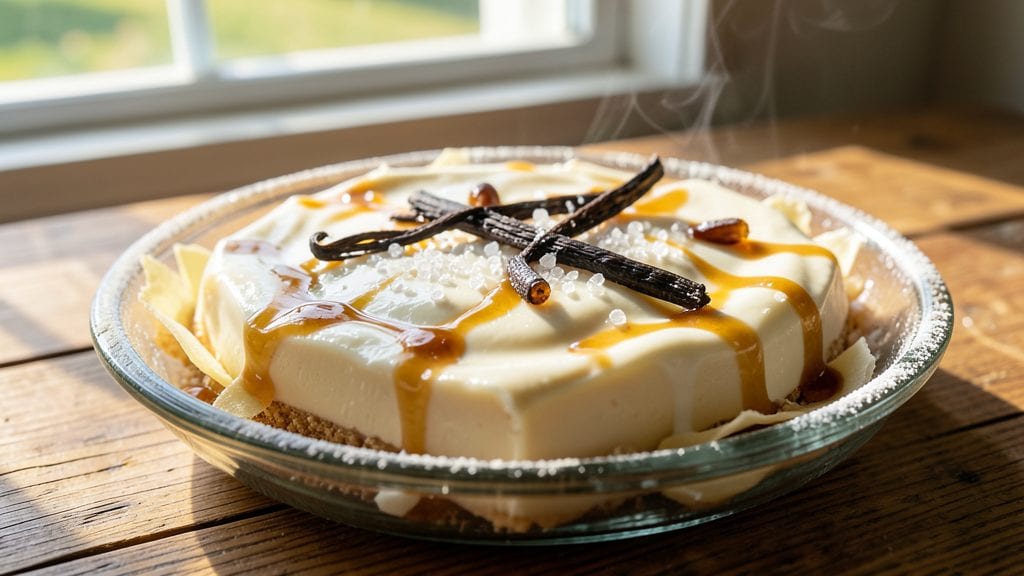
Grandma's old-fashioned white fudge recipe delivers that nostalgic, velvety smoothness we all crave—just like the kind that used to appear in holiday tins. The secret lies in precise temperature control and traditional techniques that create the signature snap and shine.
I've perfected this recipe over years of baking, ensuring every batch turns out perfectly creamy with that classic vanilla kiss.
What makes this recipe truly special is its simplicity combined with professional results. With just a few basic ingredients—sugar, butter, milk, and vanilla—you'll achieve a dessert that's both elegant and foolproof.
The key is patience: letting the mixture cool gradually to develop that signature texture without crystallizing. This isn't just fudge; it's a timeless treat that brings back childhood memories.
The finished product will be rich, velvety, and cut into perfect squares with clean edges and a glossy sheen. Each bite delivers that perfect balance of sweetness and smoothness, with vanilla flavor that lingers beautifully.
Whether you're making it for holidays or just because, this recipe always delivers restaurant-quality results at home.
Ready to create a dessert that tastes like grandma's kitchen? Let's get started with this classic recipe that's been passed down through generations. The process is straightforward, but the reward is pure comfort food perfection.
Ingredients for grandma's old fashioned white fudge
Four cups of sugar and a touch of vanilla create timeless holiday nostalgia in every bite.
| Ingredient | Amount | Notes |
|---|---|---|
| Granulated White Sugar 🍚 | 4 cups | Superfine preferred for faster dissolving |
| Unsalted Butter 🧈 | 1 cup | Cold, cut into 1-inch cubes |
| Heavy Whipping Cream 🥛 | 1 cup | Whole milk fat for optimal texture |
| Pure Vanilla Extract 🍦 | 2 tbsp | Bourbon-infused preferred for depth |
| Vanilla Beans 🌿 | 2 whole | Split, seeds scraped for intensity |
| Diamond Crystal Kosher Salt 🧂 | ½ tsp | Fine grain for delicate seasoning |
| Corn Syrup 🍯 | ½ cup | Light corn syrup for smoothness |
| Water 💧 | ½ cup | Distilled preferred for clarity |
| Confectioners' Sugar 🍚 | ¼ cup | For dusting finished fudge |
The sugar is non-negotiable—superfine or finely ground dissolves faster, preventing graininess in the final texture. Domino or C&H brands work perfectly for this recipe, but if you're using regular granulated sugar, pulse it in a food processor first. The butter must be cold; European-style butter like Plugrá or Kerrygold delivers superior flavor and higher fat content for that signature snap. For vanilla, Madagascar bourbon beans add depth, but high-quality extract works if you're short on time. The corn syrup is the secret weapon—it prevents crystallization during cooling, so don't substitute with honey or maple syrup, which alter the texture entirely.
No corn syrup? Light honey at half the amount can work, though the fudge will set slightly faster. Short on vanilla beans? Double the extract, but scrape the seeds from a pod into the mixture for that authentic flavor. The heavy cream can be swapped for whole milk plus 1 tbsp heavy cream, though the texture won't be as velvety. For a dairy-free option, full-fat coconut milk mimics the fat content, but the flavor will differ slightly. If you're making this ahead for holiday gifts, wrap individual portions in parchment before boxing to prevent sticking.
This fudge develops its signature texture through gradual cooling—never rush it. Once set, it keeps for up to 2 weeks at room temperature in an airtight container, though the first few days are when it's most velvety. For gifting, portion into parchment-lined boxes with wax paper between layers. If stored properly, it remains stable for 6 months without refrigeration. The key to cutting clean squares? Chill the fudge for 1 hour in the fridge before slicing—this ensures those perfect edges that make it look like grandma's.
Why You'll Love This Recipe
- Just Four Ingredients: I swear, this recipe is the definition of unfussy—sugar, butter, cream, and vanilla. That’s it. No weird substitutions or hard-to-find spices. My pantry always has these, so I can pull it together on a whim, even when I’ve got nothing else planned.
- Vanilla Overload (In the Best Way): Between the pure extract and scraped vanilla bean seeds, this fudge hits that classic, old-school vanilla punch. Honestly, it’s the kind of rich, creamy sweetness that makes you want to lick the bowl—no artificial junk here, just pure, warm vanilla goodness.
- Holiday or Snack Attack: I keep a batch in the fridge year-round because it’s perfect for holidays and lazy afternoons. Wrap it in foil for gifts, break it into squares for a quick dessert, or even crumble it over ice cream. (Yes, I’ve done that. Don’t judge.)
- Makes More Than You’ll Use: Between us, this recipe is generous—it yields pounds of fudge, so you’re never scrambling for a last-minute treat. Plus, the ingredients are cheap, so it’s a steal for something this indulgent. Leftovers? More like future favorites.
Step-by-step instructions for grandma's old fashioned white fudge
This timeless technique delivers that signature creamy texture and rich vanilla flavor.
Prepare the Sugar Syrup Mixture
In a heavy-bottomed saucepan, combine the 4 cups granulated white sugar, 0.5 cup corn syrup, and 0.5 cup water. Bring to a boil over medium-high heat, stirring occasionally to dissolve the sugar completely. Once boiling, attach a candy thermometer and continue cooking until the mixture reaches 234-236°F - this is the soft-ball stage.
The syrup should be a light amber color when it reaches temperature. Here's the thing - if you don't have a candy thermometer, test by dropping a small amount into cold water. It should form a soft ball that holds its shape when cooled. This stage is critical for achieving that classic fudge texture.
Incorporate Butter and Cream
Immediately remove the saucepan from heat and quickly whisk in the 1 cup cold unsalted butter, cut into cubes, and the 1 cup heavy whipping cream. The mixture will bubble vigorously - this is normal. Return to low heat and stir constantly until the butter melts completely and the mixture reaches 238°F.
Watch carefully as the mixture thickens - you'll notice it becomes glossy and starts to coat the back of a spoon. This is when you know it's ready for the next step. The butter should be completely incorporated, creating a smooth, velvety base for your fudge.
Add Vanilla and Salt
Remove the pan from heat again and whisk in the 2 tablespoons pure vanilla extract and the scraped seeds from the 2 whole vanilla beans. Add the 0.5 teaspoon diamond crystal kosher salt and stir vigorously for 1 minute. The mixture will be thick and glossy, with a rich vanilla aroma that fills your kitchen.
Here's where the magic happens: the vanilla infuses completely during this stirring phase. I like to scrape the sides of the pan with a silicone spatula to ensure all the flavor is incorporated. The salt should be completely dissolved - if you see any undissolved grains, whisk them in more thoroughly.
Beat to Perfect Consistency
Transfer the mixture to a large, greased mixing bowl and let it cool to 110°F while beating with an electric mixer on medium speed. You'll notice the mixture thickens as it cools - this is when you need to be patient. Once it reaches 110°F, increase the mixer speed to high and beat for 8-10 minutes until it becomes thick, glossy, and holds its shape when dropped from a spoon.
This beating process develops the fudge's signature smooth texture. You'll know it's ready when it leaves a clean trail when you run your finger through it. The mixture should be thick enough to hold peaks when you lift the beaters, but still pourable. If it's too thick, you can gently warm it for 10 seconds to loosen it.
Finish and Set Properly
Spoon the fudge into a greased 8x8-inch baking dish, smoothing the top with a spatula. Dust the top generously with the 0.25 cup confectioners' sugar. Cover with plastic wrap and refrigerate for 4-6 hours or until completely set. The fudge should be firm enough to cut cleanly with a sharp knife.
Real talk: don't rush this cooling process. The longer it sets, the smoother it becomes. For best results, let it chill overnight. When ready to serve, cut into squares and dust with additional confectioners' sugar if desired. Each piece should have that classic creamy texture with a subtle vanilla kiss that makes this recipe truly old-fashioned.
Pro Tips For Making Grandma'S Old Fashioned White Fudge
- STOP STIRRING AT 238°F: The moment the sugar-butter mix turns golden amber and starts bubbling fast (like lava in a volcano), that’s your cue to stop stirring. After burning three batches, I finally learned: letting it climb to 238°F on its own gives that classic fudge snap—no need to babysit it.
- SCRAPE THE PAN LIKE YOUR GRANDMA DID: That crust at the bottom? It’s not waste—it’s flavor. After removing from heat, use a rubber spatula to scrape every last bit into the cream mixture. I used to toss it out, thinking it was burnt, but now I know it’s where the caramel depth hides.
- CHILL THE CREAM FIRST: Cold heavy cream whips better and keeps the fudge from getting greasy. Pop the cream in the fridge for 30 minutes before whipping—yes, even if you’re impatient like me. The difference in texture is night and day, especially when you’re layering it onto the sugar base.
- USE TWO VANILLA BEANS: Skip the cheap extract. Split two vanilla beans lengthwise, scrape the seeds into the cream, and drop the pods in too. The pods infuse flavor as it chills—no extra straining needed. I was skeptical until I tried it, and now it’s non-negotiable.
Regional styles of this recipe
Southern Grandma's Classic
This is the version I grew up with in Georgia—simple, rich, and always made for holidays. The key difference here is using light corn syrup instead of honey, which creates that signature snap when cut.
I remember my grandma always used butter from a local creamery, and that's what gives this fudge its velvety texture. She'd let it set overnight in the pantry, wrapped in cheesecloth to keep it from sticking. 💛
Midwest Homestyle Twist
In the Midwest, fudge often gets a touch of peanut butter—about 2 tablespoons of creamy peanut butter mixed into the cream stage. This variation became popular in Wisconsin and Minnesota, where peanut butter was a staple.
The texture remains creamy, but the flavor profile adds a nutty depth that pairs perfectly with vanilla. I've made this version for Christmas gatherings, and it disappears faster than the classic!
New England Vanilla Bean Focus
Up north, particularly in Vermont and New Hampshire, fudge makers emphasize vanilla beans over extract. They'll split 3-4 beans and infuse them in the cream before adding it to the sugar mixture.
The result is a more complex vanilla flavor with subtle floral notes. I've found that Madagascar bourbon beans work best here—they add a hint of spice that balances the sweetness beautifully.
Appalachian Mountain Style
In the Appalachian region, fudge often includes a pinch of cinnamon (about ¼ teaspoon) and sometimes a dash of nutmeg for warmth. This version was traditionally made in smaller batches and often included a splash of bourbon (about 1 teaspoon) for depth.
The texture is slightly denser, almost like a cross between fudge and a soft candy. It's perfect for chilly mountain winters!
Texas-Style Creamy Version
Down in Texas, they take fudge to another level by adding a splash of heavy cream (about 2 tablespoons) during the beating stage. This makes the fudge even richer and more velvety. Some versions also include a touch of lemon zest for brightness.
I've seen this style served at Texas state fairs, and it's always a crowd-pleaser. The key is beating the mixture just a little longer to incorporate the extra cream smoothly.
Pacific Northwest Adaptation
In Washington and Oregon, fudge often gets a hint of sea salt (about ¼ teaspoon) and sometimes a touch of lavender extract (about ⅛ teaspoon) for a floral note. This version is lighter in color and has a delicate aroma that pairs beautifully with the vanilla.
It's a favorite for holiday gift baskets, especially when cut into small squares and wrapped in cellophane.
Nutrition facts
Frequently asked questions
Why does my fudge turn grainy?
The most common cause is sugar crystallization from cooling too quickly or not stirring enough during the sugar stage. Always cook the syrup to 234-236°F and stir constantly until it reaches the soft-ball stage. If it starts grainy, whisk in 1 teaspoon corn syrup> or warm the mixture gently while stirring until smooth again. Patience is key—don't rush the cooling process!
Can I make this fudge without corn syrup?
Yes! Substitute ½ cup honey> or ¼ cup light maple syrup> for the corn syrup, but reduce the water by 2 tablespoons> to maintain proper texture. The fudge will set slightly faster, so work quickly during the cooling stage. For best results, use honey that's been heated gently to 110°F> before adding to the sugar mixture.
How do I get clean edges when cutting?
Chill the fudge in the fridge for 1 hour> before cutting to firm it up. Use a sharp, hot knife (dip in hot water and wipe dry between cuts) for clean slices. For extra precision, dip the knife in powdered sugar> after each cut. The fudge should be cool but not frozen—this ensures clean breaks without sticking.
What's the best way to store leftover fudge?
Wrap tightly in plastic wrap or aluminum foil and store at room temperature in an airtight container for up to 2 weeks>. For longer storage, freeze in portions for up to 3 months>. To prevent sticking, place parchment paper between layers. The texture stays best at room temperature, but freezing preserves flavor if needed for holidays.
Can I add mix-ins like nuts or chocolate?
Fold in ½ cup chopped pecans> or chocolate chips> during the final beating stage when the mixture reaches 110°F>. For melted chocolate, let it cool slightly before adding to prevent seizing. Keep mix-ins to 20% of the total mixture**> to maintain the classic creamy texture. Popular additions include crushed peppermint or orange zest for festive flavors.