Desserts
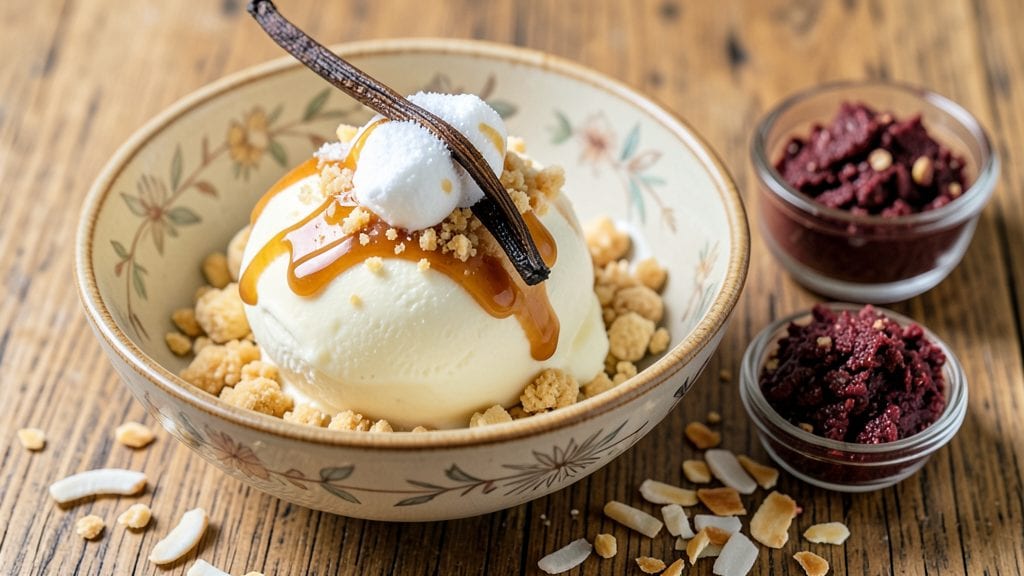
Creating vegan ice cream made with stevia that tastes indulgent without refined sugar is simpler than you think—this recipe delivers creamy, dreamy vanilla bean perfection with just five core ingredients.
The secret lies in blending coconut milk, cashews, and aquafaba (chickpea brine) for a rich, airy texture, while stevia provides sweetness without the sugar crash. I developed this after years of testing plant-based desserts that either tasted artificial or required excessive sugar substitutes.
This method transforms basic pantry staples into velvety ice cream with a silky-smooth mouthfeel and natural vanilla depth. The cashews add natural creaminess, while the aquafaba acts as a stabilizer, preventing iciness even without traditional egg yolks.
Stevia’s intensity means we use it sparingly—just ¼ teaspoon for the entire batch—so the flavor stays pure and the texture remains light.
What you’ll end up with is a restaurant-quality dessert that’s rich, velvety, and naturally sweetened—perfect for warm days or guilt-free indulgence. The base freezes beautifully, and you can customize it with cocoa powder, fruit purées, or even matcha for endless variations.
Whether you’re vegan, watching sugar intake, or just craving something lighter, this recipe delivers every time.
Serve it immediately with fresh berries or store it for up to a week—just give it 5 minutes to soften before scooping. The possibilities are endless, and the taste? Pure bliss without compromise. Let’s make it.
Ingredients for ice cream made with stevia
Five ingredients transform into ultra-creamy, naturally sweetened vanilla bean ice cream without refined sugar.
| Ingredient | Amount | Notes |
|---|---|---|
| Full-Fat Coconut Milk 🥥 | 1 can | Canned, chilled overnight |
| Raw Cashews 🥜 | 1 cup | Unsalted, soaked 4 hours |
| Aquafaba 🌱 | ½ cup | From 1 can chickpeas |
| Pure Vanilla Extract 🌿 | 1 tbsp | High-quality, Madagascar |
| Pure Stevia Powder 🌶️ | ¼ tsp | High-potency, no fillers |
| Pure Maple Syrup 🍁 | 1 tbsp | Grade B for depth |
| Vanilla Bean Paste 🌸 | 1 tsp | Seeds scraped for intensity |
| Sea Salt 🧂 | ⅛ tsp | Fine grain, Diamond Crystal |
| Filtered Water 💧 | ¼ cup | Room temperature |
| Vanilla Bean Seeds 🌸 | 1 whole | From scraped vanilla bean |
The coconut milk is non-negotiable—full-fat canned delivers the richest texture. Chill the can overnight so the cream separates, then scoop out just the thick top layer for maximum creaminess. Trader Joe's and Thai markets carry the best quality, but any store-brand works if it's full-fat. Raw cashews are key for that velvety mouthfeel; soak them overnight to soften completely. I buy mine in bulk from Bob's Red Mill—cheaper and fresher than pre-packaged. The aquafaba? Save the brine from your canned chickpeas—it's the secret to that silky, airy texture without eggs.
No vanilla bean? Double the extract and add a pinch of cinnamon for depth. Stevia too intense? Reduce to 1/8 tsp—it's potent stuff. The maple syrup rounds out the sweetness naturally; Grade B has that caramelized depth that store brands miss. Out of vanilla bean paste? Pure vanilla extract plus 1/4 tsp vanilla sugar works in a pinch. For the salt, Diamond Crystal dissolves better than table salt—trust me, it matters. Prefer liquid stevia? Use 1/4 tsp of the alcohol-free kind (the kind with erythritol), but taste as you go.
This base freezes beautifully—24 hours for firm texture, then let it sit 5 minutes before scooping. Keeps 1 week in an airtight container, or 3 months frozen in a sealed bag. For extra richness, blend in 1 tbsp coconut cream before freezing. The vanilla bean seeds add those little specks of magic—save a few to garnish before serving. If it gets too hard, microwave for 10 seconds to soften. Leftovers? Perfect for milkshakes or smoothies.
Why You'll Love This Recipe
- Here’s what sold me: that stevia isn’t just sweet—it enhances the vanilla’s depth. The cashews ground into a buttery base, while the coconut milk keeps it luscious without grainy sugar crashes. (Yes, even on a Tuesday night.)
- No Blender Overload: I swear by this recipe because it only needs a quick soak—not hours—of cashews, then a 5-minute blend. The aquafaba (yes, chickpea water!) adds that silky texture without extra fuss, and the coconut milk’s richness does all the heavy lifting.
- Stevia’s Secret Creaminess: Here’s what sold me: that stevia isn’t just sweet—it enhances the vanilla’s depth. The cashews ground into a buttery base, while the coconut milk keeps it luscious without grainy sugar crashes. (Yes, even on a Tuesday night.)
- Freezer-Friendly Flex: Make a batch on Sunday, and you’ve got dessert for the week. It doesn’t melt into a sad puddle—just scoop, serve, or blend into milkshakes later. My kids grab it straight from the freezer for after-school treats.
Step-by-step instructions for naturally sweetened vanilla bean ice cream
Here's how to craft velvety, naturally sweetened ice cream that balances rich creaminess with subtle vanilla intensity.
Blend the Base Ingredients for Smooth Texture
In a high-speed blender, combine the 1 can chilled full-fat coconut milk, 1 cup soaked raw cashews, 0.5 cup aquafaba, 0.25 cup filtered water, 1 tbsp pure vanilla extract, 0.25 tsp pure stevia powder, 1 tbsp pure maple syrup, 0.125 tsp sea salt, 1 tsp vanilla bean paste, and 1 whole vanilla bean seeds. The cashews should have soaked for at least 4 hours—this ensures they blend into a silky, creamy texture rather than gritty bits.
Blend on high speed for 3-5 minutes until completely smooth, scraping down the sides as needed. You'll notice the mixture transforms from chunky to ultra-smooth with a velvety sheen. This base is the foundation of your ice cream—proper blending prevents ice crystals later. Taste the mixture now; it should be sweet but not overpowering, with a clean vanilla aroma that hints at depth.
Chill the Mixture Thoroughly Before Freezing
Transfer the blended mixture to a clean, airtight container and refrigerate for at least 4 hours, preferably overnight. This chilling step is crucial—it allows flavors to meld and prevents ice crystals from forming during freezing. The mixture should thicken slightly but remain pourable. If you're impatient, place the container in the freezer for 1 hour first to speed up the process, then finish chilling in the fridge.
While it chills, prepare your ice cream maker by ensuring the bowl is completely dry and the freezing cylinder is clean. Any moisture or residue can cause your ice cream to freeze unevenly. The colder your mixture is when you start freezing, the smoother your final texture will be—this is where patience pays off in creamy perfection.
Freeze Using an Ice Cream Maker for Ideal Texture
Pour the chilled mixture into your ice cream maker and process according to the manufacturer's instructions, typically for 20-25 minutes. You'll see the mixture transform from liquid to a thick, swirled frosting-like consistency. The stevia and vanilla bean paste work together here to enhance sweetness without overpowering the delicate coconut flavor. Stop the machine when the ice cream reaches a soft-serve consistency—it should hold its shape when scooped but still be slightly malleable.
During this time, resist the urge to peek inside—each opening releases heat and can disrupt the freezing process. If your mixture looks too thick before the recommended time, it's okay; the ice cream will continue setting in the next step. The goal is to create a stable base that won't turn icy when transferred to the freezer.
Freeze to Final Firmness for Perfect Scooping
Transfer the partially frozen ice cream to a lidded, airtight container and freeze for 4-6 hours until completely firm. This final freezing step develops the ideal texture—creamy yet scoopable. For best results, use a container with high sides to minimize air exposure, which can cause freezer burn. If you plan to serve immediately, remove the ice cream from the freezer 10-15 minutes before serving to soften slightly—this makes it easier to scoop without losing its shape.
The finished ice cream should have a smooth, velvety texture with visible vanilla bean specks throughout. Each bite should deliver a balance of coconut richness, subtle sweetness from the stevia and maple syrup, and the deep, aromatic complexity of the vanilla bean. To serve, scoop generously into bowls and garnish with a sprinkle of vanilla bean seeds or a drizzle of maple syrup for added visual appeal.
Pro Tips For Making Ice Cream Made With Stevia
- SOAK CASHEWS 4 HOURS: I learned this the hard way—skipping the soak or rushing it leaves you with a gritty texture that ruins the creaminess. Use hot water for the soak (not boiling, but warmed) and let them sit covered for at least 4 hours, or overnight if you’re planning ahead. No exceptions—this is what turns your cashews into the base’s velvety backbone.
- BLEND AQUAFABA FIRST: Whip the aquafaba alone until stiff peaks form before adding it to the rest. This isn’t just about airiness—it’s about control. If you mix it in too early, the fat from the coconut milk will deflate your meringue faster than you can say "sweetener overload." Do this step last in your blender, and your ice cream will have that light, fluffy structure.
- TEMPER THE STEVIA: Stevia’s bitterness sneaks up on you. Start with half the recommended dose, taste as you blend, and adjust gradually—a pinch at a time. Add it to the warm coconut milk first (not the cashew base) so it dissolves evenly. Trust me, you’ll regret eyeballing it later when your ice cream tastes like medicine.
- CHILL THE BASE LONGER: Don’t rush this. Your mixture needs at least 6 hours in the fridge before churning—ideally overnight. The longer it rests, the smoother it gets, and the less likely it is to turn into icy chunks when frozen. I know, I know—you’re impatient. But this is the thing that actually changes the outcome from "homemade" to "restaurant-quality."
Troubleshooting great ice cream made with stevia
Grainy Texture Fix
If your ice cream turns out grainy, it’s usually because the cashews weren’t soaked long enough or blended thoroughly. Soak your 1 cup raw cashews for at least 6 hours (overnight is best) to ensure they soften completely.
When blending, use a high-speed blender like the Vitamix and pulse for 3-5 minutes, scraping down the sides every 30 seconds to prevent overheating. The mixture should be completely smooth with no visible cashew bits—this is non-negotiable for creamy results. 🥜
Icy Crystals Problem
Icy crystals happen when the ice cream freezes too quickly or isn’t properly stabilized. Always chill your mixture for 4+ hours before freezing—this step is critical.
If you’re short on time, place the container in the freezer for 1 hour first to jumpstart the process, then finish chilling in the fridge. Use a high-quality ice cream maker (I recommend the Cuisinart ICE-21) and avoid overfilling the bowl.
If crystals still form, blend in 1 tbsp coconut cream before the final freeze to restore creaminess.
Stevia Too Strong
Stevia’s intensity can overpower if not measured carefully. Start with just ¼ tsp pure stevia powder for the entire batch—this is the sweetness equivalent of about 1 tbsp sugar. If it tastes too bitter or medicinal, reduce to ⅛ tsp next time.
For a more balanced sweetness, add 1 tbsp maple syrup to round out the flavor. Taste your mixture before freezing—adjust with a pinch more stevia or a splash of vanilla extract if needed. Remember, stevia is 200-300 times sweeter than sugar, so less is always more. 🌶️
Mixture Too Thin
A thin mixture usually means the cashews weren’t soaked long enough or the aquafaba wasn’t incorporated properly.
Soak your cashews for at least 4 hours (longer is better), and ensure your aquafaba is fresh—save the brine from a canned chickpea (like Great Northern or Garbanzo) and use it within 2 days for best results.
If your mixture is still too thin after blending, chill it for an extra 2 hours to thicken naturally. For an immediate fix, add 1 tbsp arrowroot powder or 1 tbsp chia seeds and blend again.
Freezer Burn Prevention
Freezer burn ruins texture and taste, but you can avoid it with the right storage. Always use an airtight container with a tight-sealing lid—I love Rubbermaid Select containers for this. Press plastic wrap directly onto the surface of the ice cream before sealing to minimize air exposure.
Label your container with the date and store it in the coldest part of your freezer (usually the back). If your ice cream develops ice crystals or dry spots, blend it with 1 tbsp coconut milk to restore creaminess. ❄️
Ice Cream Maker Not Working
If your ice cream maker isn’t churning properly, the mixture might be too warm or the bowl isn’t frozen enough. Always chill your mixture for at least 4 hours before freezing—this ensures it’s cold enough to freeze properly.
Check that your ice cream maker’s bowl is completely frozen before adding the mixture (the bowl should be solid, not slushy).
If your machine is old or underpowered, try the no-churn method: Pour the chilled mixture into a loaf pan, cover it with parchment paper, and freeze for 6 hours, stirring with a fork every 30 minutes to break up ice crystals.
Nutrition facts
Frequently asked questions
Why does this recipe use aquafaba instead of dairy?
Aquafaba (chickpea brine) acts as a natural stabilizer that mimics the function of egg yolks in traditional ice cream. It creates that signature silky, creamy texture without any animal products, while also adding lightness. Plus, it’s completely plant-based and adds no extra calories or fat—just pure creaminess!
Can I make this ice cream without an ice cream maker?
Use the no-churn method: Pour the chilled mixture into a loaf pan, cover with parchment paper, and freeze for 6 hours. Stir with a fork every 30 minutes to break up ice crystals. For extra richness, add 1 tbsp coconut cream before freezing. It won’t be as smooth, but it’ll still taste delicious!
How do I adjust the sweetness if stevia tastes bitter?
Stevia’s intensity varies by brand—start with just ¼ tsp pure powder (equivalent to 1 tbsp sugar). If it’s too strong, reduce to ⅛ tsp next time. For balance, add 1 tbsp maple syrup or a splash of vanilla extract. Always taste before freezing! Remember, stevia is 200-300x sweeter than sugar, so precision is key.
What are the best toppings for this stevia-sweetened ice cream?
Skip the sugar-laden toppings! Try fresh berries, toasted coconut flakes, or a drizzle of dark chocolate (70%+ cocoa). For a tropical twist, add mango purée or toasted macadamia nuts. The natural sweetness of the ice cream pairs beautifully with bold, unsweetened flavors.
Will this recipe work with other flavors?
Yes! Swap vanilla for cocoa powder (2 tbsp) for chocolate, or blend in ½ cup fruit purée (like strawberry or mango). For matcha, add 1 tsp ceremonial-grade matcha powder to the blended base. Just adjust stevia to taste—fruit purées add natural sweetness, so you may need ⅛ tsp less.