
Sauces & Condiments
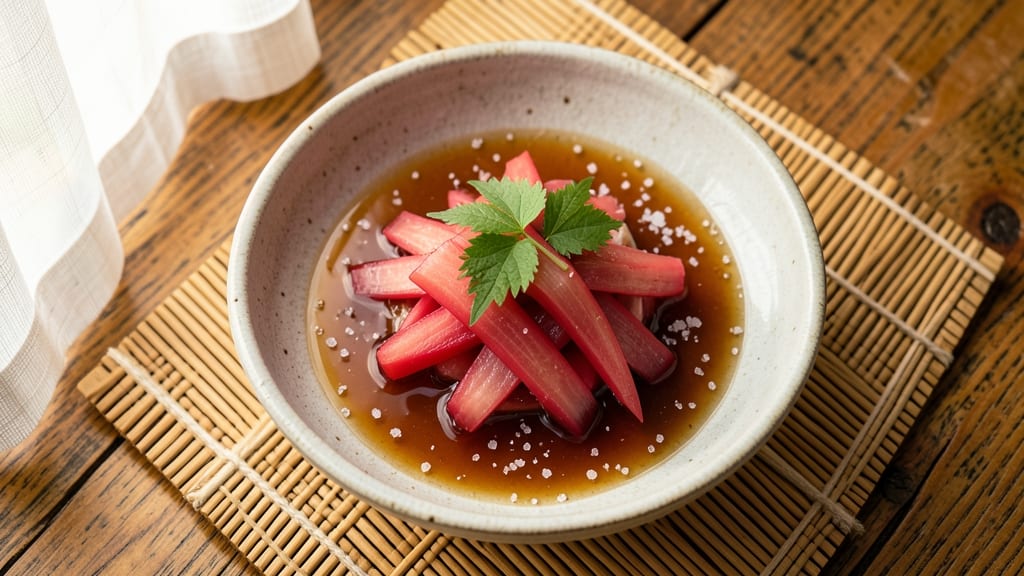
This Japanese red pickled ginger recipe transforms ordinary ginger into a vibrant, tangy condiment that elevates every sushi bowl. The process combines precise fermentation with a bright red hue—whether from natural shiso leaves or food coloring—to create a dish that’s as visually striking as it is flavorful.
I’ve refined this method over years of experimentation to ensure safety and consistency, so you can enjoy the same restaurant-quality results at home.
The key to perfect beni shoga lies in the curing process: thinly sliced ginger is salted to draw out moisture, then submerged in a vinegar and sugar solution infused with red dye. This method preserves the ginger’s natural crunch while developing a complex balance of sweet, sour, and umami flavors.
Unlike store-bought versions, homemade pickled ginger stays fresh for months when stored properly, making it a pantry staple worth mastering.
Once complete, this bright red ginger adds a satisfying crunch and palate-cleansing acidity to sushi rolls, ramen, or even as a standalone snack. The fermentation process also enhances its digestive benefits, making it a healthier alternative to conventional pickles.
With just a few simple ingredients and careful attention to timing, you’ll create a condiment that’s as impressive to serve as it is delicious to eat.
Ready to make your own? The recipe includes step-by-step guidance for fermentation, dye infusion, and storage—plus tips for adjusting sweetness or spice levels to suit your taste. Let’s get started on this flavorful project that brings a taste of Japan to your kitchen.
Ingredients for japanese red pickled ginger
Just 11 ingredients transform fresh ginger into restaurant-quality beni shoga for sushi bowls.
| Ingredient | Amount | Notes |
|---|---|---|
| Fresh Ginger Root 🧄 | 1 ½ lb | Organic preferred, skin removed |
| Rice Vinegar 🍶 | 1 ½ cups | White or seasoned, 5% acidity |
| Granulated Sugar 🍚 | 1 cup | White or raw cane sugar |
| Red Food Coloring 🎨 | ½ tsp | Natural or artificial, gel preferred |
| Diamond Crystal Kosher Salt 🧂 | ½ cup | Fine grain, non-iodized |
| Shiso Leaves 🌿 | ¼ cup | Red perilla leaves, optional |
| Water 💧 | 1 cup | Filtered preferred |
| Red Chili Flakes 🌶️ | ½ tsp | Adjust for heat preference |
| Sesame Oil 🫒 | 1 tsp | Toasted, for aroma |
| Fresh Lemon Juice 🍋 | 1 tbsp | Brightens flavor |
| Plastic or Glass Container 📦 | 1 piece | Airtight, quart-sized |
The ginger is the star here—organic ginger root has the cleanest flavor, but any fresh ginger works if it's firm and free of soft spots. Trader Joe's or Asian markets usually carry the best quality, but your regular grocery store ginger is fine too. Look for roots that are plump and have a vibrant color—those wrinkly, shriveled pieces won't give you the same crunch. Thinly slicing the ginger (about 1/8-inch thick) is crucial for even pickling and that perfect texture. I use a mandoline for consistency, but a sharp knife works too if you're careful. The shiso leaves? Optional but worth it—they add a subtle anise flavor and natural red color, but food coloring gets you the same visual impact if you can't find them.
No rice vinegar? White vinegar or apple cider vinegar will work in a pinch, though the flavor won't be quite as nuanced. Running short on sugar? Honey or agave at a 1:1 ratio adds a different depth, but it might ferment faster. The food coloring can be swapped for beet juice or pomegranate juice for a more natural red hue, though the color might fade faster. If you're avoiding artificial ingredients entirely, red cabbage juice is another great option—just simmer chopped red cabbage in water to extract the color. The sesame oil is non-negotiable for aroma, but if you're avoiding it, a pinch of toasted sesame seeds will give you that nutty flavor without the oil.
This keeps for 6-12 months in the fridge—honestly, it'll be gone long before then. The ginger stays crisp for the first 3 months, after which it softens slightly but still tastes amazing. I portion mine into small jars so I can grab just what I need for sushi bowls or ramen. If you want to extend shelf life even further, freeze portions for up to 1 year. The color might darken slightly when frozen, but it'll be fine once thawed. For best results, store the ginger submerged in the vinegar mixture—this keeps it moist and prevents browning. If you notice any mold or off smells, toss it immediately.
Why You'll Love This Recipe
- Five-Minute Prep: Honestly, this takes less time than waiting for the microwave to heat up water. Just peel, slice, and soak—no peeling potatoes or chopping onions here.
- Sweet-Tart Magic: That perfect balance of ginger’s zing and sugar’s warmth? It’s like a flavor hug. The red hue makes it look fancy too—no one suspects how simple it is.
- Party in a Jar: Serve it at sushi nights, as a palate cleanser for spicy dishes, or even in cocktails. I’ve seen it on charcuterie boards and in bento boxes—it’s the quiet MVP of any spread.
- Zero-Waste Winner: Use up that ginger root before it dries out, and the leftovers? They last weeks in the fridge. Plus, rice vinegar and sugar are pantry staples—no grocery run needed.
Step-by-step instructions for Japanese red pickled ginger
Here's how to transform fresh ginger into vibrant, tangy pickles perfect for sushi bowls.
Prepare the Ginger and Brine Solution
Peel the 1.5 lb fresh ginger root using a vegetable peeler or sharp knife, removing all the skin. Cut it into ¼-inch thick slices—thinner slices pick up flavor faster, but thicker ones hold their shape better in bowls. For even slices, I like to use a mandoline, but a sharp chef's knife works just fine with steady pressure.
In a medium bowl, whisk together the 1.5 cups rice vinegar, 1 cup granulated sugar, 1 cup water, 0.5 tsp red food coloring, and 0.5 tsp red chili flakes until the sugar dissolves completely. The mixture should be smooth and slightly syrupy. If you prefer a milder heat, reduce the chili flakes to ¼ tsp. The food coloring will give your pickled ginger that signature vibrant red hue—stir well to distribute it evenly.
Layer Ginger and Brine in the Container
Place the ginger slices in the plastic or glass container, arranging them in a single layer without overlapping. If your container isn't large enough to fit all the slices in one layer, work in batches—this ensures every piece gets properly infused. Pour half of the brine solution over the ginger, making sure each slice is fully submerged. The acidity of the vinegar will start breaking down the ginger's fibers immediately, so don't let any slices sit dry.
Next, add the 0.25 cup shiso leaves and 1 tbsp fresh lemon juice to the container. The shiso leaves contribute a subtle floral note that balances the ginger's spiciness, while the lemon juice brightens the overall flavor. Pour the remaining brine over the top, ensuring all ingredients are completely covered. If needed, weigh down the ginger with a small plate or lid to keep everything submerged—this prevents surface oxidation and ensures even pickling.
Seal and Cure for 24 Hours
Seal the container tightly and let it sit at room temperature for 24 hours. This initial curing period allows the ginger to soften slightly and absorb the full flavor of the brine. After 24 hours, transfer the container to the refrigerator and let it pickle for an additional 48 hours. The cold slows down the pickling process, giving you more control over the final texture—you want the ginger to be tender but still hold its shape when served.
Check the ginger after 48 hours by pressing a slice gently with your finger. It should be fork-tender but not mushy. If it's still too firm, return it to the refrigerator for another 12-24 hours. The longer it sits, the more vibrant and flavorful it becomes, but it should never turn to mush. The pickled ginger is ready when it's bright red, tangy, and just firm enough to bite into—perfect for adding a crunchy, zesty contrast to sushi bowls.
Finish with Sesame Oil and Store Properly
Remove the pickled ginger from the brine and drain it well, discarding the liquid or saving it for cocktails if you're feeling adventurous. Drizzle 1 tsp sesame oil over the ginger and toss gently to coat. The nutty aroma of the sesame oil complements the ginger's spiciness and adds another layer of depth to the flavor. Let the ginger sit at room temperature for 10 minutes to absorb the oil before transferring it back to the container.
Store the pickled ginger in the refrigerator for up to 2 weeks. The longer it sits, the more complex the flavors become, but it's best enjoyed within the first week when the ginger is at its crispest. When ready to use, simply slice or chop the ginger as needed—it's perfect for sushi bowls, ramen, or even as a tangy garnish for grilled meats. The bright red color and bold flavor will elevate any dish it touches.
Pro Tips For Making Japanese Red Pickled Ginger
- Peel Thin Slices: Skip the thick chunks—this isn’t a ginger stir-fry. Use a mandoline or sharp knife to slice the root paper-thin (about 1/16-inch). Thicker slices stay tough and unevenly pickled, while thin ones soak up the vinegar and sugar perfectly every time. I learned this the hard way after biting into a stubborn, chewy slice mid-bite.
- Boil Vinegar First: Heat the rice vinegar to a gentle simmer for 2–3 minutes before dissolving the sugar and salt. This drives off the sharpest acid notes and makes the final flavor smoother. I used to skip it, and the pickled ginger always tasted a little harsh—like vinegar had won the flavor fight.
- Salt Before Coloring: Dissolve the kosher salt in the warm vinegar before adding the red food coloring. The salt helps stabilize the color and prevents streaking when you mix in the ginger later. Sounds weird, but it works: the red stays vibrant and even, not clumpy or patchy.
- Store in Fridge Fast: Once the ginger is submerged, pop the jar in the fridge within 30 minutes—no waiting. The longer it sits at room temp, the more the sugar and vinegar start breaking down the ginger’s texture, turning it mushy before it even gets pickled. I was skeptical until I tried it: crisp, bright ginger every time after this.
Storing and reheating your japanese red pickled ginger
Refrigerator Storage
Store your homemade red pickled ginger in an airtight container (glass or food-grade plastic) fully submerged in the vinegar brine. The acidity preserves the ginger while maintaining its vibrant color and crisp texture.
Keep it refrigerated at 40°F or below for up to 6 months—though I find it disappears within 2-3 weeks when I make it! 🧄 The ginger stays best when submerged; if it floats, gently press it back down with a clean spoon.
For best results, portion the ginger into smaller containers (like 4-ounce mason jars) so you can grab just what you need for sushi bowls or ramen without exposing the rest to air.
This also prevents cross-contamination if you're storing other foods nearby. The longer it sits, the more intense the flavor becomes, but the texture softens slightly after 3 months.
Freezing for Long-Term
Freeze pickled ginger in single-serving portions for up to 1 year—this works great if you won’t use it all within the 6-month fridge window.
Spread the slices on a tray lined with parchment paper, freeze until solid (about 2 hours), then transfer to a freezer bag with all the air squeezed out. The color may darken slightly when frozen, but it’ll return to vibrant red once thawed.
To use frozen ginger, thaw in the refrigerator overnight or submerge the sealed bag in warm water for 10 minutes. The texture will be slightly softer than fresh, but it’s perfect for cooking in stir-fries or soups where extra crunch isn’t critical. Avoid refreezing thawed ginger to maintain quality.
Reheating (If Needed)
While pickled ginger is best enjoyed cold, you can gently warm it in a small saucepan over low heat for 2-3 minutes if using it in hot dishes like ramen or curries. Add 1 tablespoon of the reserved vinegar brine to prevent drying out.
For microwave reheating, place a slice on a plate with a damp paper towel, heat on 50% power for 10 seconds, then check—this keeps it from getting rubbery. 🔥
Never reheat pickled ginger above 140°F—the high acidity can cause texture breakdown. If you’re adding it to hot dishes, toss it in at the very end to preserve its crispness and bright flavor. The acidity also helps balance rich, fatty foods like fried rice or tempura.
Reviving Stale Ginger
If your pickled ginger loses its crispness after long storage, revive it by soaking in fresh rice vinegar brine (equal parts vinegar and water) for 30 minutes. This rehydrates the fibers and restores some of the original snap.
For extra crunch, pat the slices dry and pan-fry in sesame oil over medium-high heat for 30 seconds per side—this caramelizes the edges beautifully. ✨
Discard any ginger that develops mold, off smells, or a slimy texture—these are signs of spoilage. When in doubt, toss it! The vinegar brine itself can be reused for 1-2 more batches of pickled ginger if stored properly in the fridge, but it’ll lose some of its punch over time.
Nutrition facts
Frequently asked questions
Why does my homemade pickled ginger turn brown instead of bright red?
Exposure to air causes oxidation, which turns ginger brown. Always keep the ginger fully submerged in the vinegar brine during storage. If the color fades, add a pinch of vitamin C powder (½ tsp) or a splash of lemon juice to restore vibrancy. For deeper color, use gel food coloring instead of liquid, as it disperses better.
Can I make this recipe without red food coloring?
For natural color, blend ½ cup red cabbage juice (simmer chopped red cabbage in water) or use ¼ cup pomegranate juice. Shiso leaves also add subtle red hues, though the color may fade faster than with food coloring. Adjust the vinegar ratio if using juice-based dyes to maintain proper acidity.
How spicy should the pickled ginger be?
The ½ tsp red chili flakes in the recipe provides mild heat—adjust to taste! For no heat, omit completely. If you prefer spicier ginger, increase to 1 tsp or add ¼ tsp cayenne pepper to the brine. The heat develops over time, so taste after 48 hours and adjust if needed.
What’s the best way to use up extra pickled ginger?
Beyond sushi bowls, try it in ramen broth (add 2 slices at the end), fried rice (chop finely), or cocktails (muddle with vodka and lime). For a sweet twist, toss with honey and sesame seeds as a snack. The tangy crunch works surprisingly well in tacos or grilled cheese sandwiches too!
Is it safe to eat pickled ginger during pregnancy?
While pickled ginger is generally safe, the high vinegar content may cause heartburn for some pregnant women. If you’re experiencing acid reflux, reduce the vinegar to 1 cup and increase water to 1.5 cups in the brine. Always consult your healthcare provider before consuming homemade fermented foods during pregnancy.