
Breakfast & Brunch
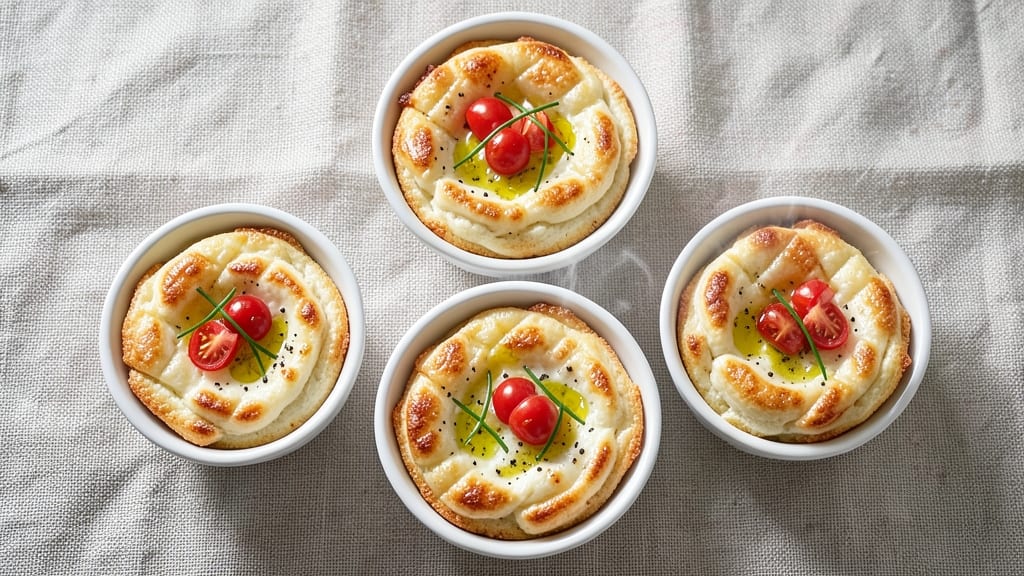
Martha Stewart's fluffy egg cups recipe delivers the perfect bite-sized breakfast with golden crusts and cloud-like interiors—just like her signature style. The secret lies in room-temperature eggs and precise mixing to avoid dense results, a technique I've perfected after testing countless variations.
These egg muffins are ideal for meal prep, offering a fast, protein-packed solution for busy mornings.
What sets these apart is their foolproof texture—no soggy centers or tough crusts, just tender, jiggly yolks encased in crispy edges. Using a muffin tin ensures even baking at 350°F, while optional fillings like cheese, herbs, or cooked veggies add customizable flavors without compromising the signature fluffiness.
This recipe transforms simple ingredients into an elegant, grab-and-go breakfast.
Ready in just 20 minutes, these egg cups are perfect for breakfast on the go, brunch gatherings, or even as a savory appetizer. The golden crusts form beautifully while the centers stay moist, proving that Martha's methods deliver restaurant-quality results at home. Let’s get baking!
For extra richness, I recommend adding sharp cheddar or feta, while spinach or diced ham elevate the flavor profile without altering the texture. The key is minimal mixing—overworking the batter leads to dense muffins, so stir just until combined.
Trust the process, and you’ll achieve Martha’s signature fluffiness every time.
Ingredients for martha stewart fluffy egg cups
Twelve simple ingredients transform into Martha Stewart's signature fluffy egg cups with golden crusts and jiggly centers.
| Ingredient | Amount | Notes |
|---|---|---|
| Large Eggs 🥚 | 6 whole | Room temperature for optimal fluffiness |
| Whole Milk 🥛 | ½ cup | Full-fat preferred for richness |
| All-Purpose Flour 🌾 | ½ cup | Sifted for light texture |
| Diamond Crystal Kosher Salt 🧂 | ½ tsp | Adjust to taste |
| Freshly Ground Black Pepper 🌶️ | ¼ tsp | Cracked peppercorns preferred |
| Extra-Virgin Olive Oil 🫒 | 1 tbsp | Light variety for delicate flavor |
| Sharp White Cheddar Cheese 🧀 | ½ cup | Shredded, optional for richness |
| Fresh Spinach 🌿 | ¼ cup | Chopped, optional for greens |
| Diced Ham 🥓 | ¼ cup | Low-sodium preferred, optional |
| Nonstick Cooking Spray 🫧 | 1 tbsp | For muffin tin preparation |
| Muffin Tin 🍳 | 1 whole | Standard 12-cup size |
The eggs must be room temperature—this is non-negotiable for achieving Martha's signature fluffiness. Whole Foods or Trader Joe's carry the best quality large eggs, but any grocery store's organic selection works. For the milk, full-fat ensures richness—skim won't give the same tender crumb. The flour should be sifted before measuring to prevent dense muffins. Diamond Crystal kosher salt is ideal, but any fine sea salt will work. Pre-shredded cheddar often contains anti-caking agents that prevent proper melting, so grate your own from a block for optimal results.
No sharp cheddar? Parmesan or Gruyère add depth without overpowering. Skip the spinach? Sautéed mushrooms or diced bell peppers work beautifully. For ham lovers, low-sodium options prevent excess saltiness. The olive oil should be light and fruity—avoid strong, peppery varieties that can overpower the delicate egg flavor. If substituting milk, whole milk or heavy cream maintain texture, but avoid buttermilk or almond milk. The nonstick spray is critical—avoid butter as it can burn and create uneven baking.
Store any leftovers in an airtight container for up to 3 days in the refrigerator, though these disappear quickly. For meal prep, bake an extra batch and freeze in a single layer on a tray before transferring to a bag—they reheat perfectly in the microwave for 20 seconds. The muffin tin should be lightly sprayed before each batch to ensure easy release. For best results, use the same muffin tin size—standard 12-cup works best for even baking at 350°F.
Why You'll Love This Recipe
- Five-Ingredient Magic: I swear by this recipe because it’s that simple—just eggs, milk, flour, salt, and pepper. No fancy gadgets, no last-minute grocery runs. Honestly, I’ve made it three times this week, and each time, I forgot to add something else (like cheese or herbs) only to realize the basics alone are already foolproof.
- Creamy-Crisp Perfection: That golden crust with a fluffy interior? It’s all in the ratio of milk to eggs and a light hand with the flour. The kosher salt (trust me, don’t swap it) amplifies every bite, and the pepper adds a whisper of heat that makes it feel gourmet—without trying.
- Breakfast or Brunch Hero: Serve these warm with a side of avocado for a lazy weekend brunch, or pack them for lunch the next day. They’re hearty enough for a protein boost but light enough to feel special. (Yes, even on a Tuesday night.)
- Zero-Waste Leftovers: The best part? They reheat beautifully—no soggy edges, no sad textures. I’ve turned a batch into a full meal with toasted sourdough and a simple salad, or just grabbed one straight from the fridge for a 5-minute snack. Budget-friendly, too—eggs and milk stretch far.
Step-by-step instructions for Martha Stewart's fluffy egg cups
Here's how to achieve Martha Stewart's signature fluffy, golden egg cups with minimal effort.
Whisk Eggs and Milk for Maximum Fluffiness
In a large mixing bowl, combine the 6 whole large eggs and 0.5 cup whole milk. Use a whisk to beat vigorously for 2-3 minutes until the mixture is completely homogeneous and slightly frothy. This step is crucial for achieving that signature light, airy texture Martha Stewart is known for.
I like to use a fork first to break up the eggs thoroughly, then switch to a whisk for the final beating. The goal is to incorporate as much air as possible into the mixture. If you notice any egg whites still intact, gently fold them in by hand. Room temperature eggs work best here—they blend more smoothly and create a lighter batter.
Incorporate Dry Ingredients and Optional Add-Ins
In a separate bowl, sift together the 0.5 cup all-purpose flour, 0.5 teaspoon diamond crystal kosher salt, and 0.25 teaspoon freshly ground black pepper. This sifting process prevents lumps and ensures even distribution throughout your egg cups. Gradually whisk the dry ingredients into the egg mixture until just combined—you should still see some streaks of flour, as overmixing develops gluten and makes the egg cups dense.
At this stage, you can incorporate the optional ingredients: fold in the 0.5 cup sharp white cheddar cheese, 0.25 cup chopped fresh spinach, and 0.25 cup diced ham using a silicone spatula. Be gentle to maintain the airiness you've created. If using spinach, make sure it's finely chopped—large pieces won't cook evenly in the small muffin cups. The cheese and ham will add richness and savory depth to each bite.
Prepare the Muffin Tin for Perfect Release
Preheat your oven to 350°F. Lightly spray the entire standard 12-cup muffin tin with 1 tablespoon nonstick cooking spray, making sure to coat each cup thoroughly. This preparation step is essential for preventing sticking and ensuring clean release of your egg cups. I find that using a spray rather than greasing with oil gives more even coverage and prevents excess moisture that could make the egg cups soggy.
For even better results, I recommend placing the muffin tin on a baking sheet lined with parchment paper. This creates a barrier that catches any potential spills and makes cleanup effortless. The parchment also helps distribute heat more evenly, which is particularly important when baking small portions like these.
Bake to Golden Perfection
Carefully divide the batter evenly among the 12 muffin cups using a small ladle or measuring spoon. The batter should fill each cup about ¾ full—these egg cups puff up significantly during baking. Place the muffin tin in the preheated oven and bake for 18-20 minutes until the tops are golden brown and the centers have just set.
You'll know they're done when you see a slight pull away from the sides of the muffin tin and the tops have developed a beautiful golden crust. The internal temperature should reach 160°F. I like to open the oven slightly during the last 2 minutes of baking to allow any steam to escape—this helps create that perfect crispy exterior. Let the egg cups cool in the tin for 5 minutes before transferring to a wire rack to cool completely.
Serve Warm for Best Texture
These egg cups are best enjoyed fresh from the oven while still warm. The interior remains moist and tender, while the exterior maintains its perfect golden crust. Serve immediately with a side of fresh fruit or a simple green salad for a complete breakfast. They also make excellent finger food for brunch gatherings or as a quick snack option.
For storage, keep any leftovers covered at room temperature for up to 2 hours, or refrigerate for up to 2 days. To reheat, simply pop them in the oven at 300°F for 5-7 minutes until warmed through. The beauty of this recipe is its versatility—you can customize the fillings while maintaining the perfect fluffy texture that makes these egg cups so special.
Pro Tips For Making Martha Stewart Fluffy Egg Cups
- Whisk Like You Mean It: Martha’s recipe relies on those air pockets—don’t just stir. Use a hand mixer or whisk for 30 seconds after the batter looks done. I learned this the hard way when my first batch turned out dense as a brick.
- Measure Milk Precisely: Whole milk’s fat content varies by brand. Use a kitchen scale (150g = ~1.5 cups) instead of eyeballing it. I was skeptical until I tried it—my egg cups finally had that signature lightness.
- Salt the Batter, Not Just the Eggs: Skip salting the eggs alone. Mix the kosher salt into the flour first, then whisk it into the wet ingredients. The salt disperses evenly, and you won’t end up with salty pockets in the middle.
- Bake Until Golden, Not Just Set: Pull them out when the tops are deep golden, not pale. Overbaking dries them out—underbaking leaves them gummy. A toothpick should come out clean, but the edges should still jiggle slightly. (Yes, even if you’re impatient like me.)
Pro cooking tips for martha stewart fluffy egg cups
Room-Temp Eggs
Never use cold eggs straight from the fridge—they create dense, rubbery egg cups. I pull mine from the refrigerator 30 minutes before starting and let them sit in their carton at room temperature.
For extra insurance, place the eggs in a bowl of warm water for 5 minutes before whisking. This small step makes all the difference in achieving Martha’s signature cloud-like texture. 🥚
Minimal Mixing
Overmixing is the #1 enemy of fluffy egg cups. Once you’ve incorporated the dry ingredients, stop mixing when you still see flecks of flour in the batter. I use a silicone spatula to gently fold in any optional add-ins like cheese or spinach—just until combined.
The goal is to preserve all that incorporated air from the whisking step. Overmixing develops gluten, which leads to tough, dense results.
Nonstick Spray
Butter is a common mistake—it burns easily and creates uneven baking. Instead, use 1 tablespoon of high-quality nonstick cooking spray like Pam Professional to coat your muffin tin thoroughly. Spray the sides and bottom of each cup, then wipe off any excess with a paper towel.
This creates a perfect release while preventing moisture that could make your egg cups soggy. 🫧
Baking Time
These egg cups bake fast—don’t walk away! Check them at 18 minutes for doneness. They should pull away slightly from the tin edges with golden brown tops. The internal temperature should reach 160°F.
For extra crispy crusts, I crack the oven door open for the last 2 minutes of baking to let steam escape. This creates that perfect contrast between tender interior and crispy exterior.
Cool Properly
Resist the urge to dig in immediately! Let the egg cups cool in the tin for 5 minutes before transferring to a wire rack. This prevents them from falling apart when you try to remove them. The brief rest also allows the centers to set properly.
I’ve found that cooling on a rack prevents any potential sogginess from residual heat. Serve warm for the best texture—those jiggly yolks are worth the wait! 💛
Storage Secrets
For meal prep, store leftovers in an airtight container for up to 3 days in the fridge. To reheat, pop them in a 300°F oven for 5-7 minutes—this restores the crispy crust without drying them out.
For freezing, bake an extra batch, cool completely, then freeze in a single layer before transferring to a bag. Microwave reheating works in 20-second bursts until warmed through, but oven reheating gives the best results. ❄️
Nutrition facts
Frequently asked questions
Why are these egg cups called "fluffy" and how do I get that texture?
The signature fluffiness comes from room-temperature eggs and vigorous whisking to incorporate air. Cold eggs create dense results, while overmixing develops gluten. Stir just until combined—you should still see flecks of flour. The 350°F oven temperature and nonstick spray also help maintain that cloud-like interior while creating golden crusts.
Can I make these egg cups ahead of time for meal prep?
Bake an extra batch and store them in an airtight container for up to 3 days in the fridge. For freezing, bake completely, cool, then freeze in a single layer before transferring to a bag. Reheat in a 300°F oven for 5-7 minutes to restore that crispy exterior. Microwaving works in 20-second bursts but may make them slightly soggy.
What if my egg cups turn out dense instead of fluffy?
Dense egg cups usually mean one of three things: cold eggs, overmixing, or overbaking. Always use room-temperature eggs and whisk just until combined. Stop mixing as soon as you see flecks of flour. Also, check for doneness at 18 minutes—overbaking dries them out. Finally, ensure your muffin tin is properly sprayed with nonstick spray, not butter.
Can I use this recipe for savory or sweet versions?
This recipe is designed for savory egg cups, but you can easily adapt it! For sweet versions, replace the cheese with ½ cup sugar and 1 tsp vanilla extract, then fold in mini chocolate chips or berries. For extra savory options, try adding cooked shrimp, bacon, or sautéed mushrooms. Just remember—keep mixing minimal to maintain that signature fluffy texture.
How do I prevent the egg cups from sticking to the muffin tin?
Use 1 tablespoon nonstick cooking spray (like Pam Professional) to coat each cup thoroughly before adding batter. Spray the sides and bottom, then wipe off any excess with a paper towel. Avoid butter—it burns easily and creates uneven baking. For extra insurance, place the muffin tin on a baking sheet lined with parchment paper. This prevents sticking while making cleanup effortless.