Breakfast & Brunch
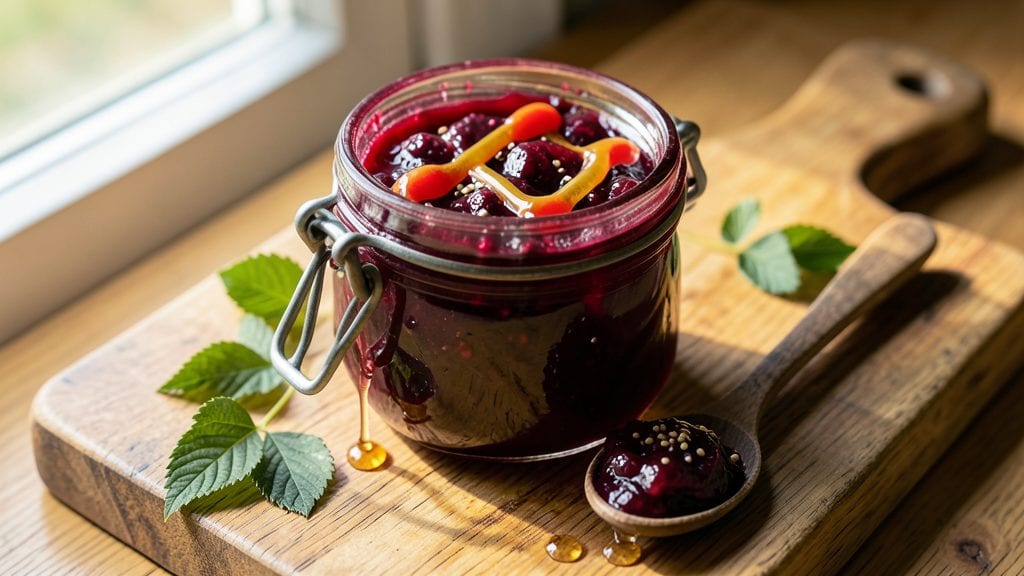
Creating a no-cook blackberry jam recipe that preserves all those summer berries without heat or sugar is a game-changer for busy mornings. ✨ This method uses natural pectin from the berries themselves, along with a touch of lemon juice for brightness, to create a thick, spreadable jam that’s ready in just 10 minutes—and requires no canning skills beyond basic refrigeration.
The beauty of this recipe lies in its simplicity and versatility. You’ll need just blackberries, lemon juice, and a natural sweetener (like maple syrup or agave) to balance the tartness, along with a pinch of salt to enhance the flavors.
No cooking means no risk of burning, and the jam stays fresh for up to two weeks in the fridge—perfect for toast, yogurt, or dessert toppings.
What sets this jam apart is its rich, vibrant color and intense blackberry flavor, achieved without heat that can degrade nutrients. The texture is smooth yet slightly chunky, with just enough natural sweetness to satisfy.
It’s also vegan-friendly and free from processed additives, making it a healthier alternative to store-bought jams.
Whether you’re prepping for breakfast or gifting homemade preserves, this no-cook method ensures effortless results with minimal ingredients. Let’s get started on making jam that’s as good for you as it is delicious.
Ingredients for no cook blackberry jam
Eight simple ingredients transform summer blackberries into vibrant, no-cook preserves with natural sweetness and texture.
| Ingredient | Amount | Notes |
|---|---|---|
| Fresh Blackberries 🫐 | 2 cups | Ripe, unwashed berries preferred |
| Organic Maple Syrup 🍯 | ½ cup | Grade B for robust flavor |
| Fresh Lemon Juice 🍋 | ¼ cup | From organic lemons |
| Chia Seeds 🌾 | 2 tbsp | Ground into fine powder |
| Raw Apple Cider Vinegar 🍶 | 1 tbsp | Unfiltered for tang |
| Diamond Crystal Kosher Salt 🧂 | ¼ tsp | Fine grain preferred |
| Pure Vanilla Extract 🌸 | ½ tsp | Optional for depth |
| Filtered Water 💧 | ¼ cup | Room temperature |
The quality of blackberries makes all the difference—farmers markets or organic sections yield the most flavorful berries. Look for deep purple, plump berries with a slight give when pressed. Costco or Trader Joe's often carry organic blackberries at reasonable prices. If using frozen berries, thaw them first and drain excess liquid. The maple syrup should be Grade B for its rich, caramel notes—avoid the lighter Grade A if you want depth. For lemon juice, fresh is non-negotiable; bottled lacks the bright acidity needed to balance the berries' tartness. Store lemons in the fridge to preserve their potency.
No maple syrup? Agave nectar or date syrup works equally well, though maple adds a subtle molasses complexity. Short on chia seeds? Ground flaxseed at double the amount provides similar thickening power. The apple cider vinegar can be swapped for raw honey (vegan substitute: more maple syrup), but it's essential for preserving the jam's natural pectin. For a more intense flavor, add 1 tsp of blackberry powder (freeze-dried berries blended into powder). If the jam seems too thick after mixing, add 1 tsp of water at a time until it reaches a spreadable consistency.
This jam thrives in the fridge for up to two weeks, maintaining its vibrant color and fresh flavor. For longer storage, portion into sterilized glass jars and freeze for up to six months. The vanilla extract, if used, can be added fresh before serving to preserve its aroma. To use, simply scoop and spread—no reheating required. The jam's natural pectin keeps it stable at room temperature for up to four hours, making it perfect for picnic spreads or breakfast preparations.
Why You'll Love This Recipe
- No Stir Needed: I’ll be real—this jam requires zero cooking or stirring. Just mash the blackberries with maple syrup, a splash of lemon, and chia seeds, then let it thicken overnight. Honestly, I’ve made jam this way while scrolling on my phone.
- Sweet-Tart Magic: That bright lemon juice cuts through the blackberries’ jammy richness, while the maple syrup keeps it luscious without overpowering. The chia seeds? They add a subtle crunch and thicken it naturally—no pectin required.
- Breakfast to Brunch: Spread it on toast with ricotta, dollop it into yogurt, or drizzle it over pancakes. I’ve even used it as a glaze for grilled chicken—trust me, the tangy-sweet balance works everywhere.
- Lasts for Weeks: The apple cider vinegar and chia seeds act like natural preservatives, so this jam stays fresh in my fridge for months. Plus, it’s cheaper than store-bought—just blackberries and pantry staples. Win-win.
Step-by-step instructions for no-cook blackberry jam
Transform ripe blackberries into velvety preserves without heat—just 10 minutes of hands-on work.
👨🍳 Step 1: Prepare the Blackberry Base
In a medium mixing bowl, combine the 2 cups fresh blackberries with the 0.25 cup fresh lemon juice. Using a potato masher or fork, gently crush the berries until you achieve a chunky consistency with minimal seeds—about 10-15 seconds of work. This preserves texture while releasing juices.
Here's the thing—don't over-mash. You want visible berry pieces that soften slightly but maintain their shape. The lemon juice will help break down the fruit's structure while preventing browning. I know it seems counterintuitive to add liquid first, but this creates the perfect vehicle for the chia seeds to work their magic later.
🥘 Step 2: Combine Wet Ingredients
Add the 0.5 cup organic maple syrup, 1 tbsp raw apple cider vinegar, and 0.25 tsp diamond crystal kosher salt to the blackberry mixture. Stir vigorously with a silicone spatula for 1 minute until all ingredients are fully incorporated. The syrup should begin to coat the berries evenly, and you'll notice the mixture becoming slightly glossy.
This is where the science happens: the vinegar acts as a natural preservative while balancing the sweetness, and the salt enhances all flavors. Taste the mixture now—it should be tart-sweet with bright acidity. If you're using the 0.5 tsp pure vanilla extract, add it here and stir for another 10 seconds to distribute the aroma evenly.
👨🍳 Step 3: Activate the Chia Seeds
In a small bowl, whisk together the 2 tbsp ground chia seeds with the 0.25 cup filtered water until completely dissolved—no lumps should remain. This creates a chia gel that will act as your natural thickener. Let this mixture sit for 2 minutes while you prepare the main bowl.
Real talk: this is the secret ingredient that replaces pectin. The chia seeds absorb liquid and form a gel that binds everything together without cooking. Pour the chia gel into the blackberry mixture and stir thoroughly for 2 minutes using a whisk or spatula. You'll notice the jam immediately begin to thicken as the chia seeds work their magic.
⏰ Step 4: Rest and Thicken
Cover the bowl with plastic wrap and refrigerate for at least 4 hours, or up to 24 hours for maximum thickening. This resting period allows the chia seeds to fully hydrate and develop their gelling properties. I know it's hard to wait, but this step transforms your jam from runny to perfectly spreadable.
After resting, give the jam one final stir. It should now have a thick, pudding-like consistency that clings to a spoon but still flows smoothly. If it's too thick after 4 hours, add 1 tsp filtered water and stir again. If it's too thin, let it rest another hour. The chia gel continues thickening even after initial setting.
🍽️ Step 5: Serve and Store
Transfer the jam to clean, sterilized jars and seal tightly. For immediate serving, let it sit at room temperature for 10 minutes to soften slightly. The texture should be velvety with visible berry pieces—not completely smooth like traditional cooked jams. This chunky texture is what makes no-cook jams so special.
Store any unused jam in the refrigerator for up to 2 weeks. The acidity from the lemon juice and vinegar helps preserve it naturally. For best flavor, let it come to room temperature before serving—this enhances the aromatic qualities of the vanilla and maple syrup. Spread on toast, mix into yogurt, or use as a glaze for pancakes.
Pro Tips For Making No Cook Blackberry Jam
- Mash the Berries First: I learned this the hard way—skipping the mashing step leaves your jam with a grainy texture, no matter how long you let it thicken. Use a fork or potato masher to break down the blackberries until they’re mostly smooth, but leave a few small chunks if you like rustic texture. This also helps the chia seeds bind better later.
- Weigh the Chia Seeds: Don’t eyeball it—chia seeds are sneaky. For every 2 cups of blackberries, use exactly 2 tablespoons of seeds (about 15g). Too little and your jam won’t gel properly; too much and it’ll turn into a gluey mess. Scoop them straight from the bag into a small dish first to avoid spills.
- Let It Thicken Overnight: Patience here saves you from watery jam. After mixing everything, refrigerate the jar for at least 8 hours—overnight is ideal. The chia seeds need time to fully absorb the liquid and create that perfect spreadable consistency. Trust me, rushing it just means you’ll be stirring in extra seeds later.
- Use Warm Syrup: Cold maple syrup makes the chia seeds work harder to gel. Heat the syrup in a microwave for 30 seconds or warm it in a bowl over hot water until it’s just lukewarm to the touch. This small step helps the seeds activate faster and creates a smoother jam from the start.
Wine and beer pairings for this dish
White Wine Pairings
For this vibrant no-cook blackberry jam, I reach for crisp white wines that cut through the jam’s natural sweetness while complementing its bright acidity. A Sauvignon Blanc from New Zealand—like Oyster Bay Sauvignon Blanc—is my go-to choice.
Its citrusy notes and herbal undertones mirror the lemon juice in the jam, while the wine’s mineral finish balances the maple syrup’s richness. 🍷
If you prefer something lighter, try a Pinot Grigio from Italy, such as Santa Margherita Pinot Grigio. The wine’s delicate almond and apple flavors won’t overpower the jam’s blackberry intensity, making it a perfect match for breakfast or brunch pairings.
Serve both wine and jam slightly chilled for the best experience.
Rosé Wine Harmony
For a refreshing twist, a dry rosé like Whispering Angel or Miraval brings a perfect balance. The wine’s subtle berry undertones enhance the jam’s blackberry flavors, while its crisp acidity cleanses the palate.
Rosé’s versatility makes it ideal for both casual and elegant settings—imagine it alongside brie and crackers with this jam as a sweet-savory spread. 🍇
Sparkling Wine Pairing
Celebrate your homemade jam with a dry sparkling wine, such as La Marca Prosecco or Freixenet Cordon Negro Cava. The effervescence and citrus notes in these wines create a dynamic contrast with the jam’s velvety texture and sweet-tart profile.
This pairing works beautifully for festive occasions or as a sophisticated dessert accompaniment.
Beer Pairings
For beer lovers, a crisp wheat beer like Blue Moon Belgian White or Allagash White is an unexpected but delightful match. The beer’s coriander and citrus flavors bridge the gap between the jam’s sweetness and tartness, while its light body won’t overwhelm the delicate flavors.
Serve both at 45°F for the best balance. 🍺
Non-Alcoholic Options
Skip the alcohol without sacrificing flavor with a sparkling apple cider like Martinelli’s Sparkling Apple Cider or a ginger beer such as Brew Dr. Brown’s. The effervescence and natural sweetness in these beverages mirror the jam’s texture and brightness, making them perfect for family gatherings or health-conscious guests.
Chill both the jam and drink to enhance their refreshing qualities.
Nutrition facts
Frequently asked questions
Why does this no-cook blackberry jam need chia seeds?
Chia seeds act as a natural thickener and gelling agent, replacing traditional pectin. When mixed with water, they form a gel that binds the fruit and sweetener together without heat. This creates that perfect spreadable consistency while keeping all the blackberries' nutrients intact.
Can I make this jam without any sweetener?
While you can reduce the maple syrup to 1-2 tablespoons for a tart version, blackberries alone won't create a stable jam without some sweetener. The sugar (or sweetener) helps balance the acidity from the lemon juice and vinegar, which are essential for preservation. Try date syrup or agave if you prefer alternatives to maple.
How do I fix runny jam after the 4-hour rest?
If your jam is too thin, simply add 1 teaspoon of ground chia seeds mixed with 1 tablespoon water, then stir and let it rest another 1-2 hours. The chia gel continues thickening even after initial mixing. For immediate use, you can also gently heat the jam in a saucepan (just until warm) to help it set faster.
Is this jam safe to eat without refrigeration?
While the acidity from lemon juice and vinegar helps preserve it, this no-cook jam should only sit at room temperature for up to 4 hours for safety. For longer storage without refrigeration, use sterilized jars and consume within 24 hours. The texture may soften slightly when warm, but it remains safe to eat. Always refrigerate after opening.
What's the best way to use up extra jam?
Try these creative ideas: mix into overnight oats, swirl into yogurt parfaits, or use as a glaze for pancakes or waffles. For savory pairings, spread on goat cheese crostini or mix into homemade granola clusters. The chunky texture makes it perfect for topping ice cream or cheesecake too!