Side Dishes
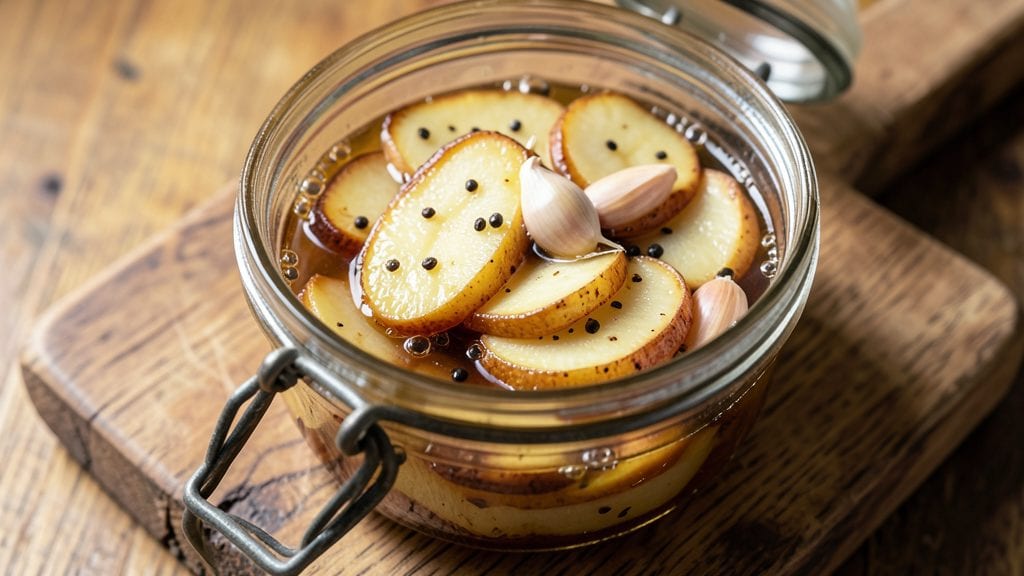
This old-fashioned pickled potatoes recipe delivers the tangy, crunchy side dish that's been a pantry staple for generations—no shortcuts, just time-tested flavor. The secret lies in the precise vinegar-to-water ratio and the 7-day fermentation that transforms simple potatoes into bite-sized jewels of tangy perfection.
I first discovered this method while researching Appalachian cookbooks, where pickled potatoes were a common accompaniment to fried chicken and cornbread.
The process begins with thinly sliced potatoes that cook just until tender, then soak in a bright vinegar brine infused with garlic and mustard seeds. This isn't quick pickling—it's a slow transformation that builds depth of flavor over time.
The result is a side dish that stays crisp even after days in the jar, with a vinegar-kissed crunch that cuts through rich main courses beautifully.
What makes these potatoes truly special is their versatility—they elevate sandwiches, salads, or even breakfast plates with minimal effort. The 7-day wait ensures maximum tang and texture, but the reward is worth it. Once you try homemade, store-bought pickled potatoes won't compare. Here's how to make them the traditional way.
This recipe serves as both a preservation method and a flavor enhancer, perfect for meal prep or holiday gatherings. The vinegar brine keeps them fresh for weeks, making them an ideal make-ahead side dish.
Whether you're recreating a family tradition or discovering a new favorite, these pickled potatoes bring old-fashioned charm to every table.
Ingredients for old fashioned pickled potatoes
Eleven simple ingredients transform into a classic side dish with bold vinegar-kissed crunch after seven days.
| Ingredient | Amount | Notes |
|---|---|---|
| Russet Potatoes 🥔 | 3 lbs | Thinly sliced 1/8-inch thick |
| White Vinegar 💧 | 3 cups | Distilled, 5% acidity preferred |
| Granulated Sugar 🍚 | 2 tbsp | White, fine grain preferred |
| Diamond Crystal Kosher Salt 🧂 | 1 ½ tbsp | Coarse grain preferred |
| Garlic Cloves 🧄 | 6 whole | Smashed, not minced |
| Mustard Seeds 🌶️ | 1 tbsp | Yellow or brown preferred |
| Black Peppercorns 🌶️ | 1 tsp | Whole, lightly crushed |
| Bay Leaves 🍃 | 2 whole | Dried, standard size |
| Red Wine Vinegar 🍷 | 1 cup | For depth of flavor |
| Dill Seeds 🌿 | 1 tsp | Optional, for herbal note |
| Distilled Water 💧 | 3 cups | Chlorine-free preferred |
The potatoes are the foundation, and Russet potatoes deliver the ideal texture—firm enough to hold their shape yet tender enough to absorb the brine. Most grocery stores carry them in the produce section, but local farms or specialty markets often offer fresher, higher-quality tubers with tighter skins. Look for potatoes that are firm, free of sprouts, and have a vibrant, even color. The thin slicing is critical—use a mandoline or sharp knife to achieve consistent 1/8-inch slices. Pre-sliced potatoes from the grocery store won’t work here; the uneven thickness leads to inconsistent texture. For the vinegars, White Vinegar provides the classic tang, while Red Wine Vinegar adds depth—both should be food-grade and stored in dark glass bottles to preserve potency. If you're sourcing from a bulk bin, ensure the vinegars are labeled as distilled and free of additives.
No Red Wine Vinegar? Apple Cider Vinegar works in a pinch, though it’ll impart a slightly fruity note. Substituting white vinegar for red wine vinegar at a 1:1 ratio maintains the tang but lacks complexity. For the mustard seeds, ground mustard at half the quantity can replace them, though the texture will differ slightly. If you’re avoiding sugar, honey or maple syrup can substitute at a 1:1 ratio, though the flavor profile shifts subtly. The Diamond Crystal Kosher Salt is essential—its coarse texture ensures proper brine saturation without dissolving too quickly. For storage, keep vinegars in airtight containers away from direct sunlight to maintain their potency for up to 12 months. If you’re using dried herbs like dill seeds, toast them lightly in a dry pan for 30 seconds before adding to enhance their aroma.
These pickled potatoes develop their signature crunch over 7 days, so patience is key. Once the jars are sealed, store them in a cool, dark place like a pantry or cellar—avoid refrigeration during the fermentation period, as it slows the process. After 7 days, transfer jars to the refrigerator where they’ll keep for up to 3 months, though the texture may soften slightly over time. For meal prep, portion the potatoes into small jars or containers—this makes them perfect for sandwiches, salads, or as a quick side dish. The brine can be reused for up to 2 additional batches if strained and stored properly, though the flavor will mellow with each use. If you notice any mold or off odors during storage, discard the batch immediately.
Why You'll Love This Recipe
- No-Fuss Prep: I swear by this—just slice the Russets, toss them in vinegar and sugar, and let time do the work. No peeling, no fancy techniques, just raw potatoes and a jar. Honestly, I’ve made it while chatting on the phone.
- Tangy Crunch Magic: That first bite? The vinegar cuts through the creamy potato, while the garlic cloves add a slow, warm punch. The sugar balances it just enough to make it dangerously addictive—like a pickle, but better.
- Potluck Hero: Bring a jar to any gathering, and you’ll be the MVP. It keeps for weeks, pairs with everything from burgers to charcuterie, and even my picky uncle asks for seconds. (Yes, even on a Tuesday night.)
- Pantry Goldmine: A single batch stretches into salads, sandwiches, or just straight-up snacking. The vinegar and salt make it shelf-stable, and the cost? Peanuts. I’ve fed a crowd for under $10 with this trick.
Step-by-step instructions for old fashioned pickled potatoes
Here's the precise method for developing that signature tangy crunch through careful layering and time.
Prepare the Potatoes with Precision
Begin by thoroughly washing the 3 lbs of russet potatoes under cold water to remove any dirt or debris. Using a sharp mandoline slicer or a very sharp knife, slice the potatoes into uniform 1/8-inch thick rounds. I find consistency in thickness is crucial for even pickling and texture throughout.
As you slice, arrange the rounds in a single layer on paper towels to absorb any excess moisture. This step prevents the potatoes from becoming soggy during the pickling process. For best results, work in batches and keep the sliced potatoes covered with a damp towel until ready to use.
Create the Brine Solution
In a large mixing bowl, combine the 3 cups of white vinegar, 1 cup of red wine vinegar, 3 cups of distilled water, 2 tbsp of granulated sugar, and 1.5 tbsp of diamond crystal kosher salt. Stir thoroughly until the sugar and salt are completely dissolved. The solution should be clear with no visible graininess.
Add the 6 smashed garlic cloves, 1 tbsp of mustard seeds, 1 tsp of lightly crushed black peppercorns, 2 whole bay leaves, and 1 tsp of dill seeds to the brine mixture. Gently stir to distribute all the aromatic components evenly throughout the liquid. This aromatic blend forms the flavor foundation for your pickled potatoes.
Combine Potatoes and Brine
Transfer the sliced potatoes to a clean, quart-sized mason jar with a tight-fitting lid. Pour the prepared brine mixture over the potatoes, ensuring each slice is fully submerged. If needed, use a clean utensil to press down the potatoes to eliminate any air pockets.
Seal the jar tightly and store it in a cool, dark place (like a pantry) for 7 days. This extended pickling period allows the flavors to fully develop and the potatoes to achieve that ideal crisp-tender texture. Remember to burp the jar daily by opening it briefly to release any built-up gases that form during fermentation.
Test for Doneness and Storage
After 7 days, remove the jar from storage and carefully open it. The potatoes should exhibit a golden hue and maintain their shape while developing a satisfying crunch. Taste one of the slices to verify the flavor balance - there should be a pleasant tang from the vinegars, subtle sweetness from the sugar, and a hint of aromatic complexity from the garlic and spices.
For optimal preservation, store the pickled potatoes in the refrigerator where they will keep for up to 3 months. The cold temperature helps maintain their texture and flavor profile. When ready to serve, simply drain the potatoes and arrange them on a platter, reserving some of the pickling liquid for drizzling if desired.
Pro Tips For Making Old Fashioned Pickled Potatoes
- USE COLD POTATOES ONLY: I learned this the hard way—warm potatoes release starch into the brine, making it cloudy and gummy. Chop your Russets raw, then soak them in cold water for 30 minutes before pickling. This keeps them crisp and lets the vinegar work its magic without fighting starch.
- MEASURE SALT BY VOLUME: Diamond Crystal kosher salt clumps like crazy, and eyeballing it ruins the balance. Use a kitchen scale (1 tablespoon = ~20g) or spoon it into the jar before adding vinegar—this way, you avoid over-salting later. Trust me, your taste buds will notice the difference.
- STEAM THE GARLIC: Raw garlic cloves in vinegar taste bitter and harsh. Instead, crush them lightly, then microwave in a damp paper towel for 20 seconds. This softens them without cooking—just enough to release flavor without turning the brine into garlic soup.
- PACK POTATOES TIGHTLY: Loose potatoes in the jar? They’ll float, leaving some submerged in weak brine. Press them down with a wooden spoon or weight them with a clean stone. If you skip this, you’ll end up with half the batch tasting bland. (Yes, even if it looks messy.)
Make-ahead tips for this recipe
Prep Ahead Timeline
Start by slicing the potatoes 2 days before pickling to ensure they dry completely. Store the slices in an airtight container lined with paper towels in the refrigerator. This head start prevents sogginess during the 7-day fermentation. I find this step critical for maintaining crisp texture after pickling. 💪
Brine Prep Shortcut
Make the brine 1 day ahead and store it in a sealed glass jar in the fridge. This allows the sugar and salt to fully dissolve, creating a smoother, more flavorful liquid.
When ready to use, simply bring it to room temperature before combining with the potatoes. The extra day also lets the garlic and spices infuse more deeply. 🌶️
Fermentation Stages
After the initial 3 days, the potatoes will begin developing their signature tang. At this point, you can taste-test a slice—the flavor will be developing but not fully mature.
The next 4 days are when the real magic happens as the vinegar fully penetrates and the texture transforms. I recommend marking your calendar to track progress. ✨
Storage Extension
Once refrigerated, these potatoes stay fresh for 3 months with no noticeable texture change. For maximum shelf life, transfer to glass mason jars with fresh brine if you plan to store beyond 1 month.
The original brine can be reused for up to 2 more batches if strained and stored properly. 🥫
Portioning for Meals
Divide the pickled potatoes into small glass jars (like 8-ounce Ball jars) before refrigerating. This makes them perfect for grab-and-go lunches or quick side dishes. I keep one jar in the fridge for immediate use and freeze extras in 1-cup portions for future meals.
The portion control also helps prevent overconsumption of vinegar! 🍽️
Freezing Tips
If you won't use them within 3 months, freeze the potatoes in their brine using ziplock freezer bags. Leave 1 inch of headspace for expansion, then lay flat to freeze.
Thaw in the refrigerator overnight—they'll maintain their crunch when reheated gently in a skillet for 2-3 minutes. This method preserves them for up to 6 months. ❄️
Nutrition facts
Frequently asked questions
Can I use sweet potatoes instead of russets for this recipe?
While you can substitute sweet potatoes, the texture and flavor will differ significantly. Sweet potatoes are denser and absorb more liquid, resulting in softer pickles with a sweeter taste. For the classic crunch and mild flavor of this old-fashioned recipe, stick with russet potatoes. If you're set on sweet potatoes, reduce the pickling time to 5 days and add an extra 1 tbsp of vinegar to compensate for their moisture content.
What happens if I skip the 7-day fermentation?
Skipping the full 7 days will result in less tangy, crunchy potatoes. After just 3 days, they'll be edible but milder in flavor and softer in texture. The fermentation process is key to developing that signature vinegar-kissed crunch. If you're short on time, try 5 days for a compromise—you'll still get good flavor, though not the full depth of the traditional method.
How do I know when the potatoes are done pickling?
The potatoes are ready when they've developed a golden hue, maintain their shape, and have a satisfying crunch. After 7 days, taste one—it should have a bright tang from the vinegar, subtle sweetness, and a hint of garlic and spices. If they're still too soft or lack flavor, let them pickle another 2 days. The brine should also smell fresh and vinegary, not sour or funky.
Can I make this recipe without red wine vinegar?
Yes, but the flavor will be less complex. Replace the 1 cup of red wine vinegar with an extra 1 cup of white vinegar for a similar tang. For depth, try apple cider vinegar or balsamic vinegar (use half the amount) to add subtle fruity or caramel notes. The mustard seeds and garlic will still provide the backbone of flavor, but the vinegar variation makes a noticeable difference in the final taste.
Why do my pickled potatoes turn mushy after refrigeration?
Mushy texture usually means the potatoes absorbed too much liquid or weren't properly dried before pickling. Always pat slices dry with paper towels and ensure they're fully submerged in the brine—this prevents sogginess. If using store-bought vinegar, check for additives that might alter the process. For extra crunch, add 1 tsp of cornstarch to the brine before pickling. Also, avoid refrigerating during the initial 7-day fermentation—this slows flavor development and can cause texture issues.