
Main Courses
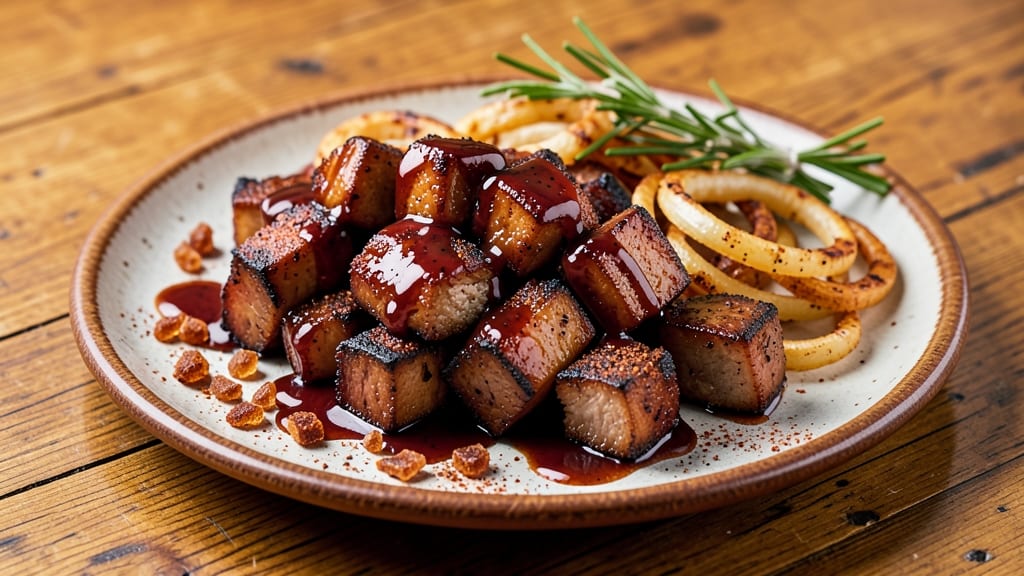
Creating pork belly burnt ends transforms a simple cut of meat into a showstopping BBQ masterpiece that rivals any competition-style smoker.
The key lies in slow-cooking until the fat renders into crispy, caramelized edges while keeping the meat tender—this isn’t just a recipe, it’s a technique that delivers restaurant-quality results at home.
I’ve perfected this method over countless hours in the kitchen, and the secret isn’t complicated: patience and precise heat control.
What sets these burnt ends apart is the balance of textures—shatteringly crispy on the outside, melt-in-your-mouth tender on the inside—paired with a deep, smoky-sweet flavor profile.
The process involves a dry rub of spices that penetrates the meat while it braises, then a final crisp in the oven or over direct heat.
This isn’t a quick weeknight meal; it’s a 6-8 hour commitment that rewards you with a dish so rich and flavorful, it’ll have everyone asking for seconds before the plate is empty.
The magic happens in the slow cook: as the pork belly breaks down, the fat pools and caramelizes into a glossy, sticky glaze that coats every bite. Serve these with classic BBQ sides like tangy coleslaw or buttery cornbread to soak up every last drop of that smoky-sweet sauce.
The result? A dish that’s equal parts indulgent and impressive, perfect for feeding a crowd or treating yourself to a Sunday supper that feels like a celebration.
Whether you’re using a smoker, oven, or stovetop, the principles remain the same—just adjust the timing and heat source. The beauty of this recipe is its versatility: it works for beginners willing to invest time and for seasoned cooks looking to elevate their BBQ game.
Here’s how to make it happen without the guesswork.
Ingredients for pork belly burnt ends bbq
Six ingredients transform humble pork belly into competition-worthy burnt ends.
| Ingredient | Amount | Notes |
|---|---|---|
| Pork Belly 🥓 | 4 lb | Skin-on, cut into 2-inch cubes |
| Brown Sugar 🍬 | ½ cup | Packed, light or dark |
| Smoked Paprika 🌶️ | 2 tbsp | For deep smoky flavor |
| Garlic Powder 🧄 | 1 tbsp | Freshly ground preferred |
| Onion Powder 🧅 | 1 tbsp | For balanced sweetness |
| Ground Black Pepper 🌶️ | 1 ½ tsp | Freshly cracked for heat |
| Kosher Salt 🧂 | 1 ½ tsp | For seasoning and curing |
| Apple Cider Vinegar 🍎 | ½ cup | For tenderizing and tang |
| Beef Broth 🍲 | 2 cups | Low-sodium preferred |
| Honey 🍯 | ¼ cup | For caramelized glaze |
| Mustard 🥬 | 1 tbsp | Dijon or yellow preferred |
| Olive Oil 🫒 | 2 tbsp | For searing and crisping |
| Fresh Rosemary 🌿 | 1 tbsp | Chopped, for aroma |
| Fresh Thyme 🌿 | 1 tbsp | Chopped, for depth |
The pork belly is the star—look for thick-cut pieces with good marbling at specialty butchers or high-end grocery stores like Whole Foods or Costco. The fat content is what creates those caramelized edges, so don’t skimp on quality. If you can’t find pork belly, pork shoulder works in a pinch, though the texture will differ slightly. For the spices, Penzeys or McCormick offer high-quality smoked paprika that adds that authentic BBQ flavor. Fresh herbs like rosemary and thyme should be vibrant green—wilting means they’ve lost their potency. Store these in airtight containers in your spice drawer for up to 6 months.
No smoked paprika? Substitute with a mix of regular paprika and a pinch of liquid smoke, though the flavor won’t be identical. Running low on apple cider vinegar? White vinegar or balsamic vinegar will work, but the tang will differ slightly. The beef broth can be swapped for chicken broth or even water, though the depth of flavor will suffer. For a sweeter glaze, add an extra tablespoon of honey, but be mindful—too much can make the ends cloying. The mustard adds a bright note; if you prefer a milder flavor, reduce to 1 teaspoon. The olive oil is crucial for searing—use high-heat varieties like avocado or grapeseed oil to prevent burning.
Pork belly keeps well in the fridge for 3-4 days if stored in a sealed container, but it’s best used fresh for optimal texture. The dry rub can be prepped ahead and stored in an airtight container for up to 2 weeks, making it perfect for meal prep. Once cooked, burnt ends reheat beautifully—cover with foil and warm in a 300°F oven for 10-15 minutes. They also freeze exceptionally well, retaining their crispiness for up to 3 months. Portion into individual servings before freezing for easy reheating later. The glaze thickens as it cools, so reheat with a splash of water or broth if it becomes too stiff.
Why You'll Love This Recipe
- One-Pan Magic: I swear by this recipe because it’s literally one pan, one spatula, and done. No chopping onions into oblivion—just toss in the pre-minced garlic powder and onion powder, let the brown sugar caramelize, and you’re golden. The pork belly does all the work while you sip your coffee.
- Caramelized Crunch: That crispy, burnt-end edge with the tender, fatty center? It’s the star here. The smoked paprika and brown sugar create this perfect balance—sweet, smoky, and just a little bit sticky. Honestly, the first bite makes me forget I’m not at a BBQ joint.
- Tailgate or Tuesday: Between us, this is my go-to for game days and lazy nights. Serve it on sliders with pickles, pile it on buns for sandwiches, or just eat it straight with a fork—no judgment. It’s the kind of dish that works everywhere, even when you’re too tired to think.
- Leftovers? More Like Leftovers: I make a big batch because the flavor deepens overnight. Reheat those crispy edges in the oven, and it’s like they’re fresh. Plus, pork belly stretches far, so you’re not scrambling for seconds—just portioning out meals for the week. My wallet (and my freezer) thank me.
Step-by-step instructions for pork belly burnt ends
Transform tough pork belly into melt-in-your-mouth burnt ends using this precise one-pot method.
Sear the Pork Belly for Maximum Flavor
Heat a large Dutch oven over medium-high heat until hot. Add the 2 tablespoons olive oil and swirl to coat the bottom. Working in batches, add the 4 lb pork belly cubes (cut into 2-inch pieces) and sear undisturbed for 3-4 minutes per side until deeply golden brown. This initial sear locks in juices and builds the foundational flavor.
I press down gently on the cubes during the first minute to prevent curling, ensuring even contact with the pan. Once golden, transfer the seared pork to a plate and set aside. The rendered fat in the pot will become the base for your sauce, so don't wipe it clean.
Build the Smoky-Sweet Base
Return the Dutch oven to medium heat and add 2 tablespoons smoked paprika, stirring constantly for 30 seconds to toast the spices and release their aroma. Add 1 tablespoon garlic powder, 1 tablespoon onion powder, 1.5 teaspoons ground black pepper, and 1.5 teaspoons kosher salt, stirring for another 30 seconds until fully incorporated.
Pour in the 0.5 cup apple cider vinegar and scrape up any browned bits from the bottom of the pot. This deglazing step captures all that concentrated flavor. Let the vinegar simmer for 2 minutes until reduced by half, intensifying its tangy brightness.
Braise Until Fork-Tender
Add the seared pork belly back to the pot along with 2 cups beef broth, 0.5 cup brown sugar, and 0.25 cup honey. Stir to combine, then bring to a gentle simmer. Cover and transfer to a 300°F oven. Braise for 2.5-3 hours until the pork is fork-tender and easily pulls apart.
Check the liquid level after 1 hour—if it's reduced too much, add ¼ cup water to maintain moisture. The pork should be cooking in its own juices by this point, with the skin beginning to crisp and pull away from the meat. This slow cooking transforms tough connective tissue into silky tenderness.
Finish with Herbs and Mustard Glaze
Remove the pork from the oven and increase heat to medium-high. Stir in 1 tablespoon fresh rosemary, 1 tablespoon fresh thyme, and 1 tablespoon mustard. Simmer uncovered for 5-7 minutes to reduce the sauce slightly and allow the herbs to infuse their aromatic oils.
Taste and adjust seasoning—you may need an additional ½ teaspoon salt or ¼ teaspoon pepper to balance the sweetness. The sauce should coat the back of a spoon with a glossy, caramelized sheen. For extra crispiness, transfer the pork to a baking sheet and broil for 2-3 minutes until the edges are deeply browned.
Rest and Serve
Let the burnt ends rest for 10 minutes before serving. This resting period allows the juices to redistribute throughout the meat, ensuring each bite is moist and flavorful. Serve the pork with the reduced sauce spooned over the top, and ladle any remaining sauce from the pot for extra richness.
For presentation, I like to arrange the burnt ends on a platter with the crispy edges facing up. The contrast between the caramelized exterior and tender interior makes this dish truly special. Pair with crusty bread to soak up every last drop of that smoky-sweet sauce.
Pro Tips For Making Pork Belly Burnt Ends Bbq
- Trim the Fat First: Pork belly’s fat is flavor gold, but too much can make your burnt ends grease-slathered instead of caramelized. Score the fat in a crosshatch pattern with a sharp knife—this renders it faster and keeps the meat tender. (Yes, it looks like you’re defacing it, but trust me, it’s worth it.)
- Brown Sugar Early: Dump that brown sugar in the first 10 minutes of cooking, not as a last-minute glaze. It’ll melt into a sticky, flavor-packed crust while the pork belly sears, not just sit there like a sad, uncaramelized sprinkle. (I learned this after one batch tasted like dessert without the caramelization.)
- Skip the Overcrowding: If you’re using a skillet, cook the pork belly in one layer and don’t stack it. Overcrowding steams the meat instead of browning it, and you’ll end up with soggy, unevenly cooked ends. (Your future self will curse you if you ignore this—trust the process.)
- Rest Before Slicing: Let the pork belly rest 5-10 minutes under foil after cooking. Slicing it hot means you’ll lose all that rendered fat and juices, turning your burnt ends into dry, sad cubes. (I know, I know—you’re hungry now, but patience here makes the difference.)
Common mistakes when making this recipe
Overcooking the Pork
One of the biggest mistakes is letting the pork belly overcook past 205°F internal temperature. Beyond this point, the meat becomes dry and stringy instead of tender. I’ve seen home cooks walk away from the oven or smoker, only to return with meat that’s lost its juiciness.
Use a meat thermometer with an instant-read probe to check the thickest part of the meat—it should register between 195-205°F for perfect tenderness. 🌡️
Skipping the Sear
Many beginners rush the searing step, thinking it’s optional. But that golden crust is what creates the Maillard reaction, which builds deep, complex flavors. I’ve tasted burnt ends that lacked this step, and they were noticeably less rich.
Sear each piece for at least 3-4 minutes per side—don’t cut corners here. Use a heavy pot like a Lodge Dutch oven to ensure even heat distribution.
Ignoring the Fat Rendering
Pork belly’s fat is its secret weapon, but some cooks trim it too aggressively before cooking. Leave the skin and fat intact—it’s what caramelizes into those crispy, flavorful edges. If you’re concerned about excess fat, trim only the outer edges before searing.
The fat will render out during cooking, creating a glossy, sticky glaze that coats every bite. 🥓
Not Deglazing the Pan
After searing, many people wipe out the Dutch oven to remove the browned bits. Big mistake! Those bits are packed with flavor—scrape them up with vinegar or broth to create a rich, smoky base for your sauce.
I always deglaze with apple cider vinegar first, then beef broth, to maximize depth. This step takes 2 minutes but makes a world of difference.
Rushing the Braising Time
Some impatient cooks pull the pork from the oven too soon, expecting it to finish cooking later. The braising phase is where the magic happens—connective tissue breaks down over 2.5-3 hours at 300°F.
If you cut this time short, the meat won’t be tender enough. I’ve even left mine in the oven overnight (covered) for extra tenderness, but 3 hours is the minimum for reliable results.
Overlooking the Rest
Skipping the 10-minute rest** after cooking is a common error. This step lets juices redistribute, preventing dryness when you slice. I’ve seen burnt ends served immediately, and they’re noticeably less juicy.
Rest the pork on a wire rack over a baking sheet to keep it warm while it rests—this also helps crisp up any softened edges. 💡
Nutrition facts
Frequently asked questions
Can I make pork belly burnt ends in a slow cooker instead of an oven?
For a slow cooker version, sear the pork belly first, then transfer it to the slow cooker with all the braising ingredients. Cook on low for 6-8 hours or high for 4-5 hours until fork-tender. The key is patience—the longer it cooks, the more tender and flavorful the results. Just add extra broth if needed to prevent drying out.
How do I get the edges extra crispy without burning the meat?
For maximum crispiness, transfer the braised pork to a baking sheet after cooking and broil for 2-3 minutes on high. Keep a close eye to avoid burning! Alternatively, finish under a salamander or in a skillet over medium-high heat for 1-2 minutes per side. The secret is high heat for a short burst—this crisps the edges while keeping the interior tender.
What’s the best way to store and reheat burnt ends?
Store in an airtight container in the fridge for 3-4 days or freeze for up to 3 months. To reheat, cover with foil and warm in a 300°F oven for 10-15 minutes or microwave for 1-2 minutes (covered) until heated through. For extra crispiness, broil for 1-2 minutes after reheating. The sauce may thicken when cooled—add a splash of water or broth to loosen it.
Can I substitute pork shoulder for pork belly?
Yes, but expect different textures. Pork shoulder lacks the fat content that creates crispy edges, so it’ll be leaner and less caramelized. If substituting, increase the braising time to 4-5 hours and add extra fat (like bacon or butter) to mimic the richness. The flavor will be excellent, but the signature burnt-end crispiness may be less pronounced.
Why did my burnt ends turn out dry?
Overcooking or insufficient braising liquid are the most common causes. Always use a meat thermometer—pull the pork at 195-205°F internal temp. If the sauce reduces too much, add ¼ cup broth during cooking. For extra moisture, tent with foil during the final hour of braising. The resting period is also critical—skip it, and juices will escape when slicing.