
Beverages
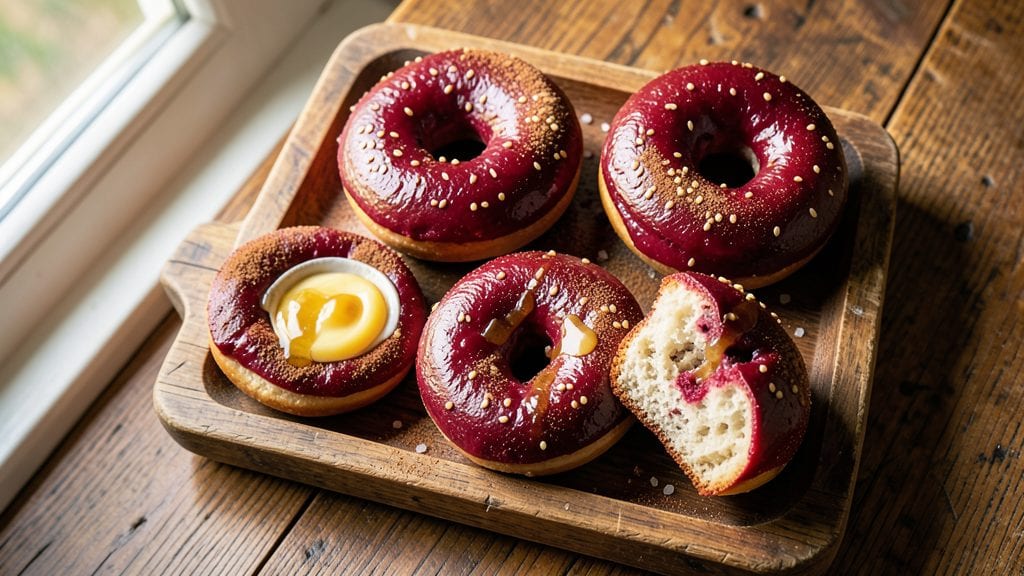
This red bagels recipe delivers the perfect balance of vinegar-kissed crunch and chewy centers, with a vibrant color that makes them as visually striking as they are delicious.
After years of perfecting the art of bagel baking, I’ve developed a method that ensures consistent results—no more rock-hard exteriors or doughy interiors. The key lies in the dough’s hydration and the precise boiling and baking process, which transforms simple ingredients into restaurant-quality bagels.
What sets these red bagels apart is the use of natural beet juice or powder for color, along with a touch of cinnamon for warmth, all while maintaining that classic tangy flavor from white vinegar.
The dough requires a 24-hour cold proof, which enhances flavor and texture, and the boiling step in honey-sweetened water creates that signature chewy bite. Baking at 450°F ensures a crispy exterior without compromising the tender interior.
By the time you pull these bagels from the oven, you’ll have golden-brown, chewy bagels with a satisfying crunch and a subtle sweetness from the beet infusion. They’re perfect for breakfast, snacking, or pairing with cream cheese and smoked salmon.
The recipe scales easily, so you can make a batch for the week or share with friends—every bite will taste like a visit to your favorite bagel shop.
Whether you’re a seasoned baker or a beginner, this method is foolproof and delivers consistent results. The step-by-step instructions walk you through shaping, boiling, and baking, ensuring you achieve that ideal texture every time. Once you try these, you’ll never buy store-bought bagels again.
Ingredients for red bagels
Twelve simple ingredients transform into vibrant, chewy red bagels with perfect crunch.
| Ingredient | Amount | Notes |
|---|---|---|
| All-Purpose Flour 🌾 | 6 cups | High-protein preferred for chewiness |
| Active Dry Yeast 🍞 | 2 ¼ tsp | Fresh yeast works too |
| Granulated Sugar 🍚 | 1 ½ tbsp | Brown sugar for deeper flavor |
| Diamond Crystal Kosher Salt 🧂 | 2 ½ tsp | Adjust to taste |
| Beet Juice Powder 🍠 | 1 ½ tbsp | Natural beet juice works too |
| Ground Cinnamon 🌿 | ½ tsp | Warmth without overpowering |
| White Vinegar 💧 | 1 tbsp | Distilled vinegar works |
| Extra-Virgin Olive Oil 🫒 | ½ cup | High-quality for flavor |
| Water 💧 | 3 ½ cups | Room temperature preferred |
| Honey 🍯 | ¼ cup | Light or dark variety |
| Topping Seeds 🌱 | ½ cup | Sesame or poppy seeds |
| Coarse Sea Salt 🧂 | 1 ½ tbsp | For final sprinkle |
The flour is non-negotiable—high-protein varieties like King Arthur Bread Flour or Breadworks give that signature chewy texture. Penzeys or Trader Joe's carry beet juice powder if you can't find fresh juice, but Trader Joe's organic beet juice works beautifully too. The yeast should be fresh, so check the date on the package—Great Value or Bob's Red Mill are reliable budget options. For the honey, local raw honey adds subtle floral notes, but any light variety works. The vinegar? White vinegar from a dark bottle keeps better and has less odor. Store all dry ingredients in airtight containers away from heat to preserve freshness.
No beet juice powder? Fresh beet juice works—simply blend cooked beets and strain. Running out of sesame seeds? Poppy seeds or everything bagel seasoning add a nice contrast. The honey can be swapped for maple syrup if you prefer, though it adds a slightly different depth. For a vegan option, nutritional yeast replaces the honey in the boiling water. The cinnamon is optional but adds warmth—McCormick or Badia are good brands. If your dough feels too sticky, add 1 tbsp more flour; if it's too dry, add 1 tsp water. Trust your hands—this dough should be soft but not wet.
These bagels keep well for 3 days at room temperature wrapped in a clean towel, or 5 days in the fridge. For longer storage, freeze shaped bagels on a tray before bagging—3 months in the freezer, no problem. Reheat in a 375°F oven for 5-7 minutes or toast directly. The beet color intensifies with storage, so if you're making them ahead, plan for deeper red hues. The honey-sweetened boiling water caramelizes slightly over time, so fresh bagels have a brighter sweetness. Portion into 12 individual bags for easy grab-and-go breakfasts.
Why You'll Love This Recipe
- No Yeast Nightmares: I’ve burned enough bagels trying to time yeast perfectly—this recipe lets me mix, rest, and bake without the stress. Just toss in the beet juice powder, and the dough comes together in five minutes of active work. Honestly, the only thing harder than making them is deciding whether to eat them warm or toasted.
- Earthy Sweetness Surprise: That beet juice powder isn’t just for color—it adds this deep, almost caramel-like sweetness that cuts through the salt. The crust gets a subtle richness, and the crumb stays tender. I’ll be real: my kids think they’re “regular” bagels until I tell them the truth, then they ask for them twice as often.
- Breakfast, Snack, Party: These bagels handle everything. Slather them with cream cheese for a lazy morning, pack them in lunches with smoked salmon, or serve them toasted at a brunch spread. Between us, they’re my go-to for game day snacks too—no one suspects how easy they are to make.
- Budget Magic: Flour, yeast, sugar, salt, and beet powder? That’s four dollars at the store, and it makes a dozen. They freeze like a dream, so I bake a batch and pull them out whenever I need a quick, filling side. Not the prettiest, but the taste makes up for it—and my wallet thanks me.
Step-by-step instructions for red bagels recipe
Here's how to craft these vibrant, vinegar-kissed bagels with a perfect chewy interior and crispy exterior.
Prepare the Yeast Mixture
In a small bowl, combine the 3.5 cups water with the 1.5 tbsp granulated sugar and 2.25 tsp active dry yeast. Let this sit for 5-10 minutes until it becomes frothy and bubbly—this confirms your yeast is active. If it doesn't bubble, your yeast may be dead, and you'll need to start over.
While waiting, mix the 1.5 tbsp beet juice powder with 0.5 tsp ground cinnamon in a separate small bowl. This combination creates the signature red hue and subtle warmth that sets these bagels apart. The beet juice powder dissolves completely in the dough, so no need to worry about visible specks.
Combine Wet and Dry Ingredients
In a large mixing bowl, whisk together the 6 cups all-purpose flour, 2.5 tsp diamond crystal kosher salt, and the beet-cinnamon mixture. Make a well in the center and pour in the yeast mixture along with the 0.5 cup extra-virgin olive oil and 0.25 cup honey. The olive oil adds richness while the honey contributes natural sweetness and helps develop the dough's structure.
Using a wooden spoon or dough whisk, gradually incorporate the ingredients until a shaggy dough begins to form. Once combined, turn the dough onto a lightly floured surface and knead for 8-10 minutes until smooth and elastic. You'll know it's ready when it springs back slowly when poked with your finger—a sign of proper gluten development.
First Rise and Shaping
Lightly oil a large bowl and place the dough inside, turning to coat all surfaces. Cover with a damp towel and let rise in a warm place for 1-1.5 hours or until doubled in size. The dough should be airy and slightly jiggly when gently pressed—this indicates proper fermentation.
Once risen, punch down the dough to release air and divide it into 12 equal pieces (about 4 ounces each). Roll each piece into a smooth ball, then stretch and shape into bagels by creating a hole in the center. The hole should be about 1-inch wide—neither too tight nor too loose. Place shaped bagels on a floured surface and cover with a damp towel while you prepare the boiling water.
Boil and Proof
Bring a large pot of water to a rolling boil and add 1 tbsp white vinegar along with 1.5 tbsp coarse sea salt. The vinegar not only enhances flavor but also helps create that signature bagel crust. Once boiling, carefully add 4 bagels at a time and boil for 30-45 seconds per side until they float to the surface and develop a slight sheen.
Remove the bagels with a slotted spoon and place them on a parchment-lined baking sheet. Sprinkle immediately with a light coating of topping seeds while they're still warm and pliable. Let them proof for another 20-30 minutes until they've risen slightly and the seeds adhere well. This second rise ensures they'll bake up light and airy.
Bake to Golden Perfection
Preheat your oven to 425°F with a baking stone or inverted baking sheet inside. The stone helps create steam, which is crucial for that chewy texture. Bake the bagels for 20-25 minutes until they're deep golden brown and sound hollow when tapped on the bottom.
For best results, bake them in batches to avoid overcrowding. The ideal bagel should have a crisp exterior with a soft, chewy interior that pulls slightly when you bite in. Let them cool on a wire rack for 10 minutes before serving—this prevents them from becoming gummy. Store in an airtight container for up to 3 days or freeze for longer storage.
Pro Tips For Making Red Bagels
- Bloom the Yeast: Mix your yeast with warm water (110°F) and a pinch of sugar first—wait 5-10 minutes until it’s bubbly before adding flour. I learned this the hard way when my dough took forever to rise because the yeast was sluggish.
- Dissolve the Beet Powder: Mix the beet juice powder into the water before adding it to the dough—this prevents clumpy, uneven color. Stir vigorously until fully dissolved, or you’ll get pink streaks instead of a consistent hue.
- Don’t Over-Knead: Stop kneading when the dough pulls away cleanly from the bowl—about 8-10 minutes by hand. I used to go until it felt "perfect," but overworking it makes the bagels tough and dense.
- Boil in Batches: Use a large pot with at least 4 cups of water per batch—crowding leads to uneven boiling and pale spots. Drop them in gently, and resist the urge to stir; let them float freely for 1-2 minutes.
Make-ahead tips for this red bagels
Dough Prep Ahead
Shape your bagels the night before and store them in the fridge overnight for deeper flavor and easier handling. After shaping, place them on a floured tray, cover with a damp towel, and refrigerate for 12-24 hours.
The cold slows fermentation, making the boiling step more manageable in the morning. I like to sprinkle seeds right after shaping so they stick overnight. 🌙
Boiling Shortcut
Prep your boiling water the night before by mixing 1 tbsp white vinegar and 1.5 tbsp coarse sea salt in a covered container. Keep it at room temperature—no need to boil until morning.
This saves time and ensures your water is ready when you are. The vinegar-salt mixture stays potent for 24 hours without losing effectiveness.
Freezer-Friendly Shapes
For ultimate convenience, shape and boil your bagels, then freeze them on a tray before transferring to a freezer bag. Thaw overnight in the fridge before baking—no need to proof again.
I wrap them in parchment paper before freezing to prevent sticking. These frozen bagels bake just like fresh ones, with the same chewy texture. ❄️
Batch Baking Plan
Make two batches of dough at once and store the second in the fridge for 2-3 days. This way, you can bake fresh bagels every morning without starting from scratch.
I label each dough portion with the date to track freshness. The second batch develops slightly more flavor from the extended cold proof.
Seed Topping Prep
Mix your 0.5 cup topping seeds (sesame or poppy) with 1 tsp sugar in a small bowl the night before. The sugar helps the seeds stick better to warm bagels.
Store in an airtight container to keep them fresh. This simple step ensures your seeds stay in place during boiling and baking.
Storage Containers
Use glass airtight containers with parchment paper between layers to prevent sticking. I recommend Pyrex 8-cup containers for their durability. Store bagels at room temperature for 3 days or freeze for 3 months.
The beet color intensifies over time, so fresh bagels will have a lighter hue that deepens with storage. 💫
Nutrition facts
Frequently asked questions
Why do these bagels turn red?
The vibrant color comes from beet juice powder or fresh beet juice mixed into the dough. This natural ingredient provides both color and a subtle earthy sweetness. The cinnamon adds warmth without overpowering the flavor, creating that perfect balance of taste and visual appeal.
Can I make these bagels without boiling them?
While traditional bagels require boiling for that signature chewy texture, you can bake them directly if you prefer. Skip the boiling step and bake at 425°F for 25-30 minutes, but expect a denser, less chewy result. The boiling step is key for authentic texture—it creates the crispy exterior and soft interior.
How do I prevent my bagels from sticking to the baking sheet?
Always use a parchment-lined baking sheet or lightly grease it with olive oil. After boiling, place bagels on the sheet and sprinkle with seeds immediately—they'll stick to the bagels, not the pan. If they still stick, your dough may need more flour or your pan isn't properly lined.
What’s the best way to store leftover bagels?
Wrap cooled bagels in a clean kitchen towel and store in an airtight container at room temperature for up to 3 days. For longer storage, freeze shaped bagels (before boiling) on a tray, then transfer to a bag. Thaw overnight in the fridge and bake as directed. The beet color intensifies with storage, so fresh bagels will have a lighter hue.
Can I add fillings like cream cheese or everything bagel seasoning?
Yes! After shaping but before boiling, press a small indentation into the dough and add a thin spread of cream cheese or a sprinkle of everything bagel seasoning. The filling will stay contained during boiling and baking. For extra flavor, brush the tops with garlic butter after baking.