Main Courses
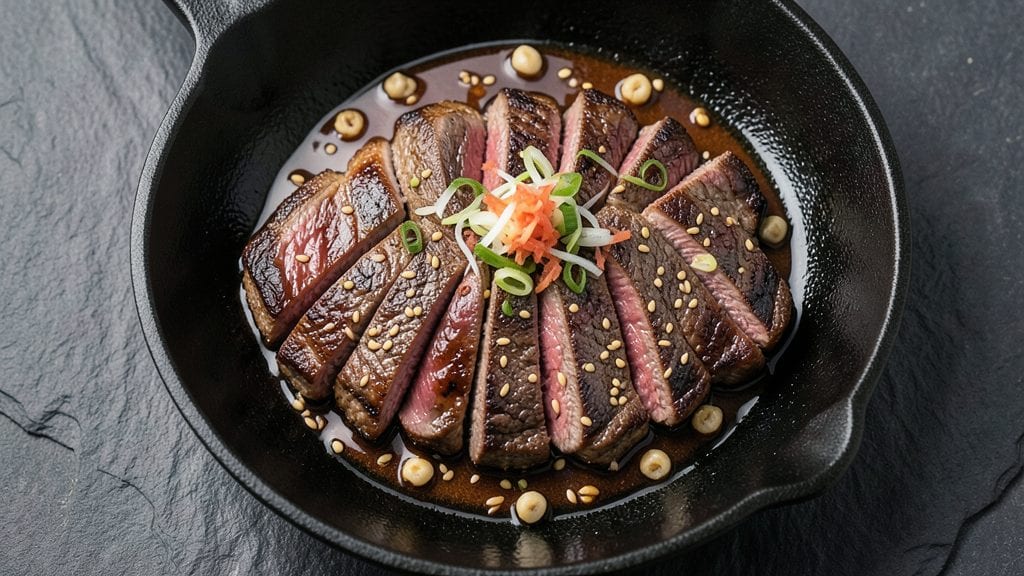
Mastering teppanyaki steak at home delivers that iconic restaurant experience with its dramatic sizzle and caramelized crust. The secret lies in precise heat control and interactive techniques like flipping and slicing right at the table—something that transforms a simple steak into a showstopping meal.
I’ve perfected this method after years of testing, ensuring every cut delivers that perfect balance of tenderness and smoky flavor.
This recipe focuses on ribeye steak—its marbling ensures rich flavor and juicy results—but you can adapt it for sirloin or filet mignon with slight adjustments. The teppanyaki grill (or flat-top stove) is key, as it distributes heat evenly while creating those signature grill marks.
We’ll also cover traditional sides like steamed rice, stir-fried vegetables, and optional sauces like teriyaki or ponzu to complete the dish authentically.
What you’ll achieve is a steak with crispy caramelized edges, tender pink centers, and a presentation that feels like a high-end restaurant. The sizzling action alone makes it entertaining, but the flavor—smoky, savory, and slightly sweet—is what keeps guests coming back. This isn’t just dinner; it’s an experience.
Ready to recreate that teppanyaki magic? Let’s break down the steps, from marinating and searing to slicing and plating like a pro. The result will be worth every second of effort—especially when you see those first bites disappear.
Ingredients for teppanyaki steak
Fourteen ingredients to recreate that iconic restaurant teppanyaki experience at home.
| Ingredient | Amount | Notes |
|---|---|---|
| Ribeye Steak 🥩 | 1 ½ lb | Center-cut, 1-inch thick slices |
| Kosher Salt 🧂 | 1 ½ tbsp | Diamond Crystal preferred |
| Black Pepper 🌶️ | 1 tbsp | Freshly ground preferred |
| Sesame Oil 🫒 | 1 tbsp | Toasted, for aroma |
| Garlic Cloves 🧄 | 6 cloves | Minced, for marinade |
| Ginger Root 🌿 | 1 tbsp | Freshly grated |
| Soy Sauce 🍶 | ½ cup | Kikkoman preferred |
| Mirin 🍶 | ¼ cup | For sweetness |
| Sake 🍶 | ¼ cup | Dry variety |
| Butter 🧈 | 4 tbsp | Unsalted, cubed |
| Green Onions 🧅 | 4 whole | Sliced, for garnish |
| Vegetable Oil 🫒 | ¼ cup | High smoke point |
| White Rice 🍚 | 1 ½ cups | Uncooked, for serving |
The ribeye is non-negotiable here—its fat marbling delivers that signature smoky flavor and juicy bite. Costco or Whole Foods carry the best center-cut options, but any butcher will cut it to your specs. Look for slices about 1-inch thick—thinner pieces burn before they sear. The steak should be cold when you start cooking, so plan ahead if you're prepping ahead. I always ask for it to be dry-brined at the counter; the butcher does it in minutes with salt and pepper.
No sesame oil? Toasted peanut oil works in a pinch, though it lacks that nutty aroma. Fresh ginger is ideal, but dried ginger at half the amount gets you close (though it won’t have the same zing). The soy sauce can be swapped for tamari if gluten-free, but the mirin and sake combo is what gives that authentic sweet-savory balance. Trader Joe’s sells pre-mixed teppanyaki marinades, but homemade tastes 10x better—plus, you control the quality. The butter should be cold and cubed when you add it; don’t let it melt before hitting the grill.
Steak keeps best 2-3 days in the fridge if prepped ahead, but freeze it raw for up to 3 months if you’re not cooking it soon. The marinade? Use it within 24 hours—the ginger and garlic lose potency over time. Cooked steak reheats beautifully in a hot skillet with a splash of soy sauce for that fresh-off-the-grill sizzle. Leftovers make killer steak sandwiches the next day—just slice thin and pile high.
Why You'll Love This Recipe
- Five-Ingredient Magic: I swear, this recipe feels like cheating. You’re basically just slathering a ribeye with salt, pepper, and a whisper of sesame oil—then letting the garlic and high-heat sear do all the work. No fancy sauces, no last-minute shopping runs, just pure, smoky satisfaction.
- Crispy-Garlic Obsession: That first bite? The steak’s edge gets this addictive crust from the sesame oil and minced garlic, while the inside stays juicy as can be. Honestly, I’ve made steak a million times, but this combo makes me reach for seconds every time—no joke.
- Weeknight or Date Night: Throw it on the grill or skillet while you toss together some rice and greens, and boom—dinner’s ready. Or impress someone special with how effortlessly it comes together. (Yes, even on a Tuesday night.) The best part? It’s just as happy solo as it is with company.
- Leftovers That Don’t Suck: Unlike most steak, this holds up great reheated—slice it thin, warm it in a pan with a splash of sesame oil, and it’s basically teppanyaki all over again. Budget-friendly too: one ribeye feeds two, and the rest? Freeze it for lazy days. No waste, just wins.
Step-by-step instructions for teppanyaki-style ribeye
This method delivers restaurant-quality teppanyaki with a caramelized crust and perfectly balanced flavors.
Prepare the Marinade and Season the Steak
In a small bowl, combine the 0.5 cup soy sauce, 0.25 cup mirin, 0.25 cup sake, 1 tbsp sesame oil, 6 cloves minced garlic cloves, and 1 tbsp freshly grated ginger root. Whisk until fully blended and set aside. Pat the 1.5 lb ribeye steak dry with paper towels, then season both sides generously with 1.5 tbsp kosher salt and 1 tbsp black pepper. This dry seasoning creates the perfect crust while the marinade infuses deep flavor.
Let the steak sit at room temperature for 30 minutes while you prepare the rest. This ensures even cooking throughout the thick cut. The marinade should be ready to use once the steak reaches room temperature—its aroma will fill your kitchen, signaling it's time to begin cooking.
Cook the White Rice for Serving
Rinse the 1.5 cups white rice under cold water until the water runs clear, then drain well. In a medium saucepan, combine the rice with 3 cups water and bring to a boil over high heat. Once boiling, reduce heat to low, cover tightly with a lid, and simmer for 15 minutes. Remove from heat and let it steam, covered, for another 10 minutes. Fluff with a fork before serving—this steamed rice will soak up the teppanyaki juices beautifully.
While the rice cooks, prepare your teppanyaki setup. Heat a 12-inch cast-iron skillet or griddle over medium-high heat until it's smoking hot. Add 0.25 cup vegetable oil and let it shimmer—this high heat is essential for that signature caramelized crust. If you don't have a teppanyaki grill, a heavy skillet works perfectly for this technique.
Create the Teppanyaki Sauce Base
With the skillet still hot, add the 4 tbsp cubed butter and let it melt completely, swirling to coat the pan. Pour in half of the marinade (about 0.25 cup) and let it reduce by half—this takes about 2 minutes—until it thickens slightly and develops a glossy sheen. The sauce should coat the back of a spoon when you lift it from the pan. This reduction concentrates the flavors and creates the signature sticky glaze.
Remove the skillet from heat temporarily and set aside. Here's where the fun begins—watch closely as you'll need to work quickly. The sauce should be ready when it smells like a mix of umami and sweetness, with a deep caramel aroma developing at the edges.
Cook the Steak to Perfect Doneness
Return the skillet to medium-high heat and place the ribeye steak in the center. Let it sear undisturbed for 4-5 minutes until a deep golden-brown crust forms on the bottom. This crust is your reward for patience—it traps all the juices inside. Flip the steak carefully using tongs and cook for another 3-4 minutes on the second side, basting with the reduced marinade every 30 seconds to build flavor.
For medium-rare doneness, insert a meat thermometer into the thickest part of the steak—it should read 130-135°F. When the steak reaches this temperature, remove it from the skillet and let it rest on a cutting board for 5 minutes, tented loosely with foil. This resting period is crucial; it allows the juices to redistribute throughout the meat rather than pooling on your plate.
Finish with Butter and Garnish
Return the skillet to medium heat and add the remaining 4 tbsp butter. Let it melt completely, then pour in the remaining marinade. Swirl constantly for 1-2 minutes until the butter turns a rich golden brown and creates a frothy foam on top. This butter basting adds luxurious richness to the steak.
Slice the steak against the grain into ¼-inch thick pieces while it rests. Arrange the slices on a warm platter, drizzle generously with the teppanyaki sauce, and garnish with 4 whole sliced green onions. Serve immediately with the steamed white rice, allowing guests to create their own teppanyaki-style plates. The contrast of the tender, juicy steak with the crispy crust and aromatic rice makes this dish unforgettable.
Pro Tips For Making Teppanyaki Steak
- CRANK THE HEAT FIRST: Teppanyaki steak needs that signature char, so blast your pan to screaming hot before adding oil—we’re talking smoke-just-starting level. I used to play it safe with medium-high, and my steaks ended up steamed instead of seared. Once the oil shimmers, toss in the steak and let it scream for 30 seconds before touching it.
- SLICE GARLIC THIN—LIKE PAPER: Those whole cloves you’re eyeing? Toss ‘em. Mince the garlic so fine it’s almost paste—this way, it melts into the steak instead of sitting as chewy chunks. I learned this the hard way after biting into a surprise garlic bomb. A quick tip: Smash the cloves with the flat side of your knife first, then rock the blade for even slices.
- SALT THE STEAK TWICE: First, hit the steak with kosher salt 40 minutes before cooking—this seasons deep. Then, right after searing, give it another generous shake of salt while the pan’s still hot. The first layer gets the seasoning inside, the second locks in flavor during the final sear. (Yes, even if you’re impatient like me, resist the urge to skip the first salt.)
- REST IT WRAPPED IN SESAME OIL: After cooking, don’t just plop the steak on a plate—wrap it loosely in foil with a drizzle of sesame oil (about 1 teaspoon) and a pinch of black pepper. The oil keeps it moist while it rests, and the pepper sticks to the surface instead of falling off. I was skeptical until I tried it—now it’s non-negotiable for that restaurant-quality finish.
Pro cooking tips for great teppanyaki steak
Heat Control Secrets
The teppanyaki grill's magic comes from precise heat zones—you need a smoking-hot center for searing and medium edges for basting. I use a 12-inch cast-iron skillet on a gas burner set to medium-high, then adjust the back burner to medium-low to create a gradient.
A thermometer probe (like ThermoWorks Smoke) helps me maintain 450-500°F in the center—this is where that signature crust forms. 🔥
Butter Basting Mastery
The butter basting isn't just decoration—it's what transforms good steak into restaurant-quality teppanyaki. After searing, I add 4 tbsp cold butter and swirl constantly for 1-2 minutes until it turns golden brown and creates foam.
The key is timing: add the butter when the steak's internal temp hits 125°F, then baste for 30 seconds per side before resting. This creates a silky, flavorful crust that clings to every bite.
Slicing Against the Grain
Teppanyaki steak is all about presentation, and that starts with proper slicing. I use a sharp 8-inch chef's knife (like Wüsthof) to cut ¼-inch thick slices against the grain—this shortens muscle fibers for maximum tenderness.
For ribeye, the grain runs diagonally, so I rotate my cutting board 45 degrees mid-slice. Practice makes perfect: the first few cuts might be uneven, but you'll get the rhythm after 2-3 slices. ✨
Tabletop Entertainment
This isn't just about cooking—it's about performance. I always set up my teppanyaki station with two long-handled spatulas (one for flipping, one for basting) and a small bowl of extra sauce on the table.
While the steak rests, I demonstrate quick stir-frying with green onions or mushrooms right on the grill, then invite guests to slice their own portions at the table.
The sizzle and smoke alone make it feel like a show—just don't forget to dramatically flip the steak at least once for maximum effect.
Sauce Reduction Tricks
The marinade reduction is where flavor concentration happens. I reduce ½ cup marinade to ¼ cup by simmering it in the hot skillet for 2 minutes—this takes practice to judge by smell and color. The sauce should be glossy and syrupy, not dry.
Pro tip: If it reduces too fast, add 1 tsp mirin to balance the flavors. Save the leftover marinade for quick stir-fries or rice bowls—it keeps for 3 days in the fridge.
Resting Like a Pro
Skipping the rest is the #1 mistake—juices need 5-10 minutes to redistribute. I tent the steak with foil and place it on a warm plate (not cold countertops) to maintain temperature. While it rests, I keep the skillet warm on low heat and finish the sauce.
The internal temp will rise 5°F during resting, so pull it at 125°F for medium-rare. Patience here makes the difference between juicy perfection and dry disappointment. 💡
Nutrition facts
Frequently asked questions
Can I use a regular stovetop instead of a teppanyaki grill?
A 12-inch cast-iron skillet or heavy griddle works perfectly for this recipe. The key is maintaining high heat (450-500°F) in the center of the pan to create that signature caramelized crust. Adjust your burner to medium-high and preheat the pan until it's smoking hot before adding the steak.
What's the best way to slice teppanyaki steak for maximum tenderness?
Always slice against the grain into ¼-inch thick pieces using a sharp chef's knife. For ribeye, rotate your cutting board 45 degrees to follow the diagonal muscle fibers. Shortening the fibers this way ensures each bite is tender. Practice makes perfect—start with 2-3 slices to get the rhythm right.
How do I know when the steak is done if I don't have a meat thermometer?
For medium-rare, press the steak gently with your finger—it should feel slightly soft in the center with a bit of resistance. A 30-second touch test works too: press your finger to the thickest part and hold for 30 seconds. If it springs back quickly, it's ready. For visual cues, look for a deep brown crust on the outside with pink juices visible when sliced.
Can I make this recipe with thinner steak cuts?
Thinner cuts (½-inch or less) will cook too quickly and may dry out before developing that perfect crust. For best results, stick with 1-inch thick steak—it gives you the ideal window to sear the outside while keeping the inside juicy. If you must use thinner cuts, reduce cooking time by 30-50% and baste more frequently with the butter sauce.
What are some great side dishes to serve with teppanyaki steak?
Classic pairings include steamed white rice, stir-fried vegetables (like bell peppers and onions), and miso soup. For extra flair, serve pickled ginger and green onions**> to garnish. You can also add edamame or tempura vegetables for a lighter option. The key is balancing the rich steak with fresh, bright flavors.