
Desserts
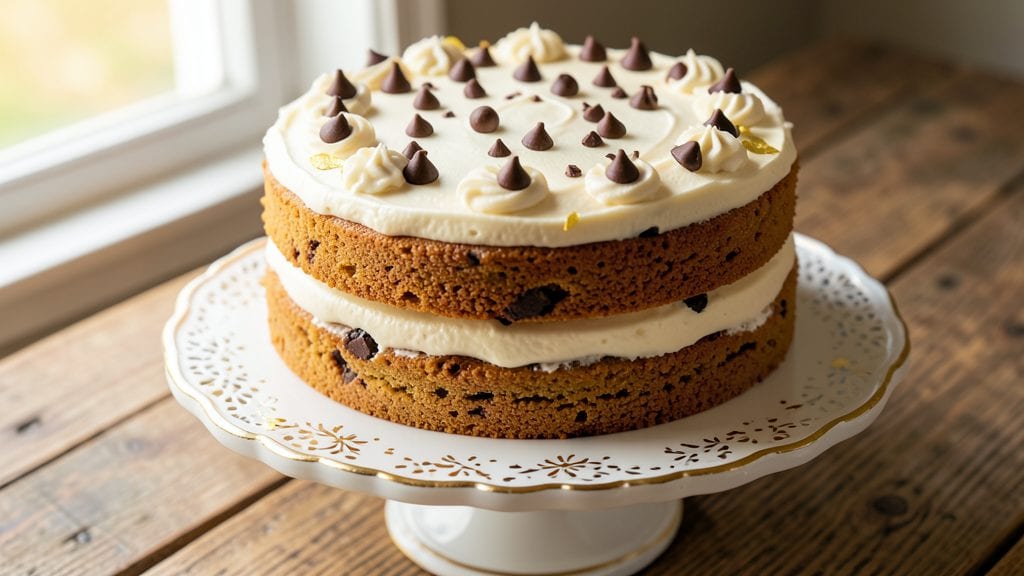
This Toll House cookie cake recipe delivers the perfect balance of fudgy centers and crispy tops in every layer, combining the best of both worlds.
After years of perfecting the technique, I've cracked the code for achieving that signature cookie-cake texture—where each slice offers the satisfying crunch of a cookie on top and the rich, moist bite of a cake beneath.
The secret lies in the precise ratio of ingredients and careful layering process that creates this unique texture profile.
What makes this recipe truly special is its ability to transform simple pantry staples into something extraordinary. With just a few key ingredients—flour, butter, sugar, eggs, and of course, chocolate chips—you'll create a dessert that looks impressive yet requires no special skills.
The cake layers stay tender and moist while developing that coveted crispy exterior that cookie lovers crave. This is the kind of dessert that disappears quickly, making it perfect for gatherings or satisfying your own sweet tooth.
The result is a cookie cake with distinct layers that offer the best of both textures—crispy on top where you'd expect it from a cookie, and rich, fudgy centers reminiscent of your favorite chocolate chip cookie.
Each slice delivers that perfect balance of sweetness and chocolate intensity, with just the right amount of crunch to satisfy. The beauty of this recipe is in its simplicity—no fancy techniques required, just precise measurements and careful layering.
Whether you're celebrating a special occasion or simply craving something sweet, this cookie cake delivers restaurant-quality results at home. The layers hold together beautifully, making it easy to serve and share. Once you try this method, you'll never go back to store-bought cookie cakes again. Let's get baking!
Ingredients for toll house cookie cake
Twelve simple ingredients for a showstopping cookie cake with crispy tops and fudgy layers.
| Ingredient | Amount | Notes |
|---|---|---|
| Unsalted Butter 🧈 | 1 cup | Cold, cubed for layering |
| Granulated Sugar 🍚 | 1 ½ cups | White or light brown |
| Packed Brown Sugar 🍚 | ¾ cup | Light or dark variety |
| Large Eggs 🥚 | 2 whole | Room temperature preferred |
| All-Purpose Flour 🌾 | 2 ½ cups | Spooning and leveling |
| Baking Soda 🍃 | 1 tsp | Pure baking soda |
| Salt 🧂 | 1 ½ tsp | Fine sea salt |
| Vanilla Extract 🌿 | 2 tsp | Pure vanilla preferred |
| Semi-Sweet Chocolate Chips 🍫 | 2 cups | Nestlé Toll House preferred |
| White Chocolate Chips 🍫 | ½ cup | Optional for contrast |
| Powdered Sugar 🍚 | ½ cup | For dusting layers |
| Vanilla Bean Paste 🌿 | 1 tbsp | For extra depth (optional) |
The butter and sugars are your texture game-changers here. Use European-style butter if you can find it—it stays firm longer when cold, which is key for those crispy layers. Trader Joe's has a great brand, or grab it from the dairy case at Whole Foods. For chocolate chips, Nestlé Toll House is the classic choice, but Guittard or Ghirardelli work too. Pro tip: Don't overmix the batter after adding the flour—just until combined. That's what keeps those layers tender. The vanilla extract? Pure Madagascar bourbon is worth the splurge if you're feeling fancy.
No white chocolate chips? Dark chocolate chips plus a sprinkle of powdered sugar mimics that contrast. Short on vanilla extract? Vanilla bean paste at half the amount gives you those little specks of happiness. The powdered sugar isn't just for dusting—it helps create that signature cookie-cake crunch. Diamond Crystal baking powder (not the double-acting kind) keeps the layers light. And if you're feeling wild, swap half the semi-sweet chips for peanut butter chips—trust me, it works. The key is keeping everything cold until the very last minute before baking.
This cake needs to rest 30 minutes before slicing—that's when the magic happens. Store leftovers in an airtight container at room temperature for 3 days, or freeze for up to 3 months. To reheat, wrap slices in foil and warm for 10 seconds. For parties, assemble the cake ahead and refrigerate—it actually tastes better the next day. The layers hold up beautifully, so you can slice it like a cake or break it into cookie-sized pieces. Either way, it disappears fast.
Why You'll Love This Recipe
- No Mixer Needed: I swear by this recipe when I’m too tired to pull out the stand mixer. Cream the butter and sugars by hand—it takes five minutes, tops—and the dough comes together smoother than you’d think. Honestly, the only tool you’ll need is a sturdy spoon.
- Buttery-Caramel Magic: That perfect balance of crispy edges and gooey centers? All thanks to the brown sugar and melted butter baked right into the cake. One bite and you’ll understand why Toll House cookies got their reputation—this just tastes like dessert all over again.
- Double-Duty Wonder: Make it for a party, and it’s a showstopper. Need a quick breakfast? Slice it up and toast it with ice cream. My kids even ask for it on school nights—because nothing says “I love you” like a warm, slightly underbaked cookie cake straight from the oven.
- Pantry Staples Only: No weird ingredients here—just butter, sugar, eggs, and flour. If you’ve ever baked cookies, you’ve got everything you need. Between us, this is my go-to when I’m low on groceries but still want to feel like I’m treating myself.
Step-by-step instructions for Toll House cookie cake recipe
This cookie cake delivers bakery-quality layers with crispy tops and fudgy centers—every bite is pure indulgence.
Cream Butter and Sugars to Light and Fluffy
In a stand mixer fitted with the paddle attachment, beat the 1 cup unsalted butter on medium speed until smooth and creamy, about 1 minute. Gradually add the 1.5 cups granulated sugar and 0.75 cup packed brown sugar, mixing continuously until the mixture becomes pale and fluffy—this should take about 3-4 minutes. You'll see the texture nearly double in volume, creating pockets of air that develop those signature crackly tops.
Here's the thing—this creaming process is where the magic happens. If you rush it, you'll end up with dense, cakey layers instead of the tender cookie texture we're after. Scrape down the sides of the bowl with a rubber spatula every minute to ensure even mixing. The mixture should look light and airy, almost like whipped buttercream.
Add Eggs and Vanilla for Rich Flavor
Add the 2 whole large eggs, one at a time, mixing on low speed after each addition until fully incorporated. Then add the 2 teaspoons vanilla extract and 1 tablespoon vanilla bean paste (if using), mixing just until combined. The vanilla bean paste adds an extra layer of depth that makes this cookie cake truly special—it's worth the slight extra effort.
Don't overmix here. You're just combining ingredients, not developing gluten. The mixture might look slightly curdled after adding the eggs, but that's normal. Once we add the dry ingredients, everything will come together smoothly. If you're worried about the texture, give it one final scrape of the bowl to make sure everything is well incorporated.
Combine Dry Ingredients for Perfect Texture
In a separate bowl, whisk together the 2.5 cups all-purpose flour, 1 teaspoon baking soda, and 1.5 teaspoons salt. With the mixer on low speed, gradually add the dry ingredients to the wet mixture, mixing just until combined—you should still see some flour streaks. This prevents overdevelopment of gluten, which would make the cookie cake tough instead of tender.
Remove the bowl from the mixer and fold in the 2 cups semi-sweet chocolate chips and 0.5 cup white chocolate chips using a silicone spatula. Make sure the chocolate chips are evenly distributed throughout the dough. I like to press the dough together gently to ensure the chocolate is well incorporated. This step is crucial for that classic Toll House flavor in every bite.
Layer and Chill for Perfect Rise
Preheat your oven to 350°F and grease a 9-inch round cake pan or line it with parchment paper. Divide the dough into three equal portions (about 1 cup each) and press each portion into the bottom of the pan, creating three distinct layers. Dust each layer generously with powdered sugar—this creates that signature cookie cake texture with crispy tops and soft centers.
Chill the assembled cake in the refrigerator for at least 30 minutes (I prefer 1 hour). This chilling step is non-negotiable—it allows the layers to set properly and prevents excessive spreading in the oven. The cold dough also helps create those beautiful crackly tops. While it chills, use this time to gather your baking tools and ensure your oven is fully preheated.
Bake to Golden Perfection
Bake the cookie cake for 25-30 minutes, or until the edges are deep golden brown and the top is set but still slightly soft to the touch. You want the centers to remain fudgy, so don't overbake—this is where many home bakers go wrong. A toothpick inserted into the center should come out with a few moist crumbs, not completely clean.
Let the cookie cake cool in the pan for 10 minutes, then transfer it to a wire rack to cool completely. The layers will firm up as they cool, making it easier to slice. Once fully cooled, dust the top with an additional sprinkle of powdered sugar for that bakery-fresh finish. Cut into 12 equal wedges and serve warm for the ultimate experience—each bite delivers that perfect balance of crispy, chewy, and fudgy textures.
Pro Tips For Making Toll House Cookie Cake
- Cream Butter Cold: Take the butter straight from the fridge—no need to soften it first. I used to melt it into the sugars like a normal Toll House recipe, but this dough stays thicker, spreads less, and holds its shape better when baking. The cake will have that classic chewy texture without turning into a flat pancake.
- Pack Brown Sugar Tight: Don’t scoop that brown sugar loosely—press it into the measuring cup with a spoon. I learned this the hard way after my first batch came out under-sweetened and dry. Packed brown sugar makes a real difference in moisture and flavor, especially when you’re baking a cake instead of cookies.
- Bake Until Golden, Not Just Set: Pull the cake when the edges are deep golden, not just when the center springs back. I used to rely on the toothpick test alone, but this cake needs that caramelized crust to taste right. If it looks done but still pale, give it another 3-5 minutes—your patience will pay off.
- Chill Dough Before Baking: Let the dough rest in the fridge for at least 30 minutes before baking. I was skeptical until I tried it—this step prevents excessive spreading and helps the chocolate melt evenly. Skip it, and you’ll end up with a cake that’s more crack than cake. (Yes, even if you’re impatient like me.)
Serving suggestions for toll house cookie cake
Warm Serving Style
Serve this cookie cake warm for the ultimate texture experience—each slice will have that perfect contrast of crispy edges and gooey centers. I like to plate it on a wooden board or marble slab to enhance the rustic appeal.
Warm slices pair beautifully with a scoop of vanilla bean ice cream or a dollop of whipped cream—the temperature difference makes every bite even more satisfying. 🍪
Garnish Ideas
For an extra touch of elegance, dust the top with powdered sugar right before serving. I also love adding a sprinkle of flaky sea salt (like Maldon) to highlight the chocolate flavors.
Fresh mint leaves or raspberries provide a vibrant pop of color that balances the richness. Keep garnishes minimal—this dessert shines on its own.
Portion Presentation
Slice into 12 equal wedges using a serrated knife dipped in hot water between cuts for clean edges. For parties, arrange slices on a tiered cake stand with alternating orientations to create visual interest.
Serve with small parchment paper-lined plates to catch any crumbs—this cookie cake is messy in the best way.
Dessert Pairings
A cup of hot coffee or espresso cuts through the richness perfectly, while a glass of cold milk adds a creamy contrast. For a boozy twist, serve with Baileys Irish Cream or a chocolate liqueur like Godiva.
The chocolate and vanilla flavors in the cookie cake complement these drinks beautifully. 🍷
Make-Ahead Serving
This cookie cake actually tastes better the next day, so assemble it ahead and refrigerate. Reheat slices for 10 seconds in the microwave (covered with a damp paper towel) to restore that warm, gooey texture.
For a special presentation, wrap individual slices in parchment paper with a twine tie—they make perfect grab-and-go treats for gatherings.
Kid-Friendly Serving
Cut into cookie-sized squares for little hands—this makes serving fun and portion control easy. Let kids decorate their own slices with sprinkles or mini chocolate chips before serving. The interactive element makes dessert time more engaging, and the cookie cake's texture is always a hit with kids. 👧🧒
Nutrition facts
Frequently asked questions
Why does this cookie cake have layers instead of being one uniform texture?
The three distinct layers create the signature cookie-cake experience—crispy cookie-like tops with tender, fudgy centers. The powdered sugar between layers helps develop that perfect contrast while keeping each bite balanced. This layering technique is what makes it different from traditional cakes or cookies.
Can I make this recipe without white chocolate chips?
Skip the white chocolate chips and use an extra 0.5 cup of semi-sweet chips instead. For contrast, sprinkle a little extra powdered sugar on top before baking—it mimics the visual and textural difference. The flavor will still be rich and delicious.
How do I prevent the cookie cake from spreading too much in the oven?
Chilling the assembled cake for at least 30 minutes (up to 1 hour) is key. Cold dough sets properly and prevents excessive spreading. Also, ensure your oven is fully preheated to 350°F before baking. Using a 9-inch round pan helps maintain shape too.
Is this recipe gluten-free?
No, this recipe uses all-purpose flour and isn't gluten-free. For a gluten-free version, substitute the flour with a 1:1 gluten-free baking blend (like Bob's Red Mill) and add 1 extra teaspoon of xanthan gum. Expect slight texture differences—gluten-free versions may be denser.
Can I make this ahead of time for a party?
Yes! Assemble the cake layers and refrigerate for up to 24 hours before baking. For best results, bake it the day of your event—it's even more delicious the next day. Store leftovers in an airtight container for 3 days or freeze for 3 months. Reheat slices for 10 seconds in the microwave.