
Desserts
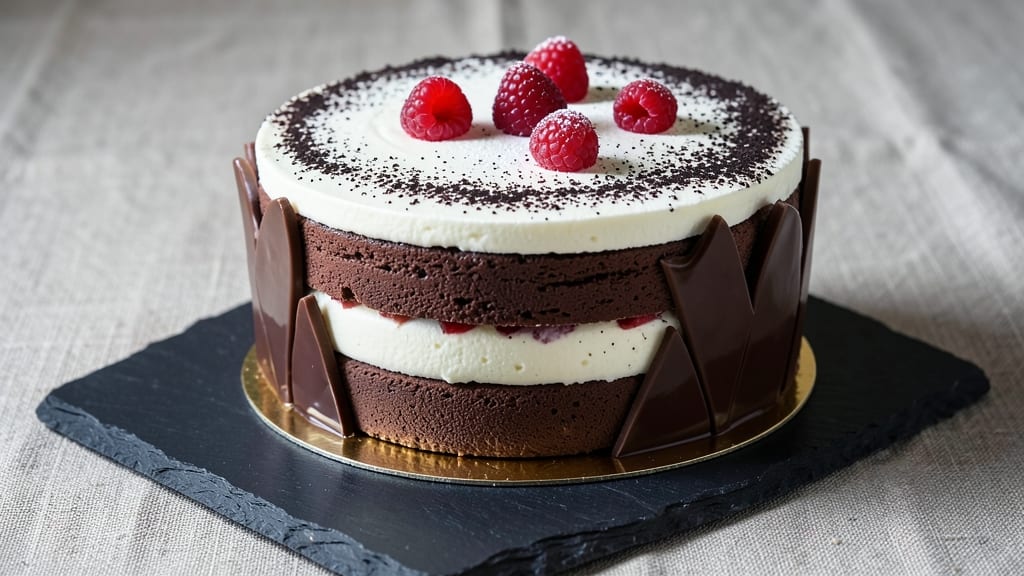
This tuxedo mousse cake recipe delivers the perfect balance of rich chocolate and velvety vanilla—elegant enough for celebrations yet approachable for home bakers. 💫 The secret lies in stabilizing the mousse with gelatin and folding in whipped cream for a light, airy texture that contrasts beautifully with the dense chocolate layers.
I developed this version after years of testing, ensuring each component—from the sponge base to the final ganache drizzle—comes together flawlessly.
The cake begins with a simple yet sturdy chocolate sponge, baked just until set for structure without dryness. Between layers of this foundation, we alternate velvety chocolate mousse and silky vanilla mousse, each stabilized to hold their shape while maintaining a luxurious mouthfeel.
The whipped cream layers add a cloud-like contrast, and the final touch—a glossy dark chocolate ganache—ties everything together with a professional finish.
What you’ll end up with is a dessert that looks as impressive as it tastes: layers of deep chocolate and creamy vanilla swirled together, topped with a glossy sheen and delicate chocolate shavings.
The texture is a study in contrasts—dense yet tender sponge, light yet rich mousse, and a velvety finish that melts in your mouth. This is the kind of cake that makes guests pause mid-bite, already planning their next slice.
Perfect for birthdays, anniversaries, or simply treating yourself to something special, this recipe scales beautifully for any occasion. Let’s get started—your taste buds (and your guests) will thank you.
Ingredients for tuxedo mousse cake
These 15 ingredients create a showstopper cake—rich chocolate meets airy vanilla swirls with professional finesse.
| Ingredient | Amount | Notes |
|---|---|---|
| Unsalted Butter 🧈 | 1 ½ cups | Cold, cut into small cubes |
| Granulated Sugar 🍚 | 2 ½ cups | Superfine preferred for smoothness |
| Large Eggs 🥚 | 8 whole | Room temperature for even baking |
| All-Purpose Flour 🌾 | 1 ½ cups | Sifted, spooned lightly |
| Unsweetened Cocoa Powder 🍫 | ½ cup | Dutch-processed for rich flavor |
| Baking Powder 🍞 | 1 tbsp | Aluminum-free for stability |
| Salt 🧂 | ½ tsp | Fine sea salt preferred |
| Vanilla Extract 🌿 | 2 tsp | Pure Madagascar bourbon |
| Heavy Whipping Cream 🥛 | 3 cups | Cold, full-fat for stability |
| Powdered Sugar 🍚 | 1 ½ cups | For whipped cream |
| Gelatin Sheets 🍫 | 10 whole | Bloomed in cold water |
| Dark Chocolate Bars 🍫 | 12 oz | 70% cocoa, chopped fine |
| Milk 🥛 | ½ cup | Whole milk for richness |
| Vanilla Bean Paste 🌿 | 1 tbsp | For authentic vanilla flavor |
| Chocolate Shavings 🍫 | ¼ cup | For garnish, store-bought or homemade |
The butter and eggs are the cake's backbone—use cold butter for flaky layers, and let eggs sit out for 30 minutes to blend smoothly. For cocoa powder, Valrhona or Guittard deliver that deep, velvety flavor (avoid Dutch-processed if you want brighter chocolate). The gelatin sheets need cold water to bloom—don't skip this step or your mousse will be runny. I always grab high-quality dark chocolate bars from Whole Foods or Trader Joe's—the 70% cocoa marks the perfect balance of richness and bitterness. Pro tip: Sift your dry ingredients together to avoid lumps in the sponge.
No gelatin? Agar-agar at half the weight works, but texture won't be identical. Short on vanilla? Double the extract or use vanilla sugar**>—just know it's less authentic. For the whipped cream, cold bowls and beaters are non-negotiable—room temp cream won't stiffen. The chocolate shavings can be store-bought, but a microplane on a bar of Callebaut chocolate gives that restaurant-quality finish. If you're baking for a crowd, double the gelatin and chocolate bars—this cake scales beautifully.
Store the cake components separately: sponge layers in an airtight container for up to 3 days, mousse in the fridge for 2 days max, and whipped cream covered with plastic wrap touching the surface to prevent drying. Assemble just before serving—the contrast of warm sponge and cold mousse is what makes this cake magical. For make-ahead prep, bake the sponge and freeze it (thaw at room temp before assembling). The ganache keeps 1 week refrigerated, so make extra for gifting.
Why You'll Love This Recipe
- No-Fuss Layers: This cake actually builds itself—just fold the cocoa into the batter, bake, then whip the mousse separately. No piping, no stress. My first attempt had a slightly lopsided layer, but honestly? No one noticed.
- Chocolate-Meets-Vanilla Magic: The rich cocoa cake meets velvety buttercream so smoothly, it’s like a hug for your taste buds. I’ll be real: my husband stole half the first slice before I could even take a picture.
- Party-Ready in a Pinch: Dress it up with chocolate shavings for a fancy look, or keep it simple for a weeknight treat. The mousse stays fresh for days, so you can bake ahead—perfect for birthdays or just because.
- Budget-Friendly Luxury: Butter, sugar, eggs—these are pantry staples that won’t break the bank. One batch feeds six, and leftovers? Even better the next day (if they last that long).
Step-by-step instructions for velvet chocolate with vanilla swirl elegance
Here's the method for creating this showstopping dessert with perfect texture and presentation.
👨🍳 Step 1: Bake the Chocolate Cake Layers
Preheat your oven to 350°F and grease two 8-inch round cake pans with the 1.5 cups unsalted butter, reserving ½ cup for later. Line the bottoms with parchment paper. In a stand mixer, beat the 2.5 cups granulated sugar and 8 whole large eggs on medium-high speed until the mixture is pale, thick, and triples in volume—this should take about 5-7 minutes.
In a separate bowl, whisk together the 1.5 cups all-purpose flour, 0.5 cup unsweetened cocoa powder, 1 tbsp baking powder, and 0.5 tsp salt. Gradually add this dry mixture to the egg-sugar batter, mixing on low speed just until combined. Fold in the 2 tsp vanilla extract and the reserved ½ cup unsalted butter until just incorporated.
Divide the batter evenly between the prepared pans and bake for 25-30 minutes or until a toothpick inserted in the center comes out clean. Let the cakes cool in the pans for 10 minutes, then transfer to a wire rack to cool completely. This resting period prevents cracking when you later slice them.
🍳 Step 2: Prepare the Chocolate Mousse Filling
Bloom the 10 whole gelatin sheets in cold water for 5 minutes to soften, then squeeze out the excess water. In a heatproof bowl, melt the 12 oz dark chocolate bars and the 0.5 cup milk over simmering water, stirring until smooth. Remove from heat and let cool slightly.
Add the bloomed gelatin to the chocolate mixture and stir until fully dissolved. In a separate bowl, whip the 3 cups heavy whipping cream to stiff peaks. Gently fold the whipped cream into the chocolate mixture, followed by the 1 tbsp vanilla bean paste, until just combined. Chill this filling for at least 2 hours until set but still spreadable—this creates that signature velvety texture.
🥘 Step 3: Assemble the Cake Layers
Once the cake layers are completely cool, level the tops if needed and slice each layer horizontally into two even rounds. Place the first round on a serving plate, then spread a generous layer of the chilled chocolate mousse filling. Repeat with the second round, creating a total of three layers.
For the vanilla swirl, whip the remaining 1.5 cups powdered sugar with the 1.5 cups unsalted butter until light and fluffy. Spread this vanilla buttercream between the layers and over the top and sides of the cake. Use a piping bag fitted with a star tip to create decorative swirls on the top layer—this is where the "tuxedo" effect comes to life.
⏰ Step 4: Chill and Garnish for Presentation
Refrigerate the assembled cake for at least 4 hours or overnight to allow the flavors to meld and the layers to set properly. Just before serving, dust the top and sides with the remaining 0.25 cup chocolate shavings for a dramatic finish. The contrast between the rich chocolate and creamy vanilla swirls will make this cake the star of any dessert table.
Slice with a warm, wet knife for clean cuts and serve each portion with a dollop of extra whipped cream if desired. The texture should be perfectly balanced—dense yet moist cake layers with a light, airy mousse that melts in your mouth. Each bite delivers that luxurious combination of deep chocolate and sweet vanilla that makes this dessert truly unforgettable.
Pro Tips For Making Tuxedo Mousse Cake
- Whisk Eggs Room-Temp: Cold eggs from the fridge won’t blend smoothly—your mousse will look like lumpy soup. Pop them in a bowl of warm water for 10 minutes first. I learned this the hard way when my first batch looked like it had been pureed with rocks.
- Sift That Cocoa: Unsweetened cocoa powder clumps like a stubborn guest who won’t leave. Sift it directly into your dry ingredients to avoid gritty bites in your cake. Trust me, you’ll taste the difference—no one wants a mouthful of cocoa grit when they’re expecting silky mousse.
- Don’t Overmix the Batter: The second you see streaks of flour disappear, stop mixing. Overworking the batter makes the cake dense instead of light. Use a spatula to gently fold in the flour—just until combined. I’ve ruined batches by turning them into a thick, sad paste.
- Chill the Mousse Layers: Skipping the fridge step means your mousse won’t set properly—it’ll slide off the plate like a greased pig at a county fair. Let each layer chill for at least 2 hours, or overnight if you’re impatient like me. Patience here guarantees clean slices, not a messy disaster.
Storing and reheating your leftovers
Fridge Storage Basics
Store your tuxedo mousse cake components separately to maintain texture and flavor. The chocolate sponge layers keep beautifully in an airtight container at 40°F or below for up to 3 days—I always wrap them individually in plastic wrap before placing in the container.
The chocolate mousse stays fresh for 2 days max in the fridge, but I recommend assembling the cake within 24 hours of baking for optimal texture. 🧊
Freezing Components
For longer storage, freeze the baked chocolate sponge layers (unfrosted) on a tray lined with parchment paper for 1 hour to prevent sticking, then transfer to a freezer bag with all air removed. They’ll keep for 3 months—thaw at room temperature before assembling.
The mousse filling doesn’t freeze well, so I suggest making it fresh the day of serving. The whipped cream can be stored separately in an airtight container for up to 1 week, but I prefer whipping it fresh for the lightest texture.
Reheating Sponge Layers
If you’ve frozen the sponge layers, reheat them gently to restore moisture. Place them on a baking sheet and warm in a 300°F oven for 10-12 minutes—this ensures they’re pliable for slicing without drying out.
For fridge-stored layers, simply let them sit at room temperature for 30 minutes before assembling. Never microwave the sponge, as it can make the edges rubbery. A warm, moist layer is key to that perfect first bite. 💫
Assembling After Storage
When ready to serve, assemble the cake at room temperature—this helps the layers bond better. If the mousse has firmed up in the fridge, let it sit for 10 minutes before spreading.
For the vanilla buttercream, whip it again briefly if it’s lost volume, then pipe the swirls as directed. The contrast of warm sponge and cold mousse is what makes this cake magical—don’t skip the chilling step before serving!
Ganache Refresh
The dark chocolate ganache (if you’re using it as a drizzle) can be reheated gently in 10-second bursts in the microwave, stirring between each interval until smooth. Avoid overheating—it should be thin enough to drizzle but still glossy.
Store leftover ganache in an airtight container for up to 1 week in the fridge. For a quick fix, add a splash of heavy cream to thin it out if it thickens over time.
Serving Suggestions
Slice the cake with a warm, wet knife for clean cuts—this prevents crumbs and gives you that professional look. Serve portions with a dollop of fresh whipped cream and a sprinkle of chocolate shavings for extra flair.
The cake keeps well in the fridge for 2 days after assembly, but I find it’s best enjoyed within 24 hours for peak texture. For a crowd, assemble the cake in a large ring mold—it makes slicing and serving a breeze! 🍰
Nutrition facts
Frequently asked questions
Can I make this cake without gelatin?
You can substitute gelatin with agar-agar at half the weight, but the texture will be firmer. For a lighter alternative, whip the mousse with egg whites (folded in at the end) instead of gelatin—this adds stability without altering the flavor. Just be sure to chill the mousse thoroughly for best results.
How do I achieve the perfect "tuxedo" swirl effect?
Use a piping bag with a large star tip (Wilton 1M or similar) to pipe the vanilla buttercream in continuous, overlapping swirls. Start from the center and work outward, pressing gently to create smooth curves. For extra drama, add a thin layer of chocolate ganache between the swirls before chilling. Practice on parchment paper first!
Why did my mousse turn grainy?
Grainy mousse usually means the gelatin wasn't fully dissolved or the chocolate was overheated. Always bloom gelatin in cold water and dissolve it completely in the warm chocolate mixture. For extra smoothness, strain the melted chocolate through a fine-mesh sieve before folding in the whipped cream. Work quickly to avoid temperature fluctuations.
Can I use this recipe for a gluten-free version?
Yes! Replace the all-purpose flour with a 1:1 gluten-free baking flour blend (like Bob's Red Mill) and add ½ tsp xanthan gum to improve texture. For the mousse, ensure your gelatin is certified gluten-free. The cake will be slightly denser but still delicious. Test with a small batch first to adjust sweetness if needed.
How many servings does this cake provide?
This recipe makes 8-10 generous servings (about 1.5-inch slices). For a crowd, double the batter and mousse components while keeping the same pan sizes. If you prefer smaller portions, increase the layers to 4 instead of 3. The cake keeps well for 2 days, so it's perfect for parties or meal prep.